Forum Replies Created
-
AuthorPosts
-
January 28, 2021 at 8:51 pm #36522
 trusty220Keymaster
A little more information before you commit. By the time I’ve paid for the artwork it looks like I’ll have to charge about £7.50 each; they will be very high quality vinyl stickers rather than waterslide transfers.
Is anyone interested? I won’t hold you to it if you decide to change your mind later.
January 24, 2021 at 11:58 am #36502trusty220KeymasterIf you want a Lucas magneto repair I can thoroughly recommend Tony Cooper. He specialises in Lucas and BTH (don’t ask him to do Wico A, he doesn’t touch them!) and does a lot of work for museums and clubs. He doesn’t advertise, doesn’t overcharge and doesn’t do anything else but he really knows his stuff.
He can be contacted on 0121 559 2405 and is based in Halesowen in the West Midlands.
January 22, 2021 at 9:41 am #36473trusty220KeymasterAha, a kindred spirit!
What about the ones looking for a blade for the Briggs and Stratton lawnmower? We used to dread Saturday mornings with the influx of impossible jobs that people wanted us to do, like sharpening a Qualcast Concorde- it was cheaper to buy a new one! You could hear the trundle of those plastic wheels coming up the yard and we’d all beat a hasty retreat to the workshop so that we were “busy” and the storeman would have to deal with it!
Happy days, but we didn’t think so at the time!
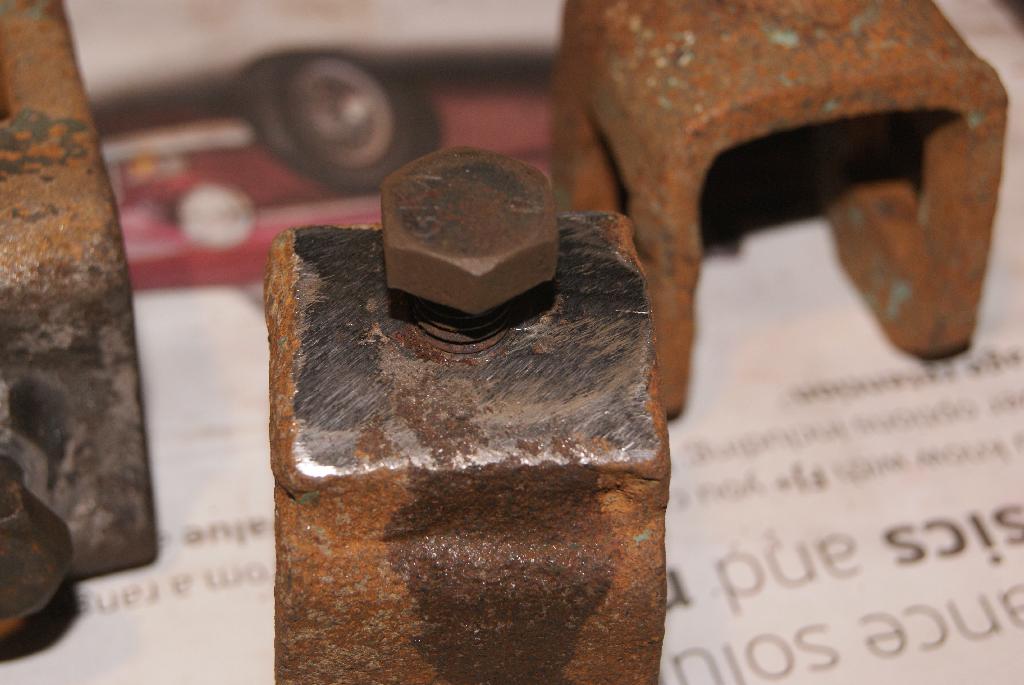
January 17, 2021 at 1:16 pm #36423trusty220KeymasterCarrying on from the last posting I thought I’d do a stage-by-stage set of pictures for anyone facing the same problem.
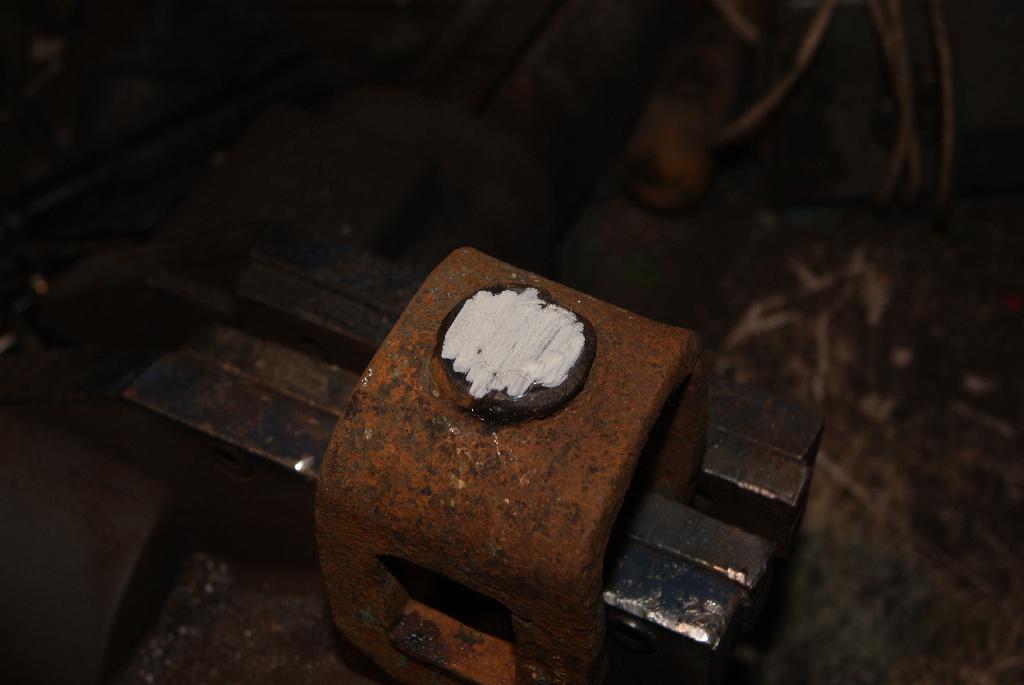
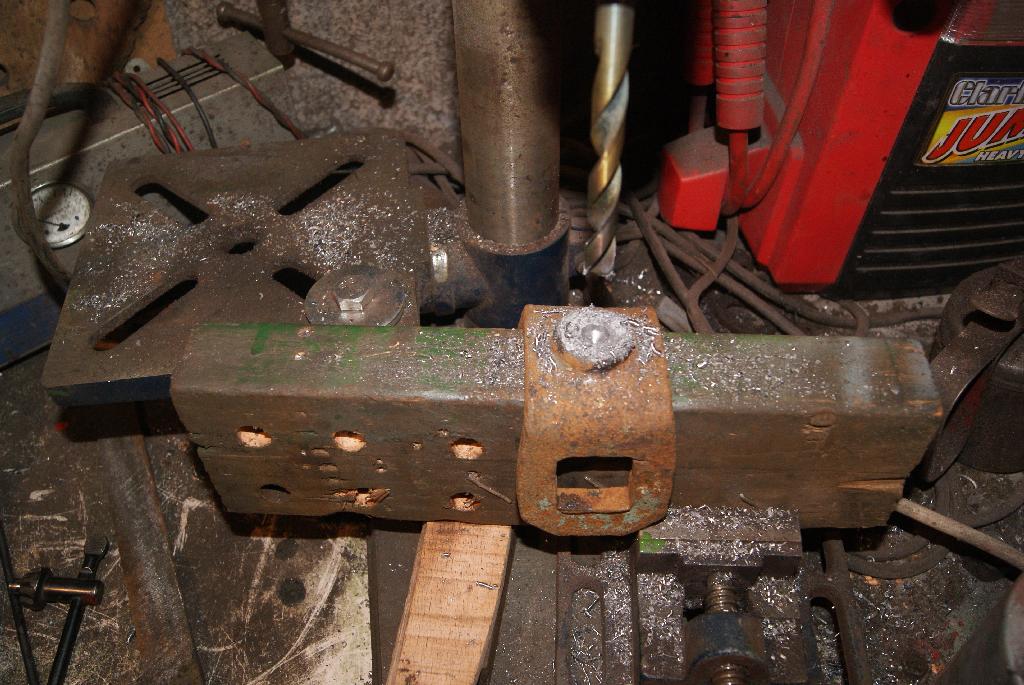
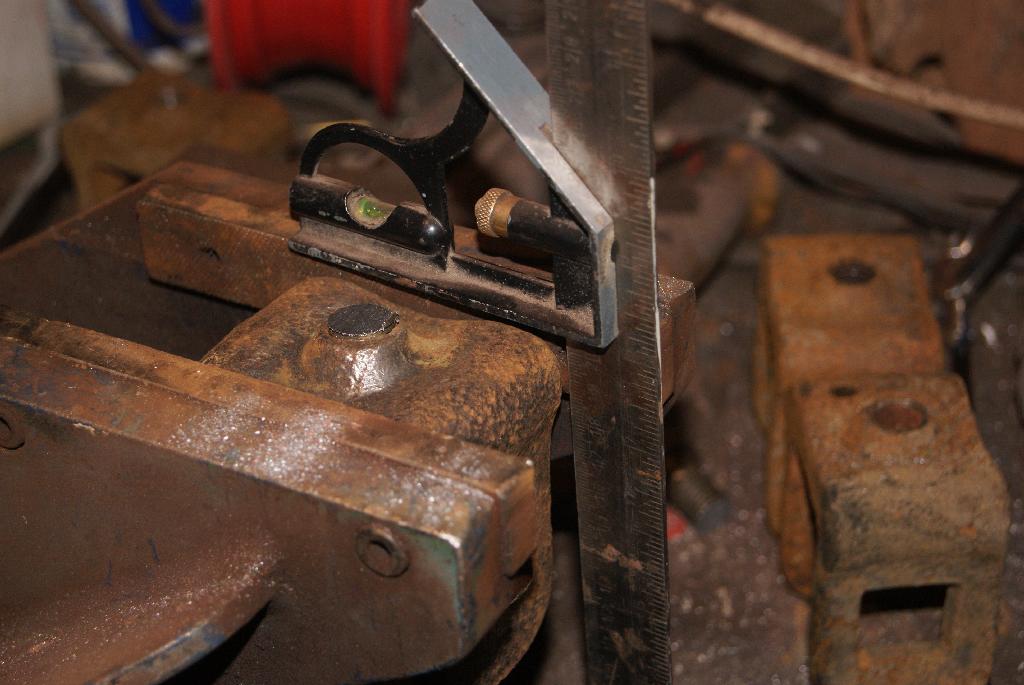
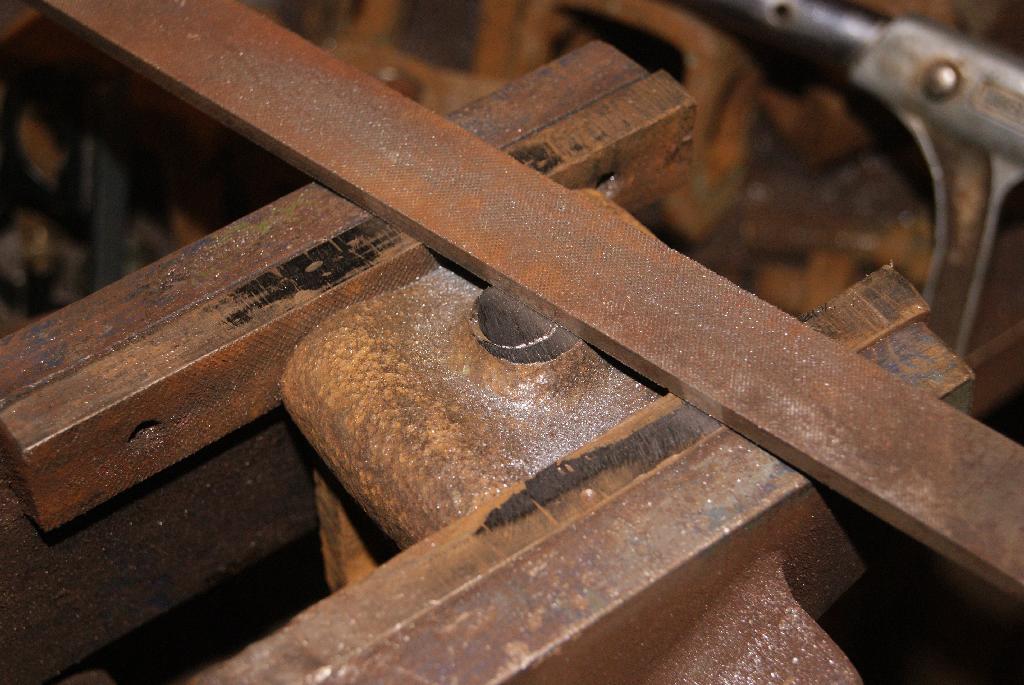
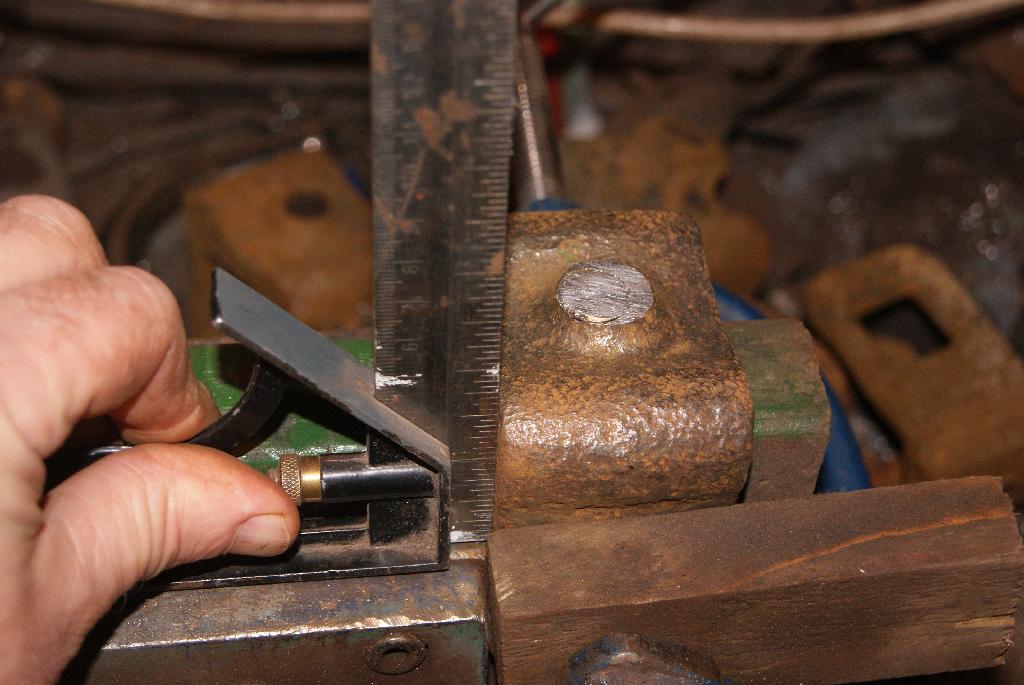
Firstly, saw off the protruding threads either side of the clamp and file smooth. Next I drilled two 5mm holes down the side of the 3/4 bolt thread, then tapped them to M6 and wound two M6 bolts in with Loctite on the threads. Leave overnight to dry then saw off the protruding threads again and finish to a smooth finish with a file both sides.
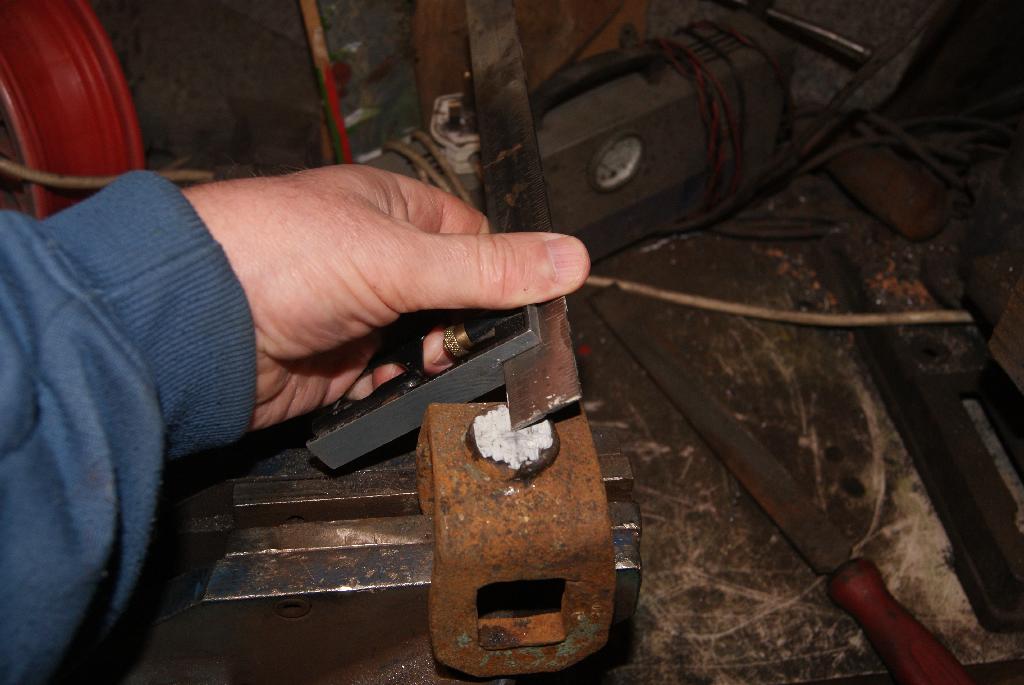
The smooth finish allows you to coat the area with paint or Engineer’s Blue so that you can mark it out and find the centre where you want the new bolt hole to be. Measure it from both sides, find the centre of the clamp (not necessarily the centre of the boss), mark it with a centre punch and drill down perpendicular. To do this I use a pillar drill and mount the clamp on a wooden jig so that it sits squarely below the drill bit; it is always worth spending time making a jig to hold the workpiece because the job takes less time and will have a much better appearance than if you’ve done it freehand.
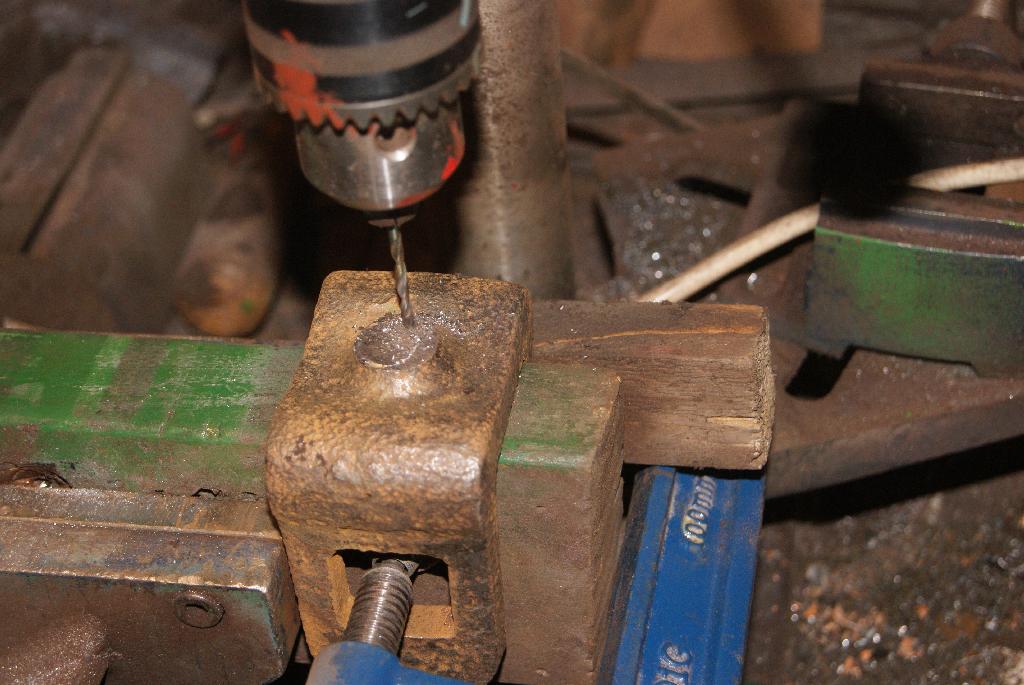
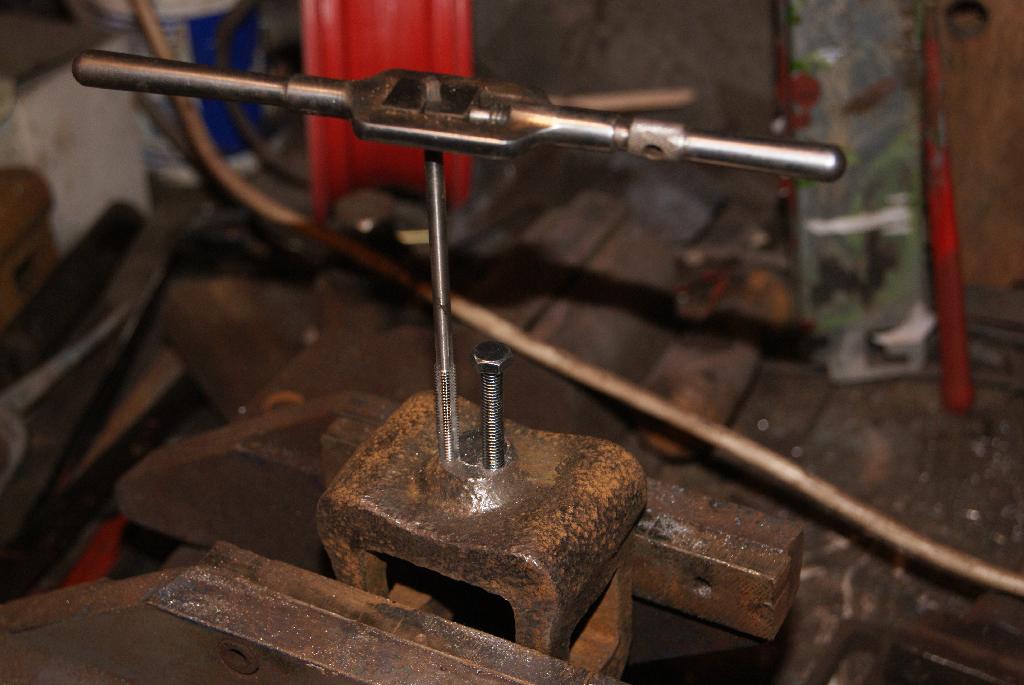
I started with a 3mm drill to drop a pilot hole down to see where it emerged at the bottom. Satisfied with the result I carried on with progressively larger drills until I took the hole out to 10mm, then mounted the clamp in the vice and tapped the hole to 1/2″ Whitworth. A quick once-over with the wire brush in the angle grinder and we’re ready for paint. Simples!
Attachments:
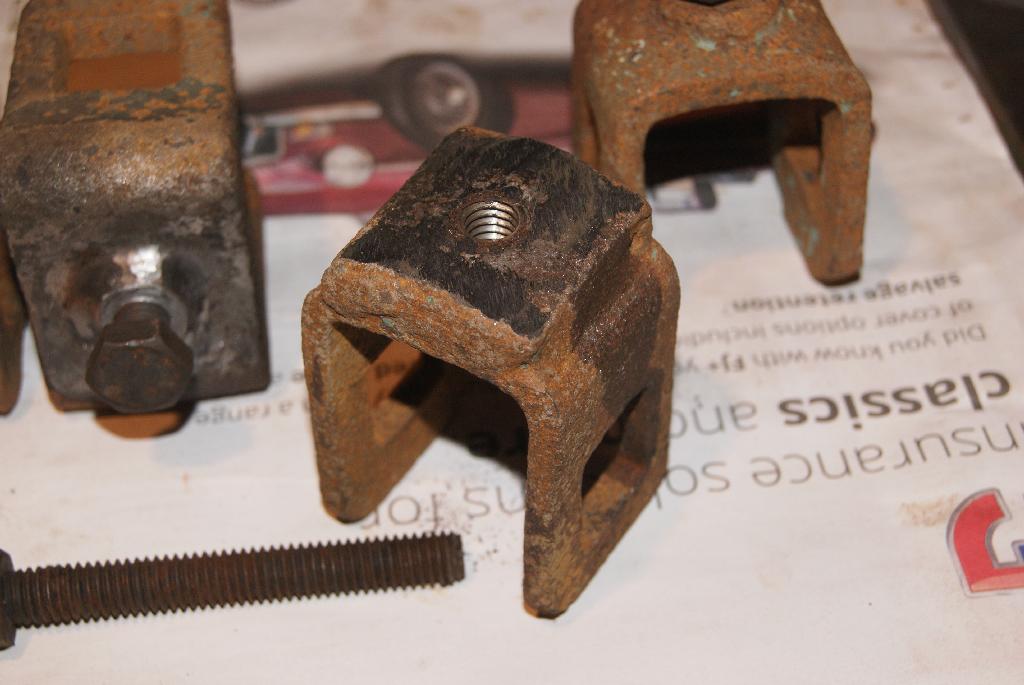
January 15, 2021 at 3:05 pm #36409trusty220KeymasterJust in case you’d thought I was slacking here is the next thrilling instalment! Well, not really thrilling, but you know what I mean.
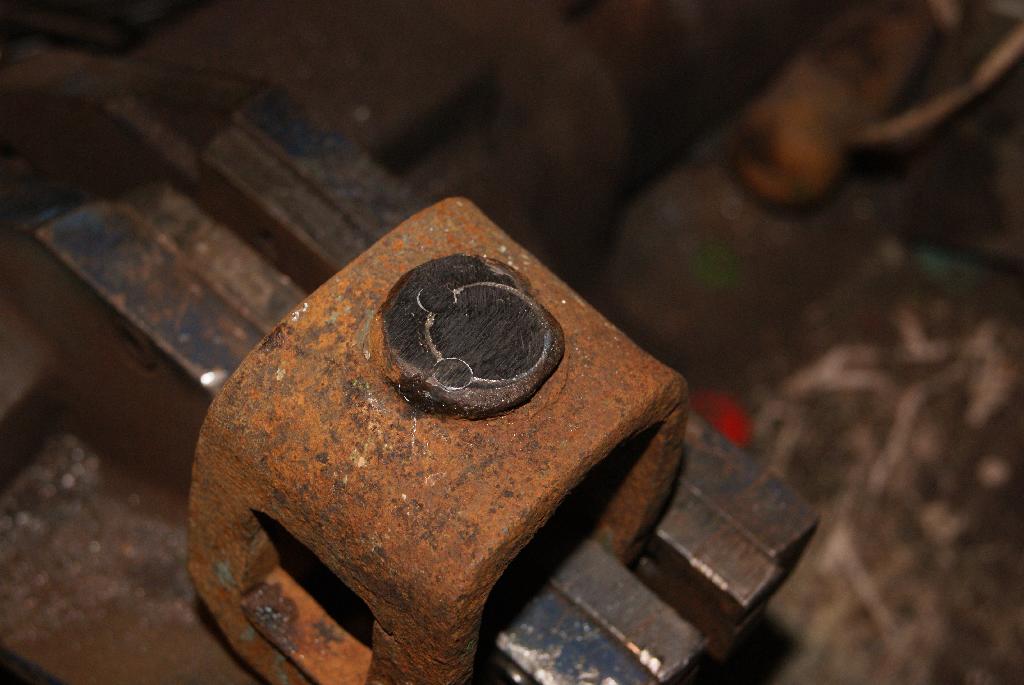
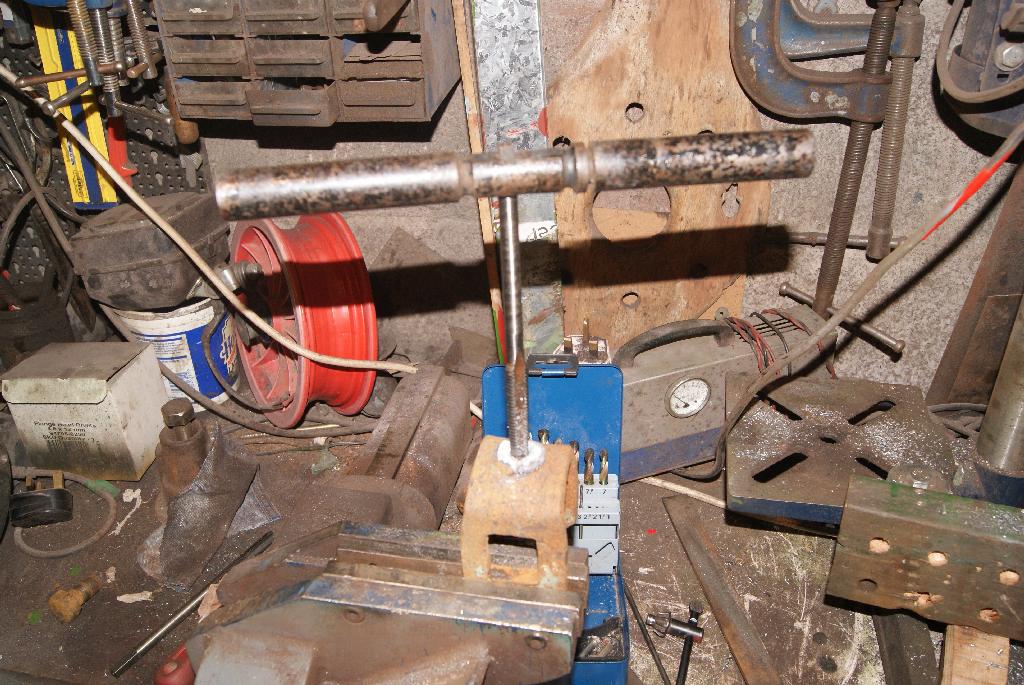
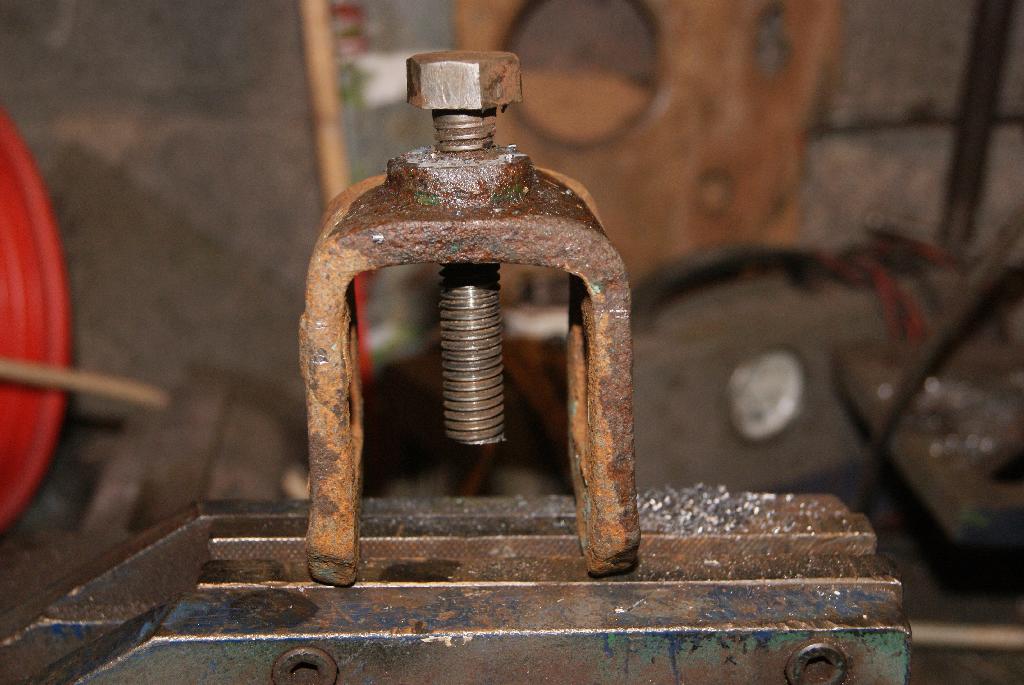
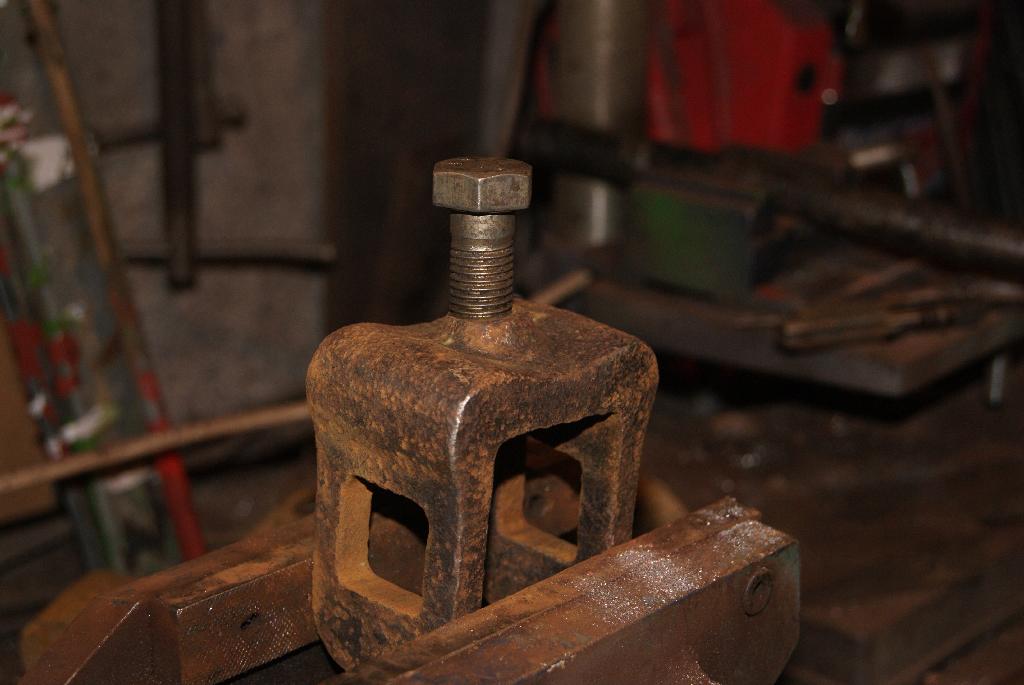
I managed to set up a production line to plug the holes in the cast clamps; it was quite easy once I’d found a different sized bolt for every clamp. In fact it was quite useful in that I used up some of my “stash” of old bolts and in particular the ones that had good threads but the heads had wasted away. Isn’t it funny how you can have a pristine bolt thread on a bolt with a knackered head? All done now apart from two clamps which were obviously replacements at some time and made from mild steel. I’m treating them the same way because my welder is packed away still, otherwise I would weld the holes up and re-drill in the centres.
I have taken a picture of the last clamp to show you how much out of true some of the holes were and why I’m having to do this. Someone had opened the thread out to 3/4″ Whitworth and drilled it on the angle. In the picture I’ve managed to find a 3/4″ bolt and I’ve screwed it home with Loctite on the threads. I’ll wait until it’s dry and then carry on the same.
Attachments:
January 15, 2021 at 2:51 pm #36408trusty220KeymasterGlad to be of service! I knew all this rubbish inside my head would come in useful one day.
January 14, 2021 at 12:25 pm #36404trusty220KeymasterThere should be a strong spring in the impulse mechanism which returns it to the fully advanced position once the weighted finger moves out of the way. You should hear a sharp click, quite loud, and the fact that you aren’t may indicate that it isn’t returning fully or quickly enough. Try dribbling a little engine oil onto the spring to start with and see if there is any improvement. The mechanism may have dried out and be binding on the shaft.
January 13, 2021 at 11:08 am #36396trusty220KeymasterI was just re-reading your posting and I remembered something that happened to me. At the time I thought it was a one-off, but it may have trapped you as well.
Have a look at the impulse mechanism on the magneto. It sits directly under the carburettor and when you flood it to start the engine, the excess petrol drips onto the impulse of the mag. This in itself doesn’t harm it but after a while the impulse gets dried out and sticks in the retarded position. This would explain why it is now retarded even though you haven’t touched any part of it.
I hope that helps.
January 11, 2021 at 5:30 pm #36390trusty220Keymaster.375 is the decimal equivalent of 3/8″ which is the correct amount of advance. In my experience so long as the correct ignition timing is set it almost always falls down to a carburettor blockage. There are some very small holes and galleries in that carb and sometimes I find poking them out with a fine wire is the only way to clean them out thoroughly. Of course, if you’re using the fine wire method be very careful not to enlarge the holes otherwise it’ll never run correctly again.
January 9, 2021 at 2:33 pm #36381trusty220KeymasterI can’t get to mine at the moment, it’s packed away at the back of the garage. What I do remember about it is that the knife coulter is attached to one side of the beam with a U-bolt, about three or four inches back from the plough point; the side of the beam that it attaches to has a round profile steel strip rivetted to it so that it will rock sideways when the U-bolt is slackened/tightened.
To explain better, the U-bolt has two nuts which hold a clamping strip against the flat side of the knife. If you slacken one side and tighten the other it should have the effect of moving the knife sideways.
I’m guessing that the rounded strip is missing from yours. Has anyone out there got an Imp plough that they can take a picture of?
January 8, 2021 at 12:59 pm #36378trusty220KeymasterIf you could post some pictures it may give some of our members a better idea of how to tackle it.
January 6, 2021 at 5:20 pm #36372trusty220KeymasterThat plate confirms that it’s got a JAP 5 engine supplied by Tractors (London) Ltd., which probably means that it’s the original one they fitted at the factory.
If it was a replacement engine supplied by the local dealer it would have the J.A.Prestwich Ltd. address at the bottom. This plate has the Tractors (London) Ltd, White House, Barnet address at the bottom so that they could make some extra money from the spares business. When the factory bought in the JAP 5 engines they used to remove the maker’s plate and substitute their own- the two were identical with engine starting instructions, etc., but when you got to the bottom it said “For spare parts contact Tractors (London) Ltd.”
The engine number for this engine should read: 5.T.60221.ST
Translated this means:- 5 = Model 5 engine
T = Year manufactured, in this case T stands for 1946
60221 = Unique engine number
ST = Customer code for Tractors (London) Ltd.I hope that’s of some use to you, Kevin.
January 5, 2021 at 5:51 pm #36365trusty220KeymasterThat’s where I got the idea from! Thanks for the comment, Angus; I hope all’s well in your corner of the world.
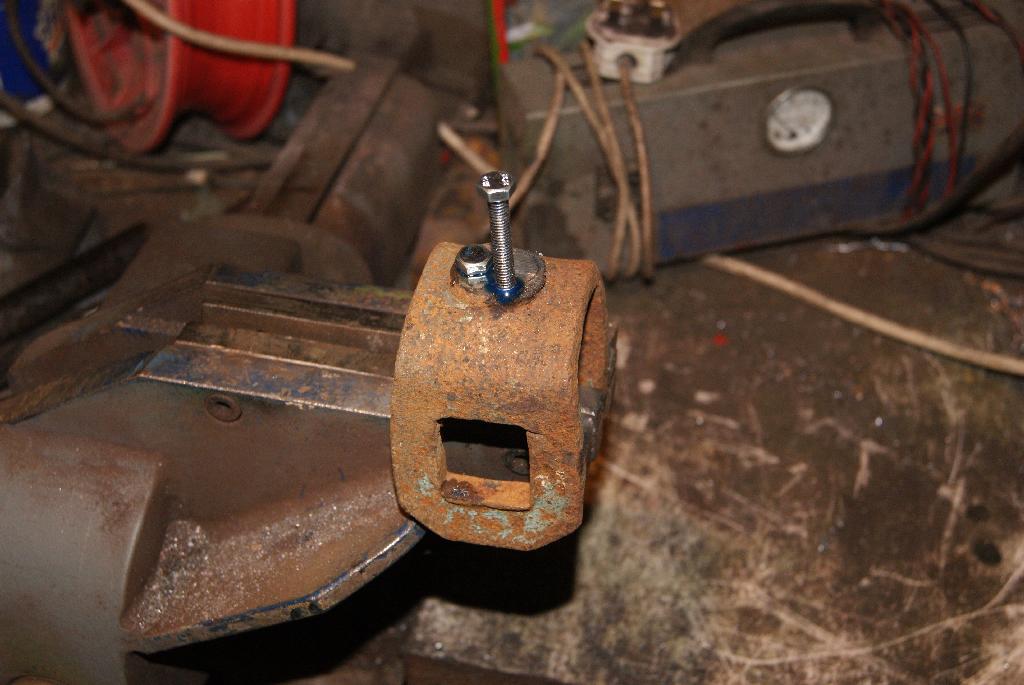
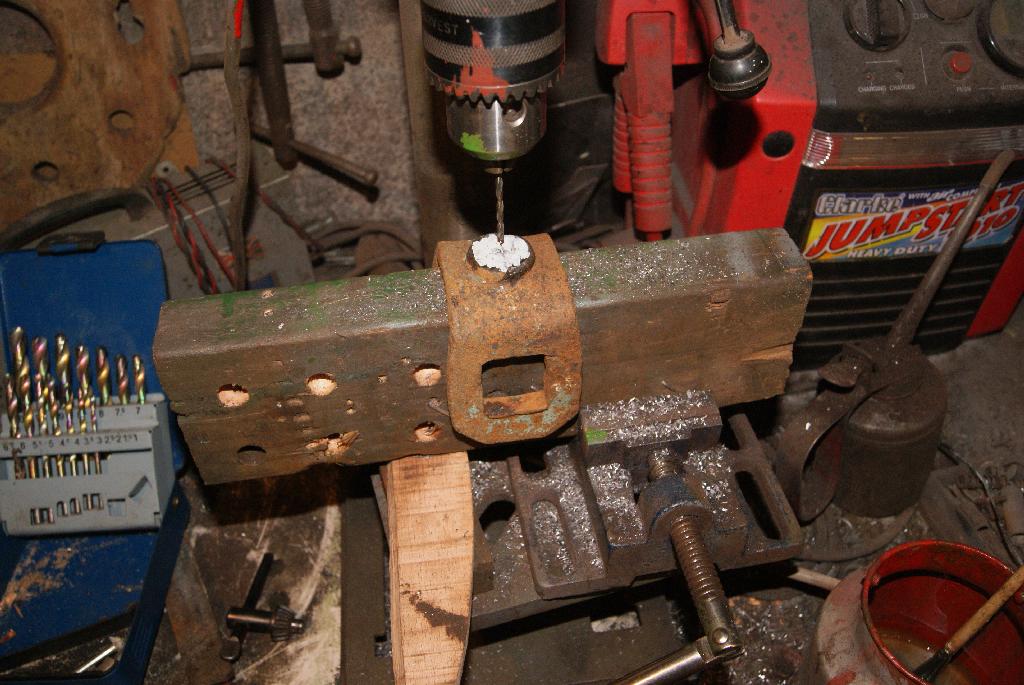
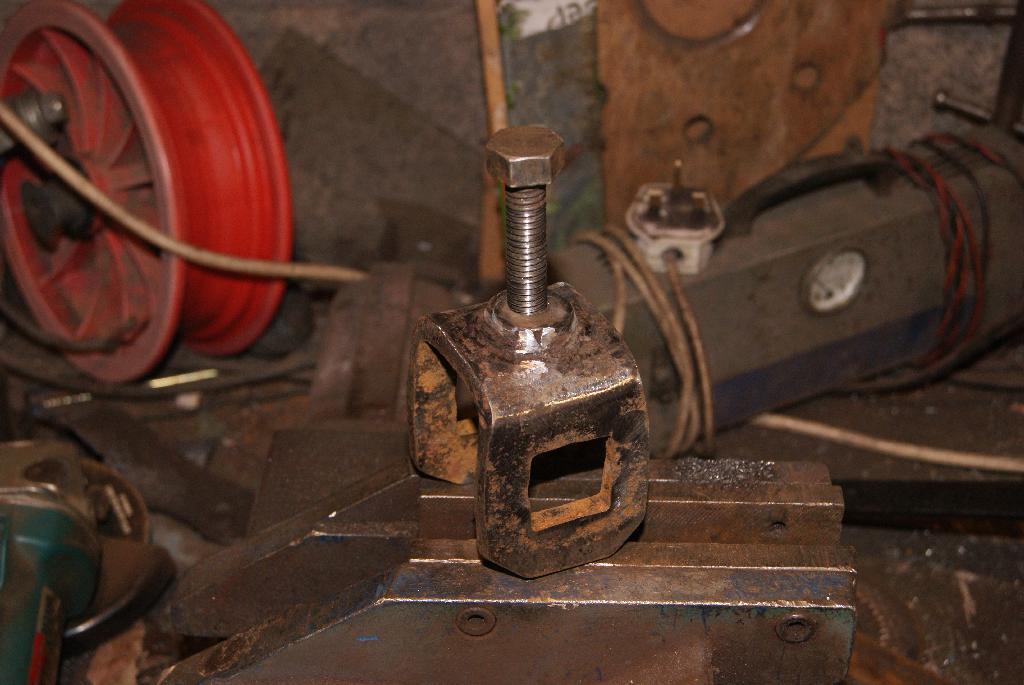
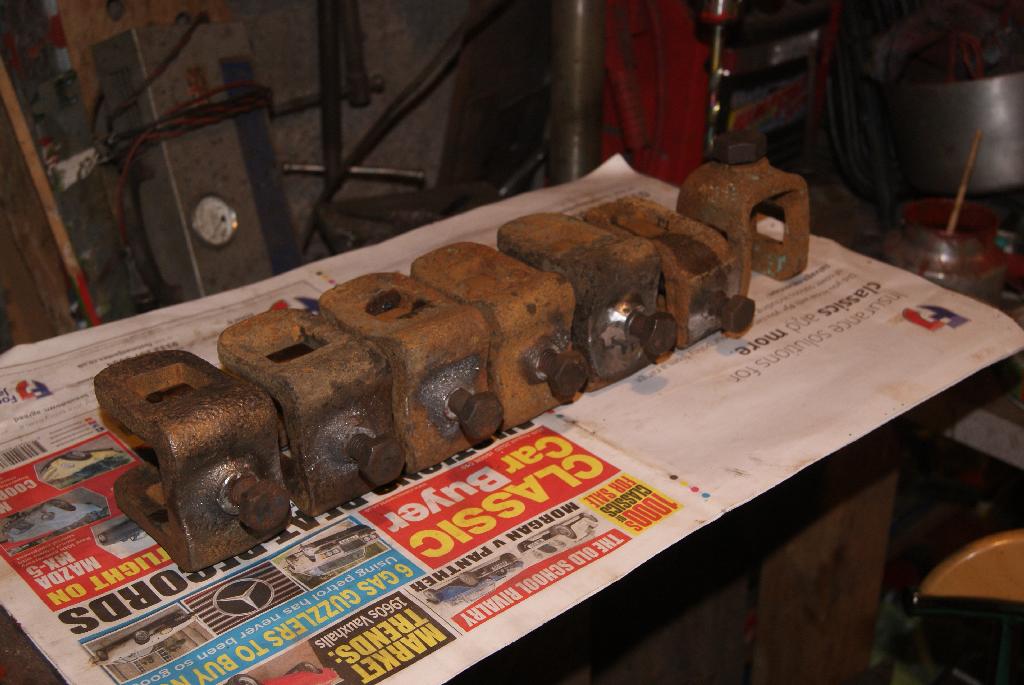
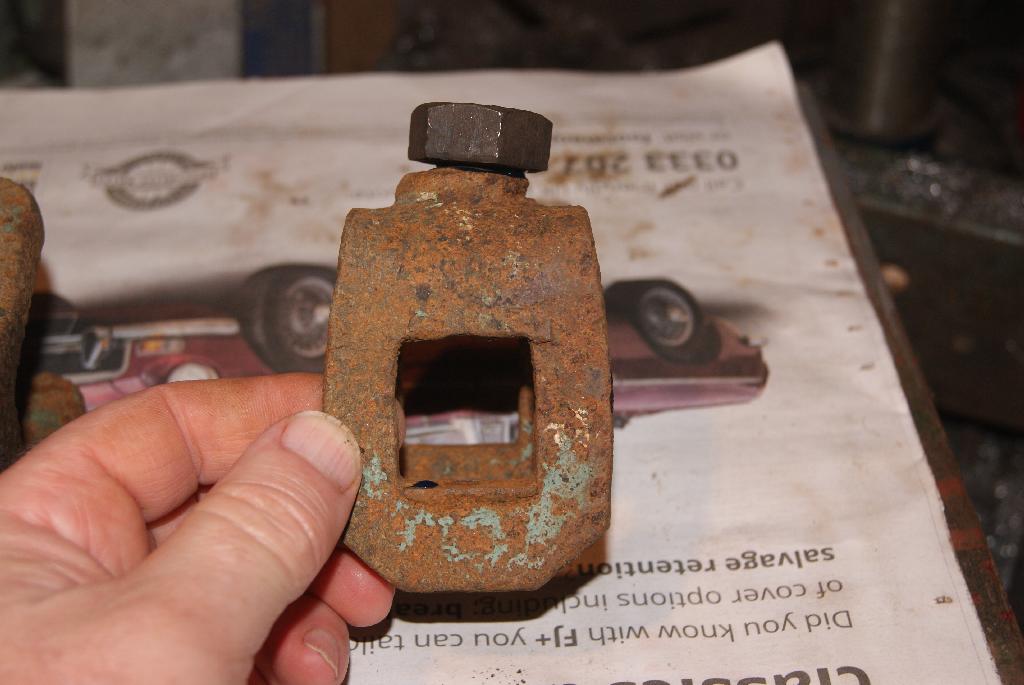
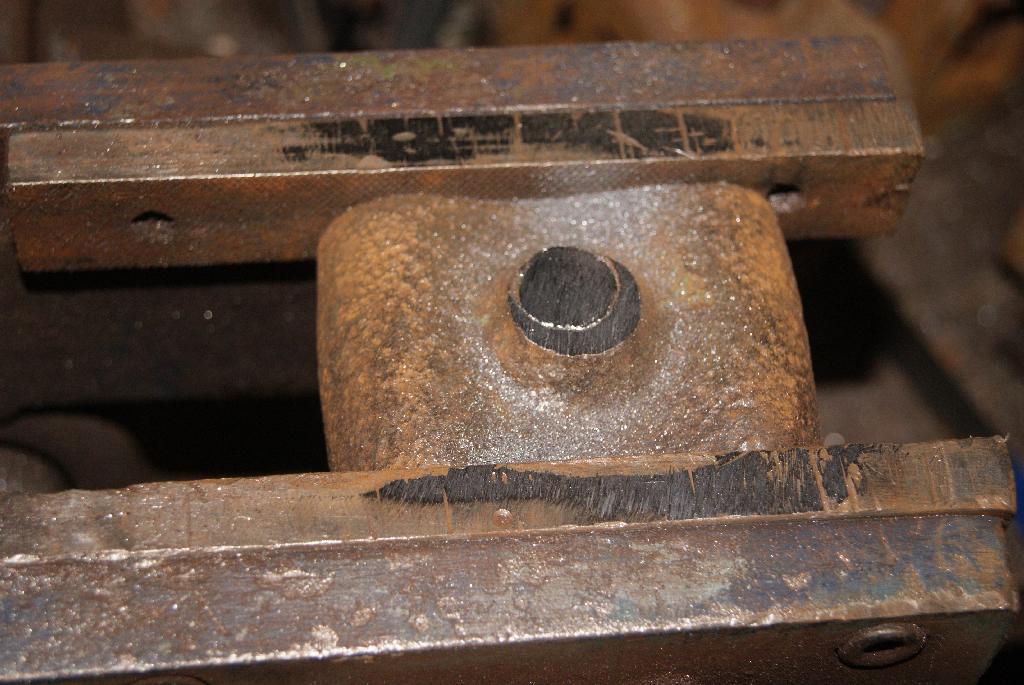
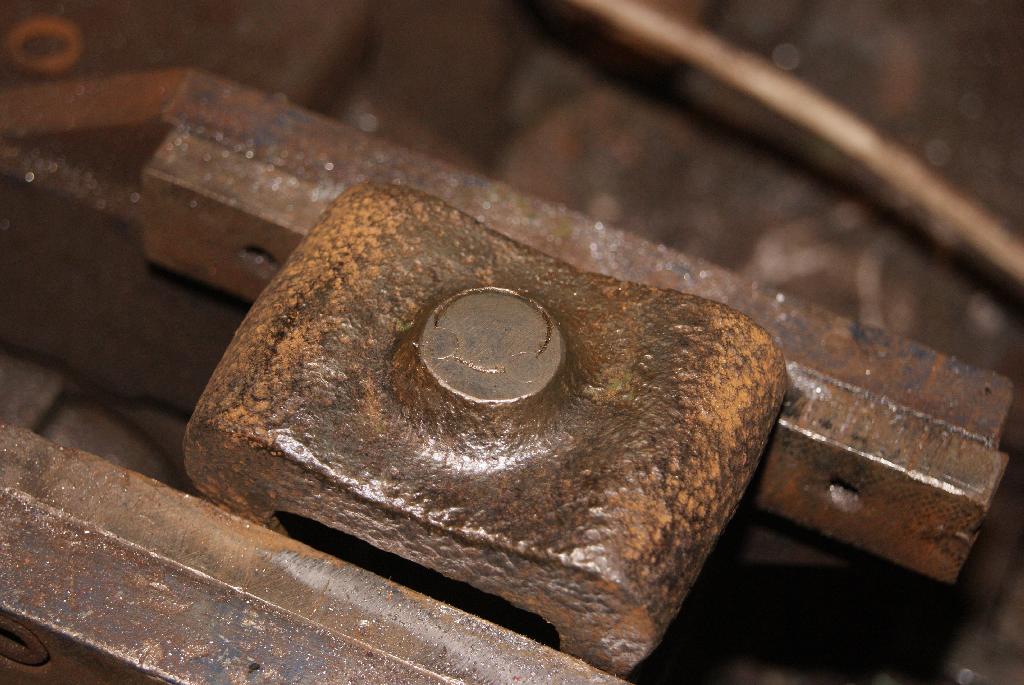
January 5, 2021 at 3:59 pm #36354trusty220KeymasterI plucked up courage today to attempt the repair of one of the tine clamps on the cultivator. If you remember the clamps are cast iron, and so very brittle, and somebody had “repaired” most of them by drilling out the bolt hole and re-tapping in a larger size. OK, a working repair that probably got the owner over the immediate problem, but why drill the hole off-centre and at an angle? I’m not OCD (or I don’t think I am) but things like that just can’t go unaltered- besides, the way it had been left would have been difficult to use with every clamp needing a different spanner size.
Normally I would just fill the hole with weld, trim it all back and drill and tap but you can’t do that with cast iron, at least not with any success. I had to do it the long way round which involved plugging the hole with a mild steel bolt, drilling two dowel holes down the threads and tapping them to accept small bolts which will prevent the larger insert from rotating when I drill and tap it later. The pictures explain it better, but the large insert was a 5/8 Whitworth bolt that I cut off and dressed back with a hand file to give a flat surface on the original boss. To prevent it rotating I clamped it in the vice and positioned the pillar drill to drop a hole straight down the edge of the larger bolt. I tapped these holes to M6 and wound in a couple of metric bolts covered with loc-tite so the hole thing is now rigid.
My local bolt supplier is closed under the lockdown rules so I can’t see if he’s got any 1/2″ Whitworth bolts, otherwise I would have drilled and tapped it as well. I’ll leave that until I know what size bolt I can lay my hands on just in case.
Only another six clamps to go- wish me luck!
Attachments:
January 2, 2021 at 4:00 pm #36329trusty220KeymasterI’m glad to see that you’ve taken the plunge, Kevin.
The rule of thumb that I use for restoring machinery is that if there is no original paint left on it then I’m not ruining anything by doing a complete repaint. Quite a few years ago I bought a 3-speed Trusty which had still got original paint and transfers on it; not pristine, but you could see where the factory had oversprayed the blue JAP 6 engine with green paint in places so I decided to clean it up and rub it with linseed oil to preserve it. That did work for a few years but eventually all of the original paint has now worn off, so when I move house and set up a new workshop that Trusty will be one of the first in the queue to be given a complete rebuild.
As Charlie says, these things are only original once and I still think it worthwhile to keep something original that has lasted this long.
Happy New Year to everyone from a snowy Redditch!
-
AuthorPosts