Forum Replies Created
-
AuthorPosts
-
January 3, 2024 at 5:57 pm #41642
 trusty220Keymaster
I may be able to trace it from the engine number and let you know what the correct serial should be. It does sound like you have the correct engine for it at least.
January 3, 2024 at 10:26 am #41638trusty220KeymasterPhoto’s of the parts listing for you. If you let me know the serial number I can tell you where and when it was sold.
By the way- I’ve just seen another posting of yours and you describe the engine as a Norton 16H. Tractors (London) Ltd. had a very good working relationship with Nortons and always used the Big Four in various types, so please don’t try ordering 16H parts for it because they won’t fit! Similarly, the Big Four engine fitted to the 2-wheel tractor was a special build from Nortons and intended from the outset to be an industrial unit- the head was cast iron and the vanes went from side-to-side, it was fitted with a Wico A magneto, had a square valve chest cover and a parallel crankshaft, so if you find one please be aware that not all of the parts will transfer over. The Big Four fitted to the Steed was a motorcycle engine with aluminium head, vanes running front-to-back, a BTH magneto, oval valve chest cover and tapered crankshaft; they were probably war surplus stock that the army were selling off cheaply.
I hope that helps. Happy New Year!
GeoffAttachments:
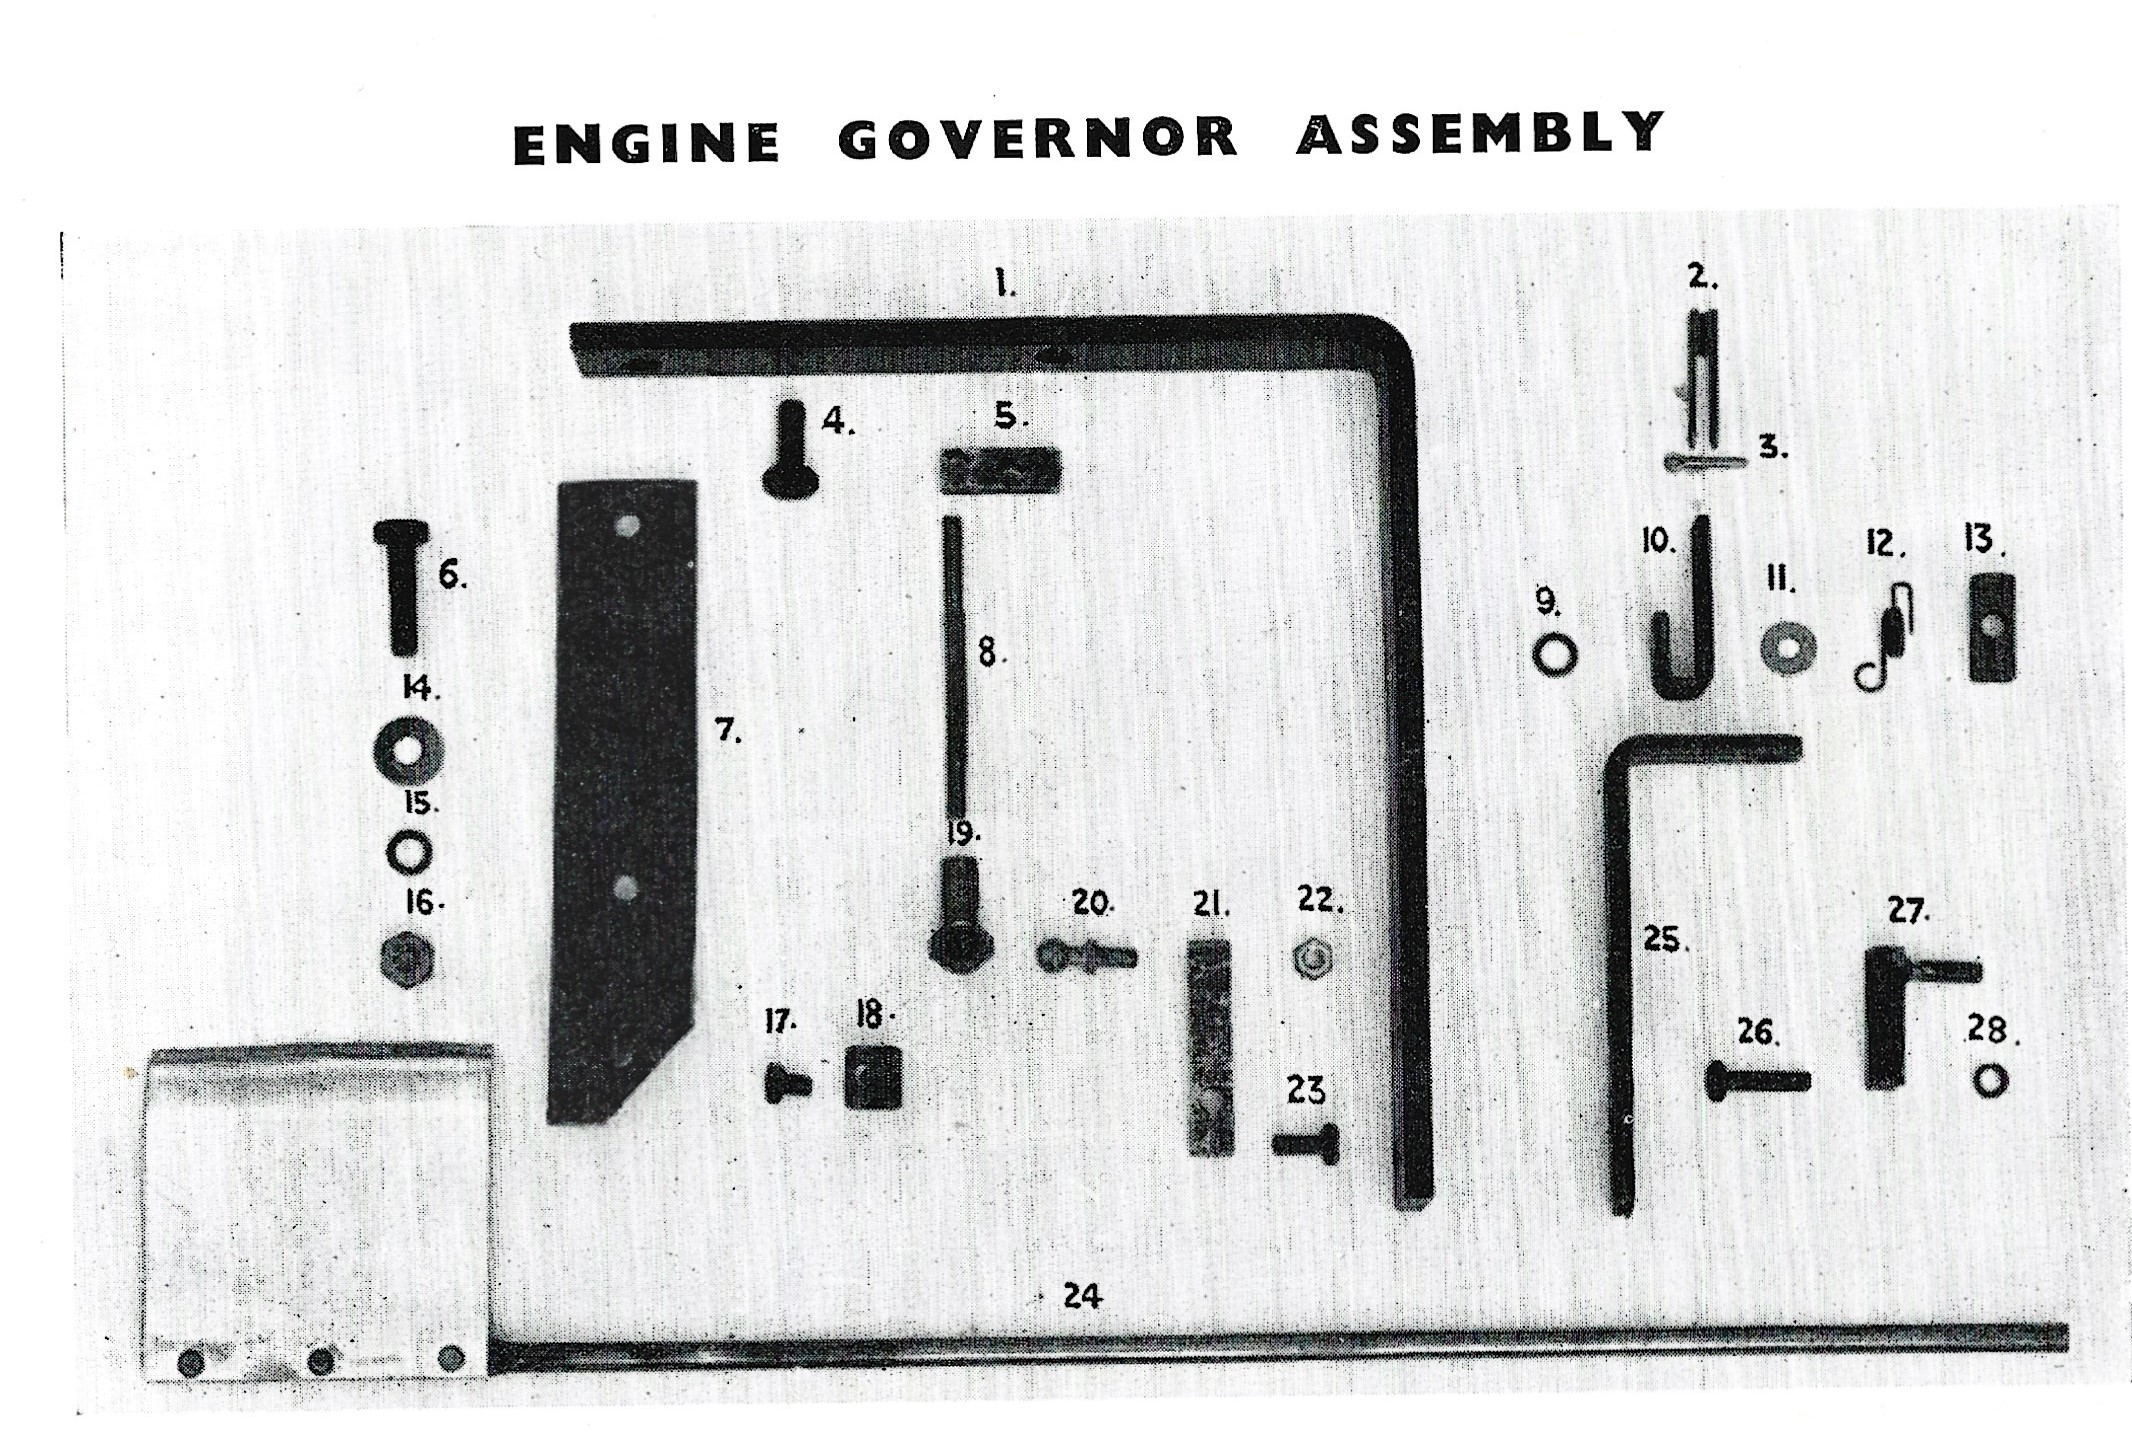
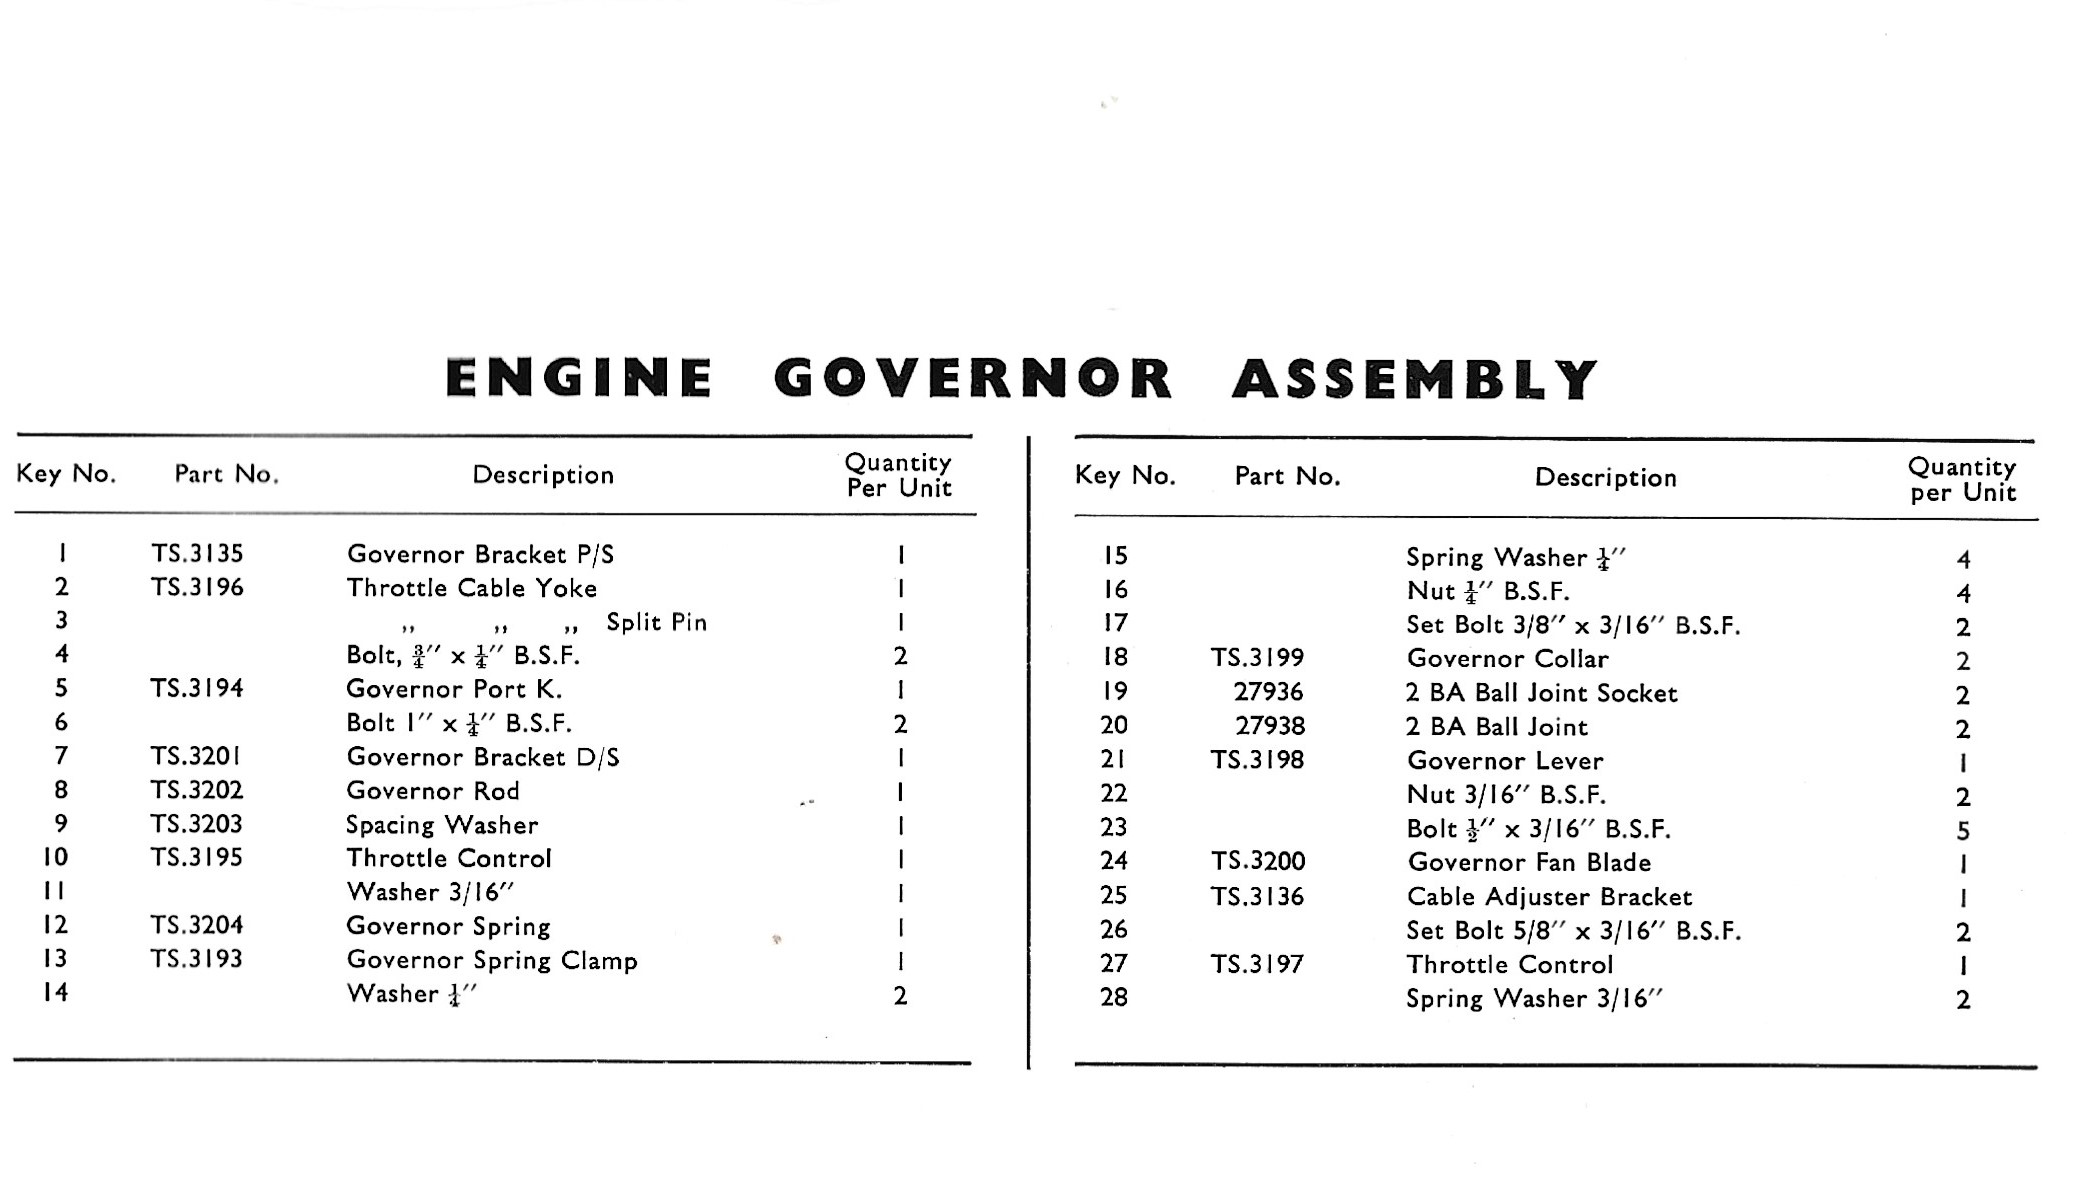
January 3, 2024 at 9:29 am #41636trusty220KeymasterThe Steed had at least two different governors fitted; the earlier Mk2 Steed had an air vane governor and the later Mk2’s had a mechanical one fitted which drove off the magneto drive. Most have been removed over the years because they never really worked very well in the first place and you are better off adjusting the engine revs by hand with the hand throttle.
If you are determined to re-fit one to your Steed you will find that they are not available anywhere and you will have to make it from scratch. As a comparison, the Norton Big Four engine fitted to the two wheeled Trusty never had a governor throughout it’s production run and it was perfectly use-able.
The only information that I have is in the Trusty Steed Owner’s Manual which has a parts listing included. This shows the air vane type governor but it is very complicated with many small parts- you would have to size it up from the drawing. I will post a scan of the relevant page, but you can pick these books up from online auction sites every so often. There was one specialist publisher who reproduced the booklet as well- try Japonica Press if you need a copy.
December 29, 2023 at 1:00 pm #41625trusty220KeymasterIt is always good to welcome a new recruit to our forum. Never be afraid to ask a question, no matter how trivial it may seem to you; we’ve all had to start somewhere and we have a host of people here with centuries of experience between us, so ask away.
I’ve sent you a Private Message using the forum’s PM system. Click on your avatar (the photo on your posting) and it will take you to your private account.
Happy New Year to everyone!
December 27, 2023 at 11:35 am #41616trusty220KeymasterCongratulations on your purchase and I’m sure you will not regret it in the coming years. The only thing people find now is that you get bitten by the bug and have to find it a housemate.
If you let me know the serial number (on the back of the transmission case) and possibly the engine number I can give you an accurate date that it was sold from the factory. One or two pictures may also help and they would certainly be of interest to other forum members.
It looks like you’re going to have a Happy New Year!
GeoffDecember 3, 2023 at 12:11 pm #41520trusty220KeymasterAnother brain teaser for Christmas from the Master! Well done, Alan!
This will get you all thinking.
November 14, 2023 at 3:16 pm #41405trusty220KeymasterJust to add a little more to Charlie’s post you will need to understand that most seed drills meter out a measured quantity of seed for a given distance travelled; they make a groove in the soil, pour a measured amount of seed into the bottom of the groove then cover it over in one continuous operation. This results in a continuous row of seedlings once they’ve germinated and so a gapper was used to take out unwanted seedlings and create gaps in the rows so that the plants could expand and grow into the gaps. If it wasn’t done you would end up with too many plants fighting each other for the available nutrients in the soil and this would consequently produce a poor crop of dwarf plants rather than a good crop of fewer but healthier and larger plants, which is what most people would aim at.
You could always do the same job by hand which would be costly and tie up a farm labourer for days. It was easier to pay a youngster to do it and buy a machine he could use so he didn’t get it wrong.
I hope that goes some way to explaining why these were used; these days seed is more expensive and modern seed drills can give a more precise delivery, so gappers have passed into history.
I hope that helps your understanding of a unique type of machine. Enjoy it, and I would recommend planting some sugar beet seed in the spring so you can try it out!
October 1, 2023 at 12:57 pm #41268trusty220KeymasterI’m glad to hear that you enjoyed yourself and it sounds like a good bunch of people that were willing to stop and help a novice.
One thing I found invaluable when I started was to go along to a few matches to spectate; that way you can pick up a few pointers whilst not under the pressure of competing and you have a lot more time to take in what other people do. When you’re competing you are under pressure to finish by a certain time and you can’t always stop and watch the others.
Keep up with it- every outing is an education and you never stop learning!
August 18, 2023 at 2:32 pm #41134trusty220KeymasterThank you for the feedback on the cover. I am now taking lots of pictures that I can use for cover shots so you should see some more recent (and more relevant!) covers from now on.
August 11, 2023 at 6:25 pm #41108trusty220KeymasterIt will be good to see you there next year, Adrian. No doubt I’ll be going as well as it’s turning out to be quite a good event for the club with plenty of members coming to see us.
There’s always room for more, so put it in your diaries for next year!
August 7, 2023 at 3:05 pm #41064trusty220KeymasterCharlie forgot half of his tent poles so he couldn’t use his marquee; Big Ears stepped in and very generously said that he could use one of his tents!
I bet Charlie won’t forget any poles next time! You are right, Jim, having a large tent/marquee on the stand does give some shelter when the weather isn’t the best and we were all grateful for it over the last three days.
August 7, 2023 at 9:40 am #41055trusty220KeymasterAt least they are made from straight round bar so you should be able to make your own replacements rather than trying to repair the bent ones.
July 24, 2023 at 11:17 am #40993trusty220KeymasterThe problem lies in the geometry of the design and it’s the same with the current range of triples that Ransomes make.
If you look at the two front cutting units they are held by the brackets at the top and are being pushed from behind which makes them try to rotate forwards and downwards. With the skid at the back of the cutting unit being the only contact it has with the ground, this has the effect of cutting the grass shorter as they are pushed forward.
In contrast, the middle cutting unit is being pulled forwards from the top which gives a more consistent height of cut on the finished grass.
When I used to train operators to use these machines I always used to tell them to set the front units at least one graduation higher than the middle one to counteract this tendency; this was with new machinery as well, but once they’ve hit one or two trees then anything goes!
I hope that puts your mind at rest; at least you know that there isn’t anything fundamentally wrong with your machine.
July 19, 2023 at 3:35 pm #40979trusty220KeymasterJust a little reminder to all of you out there that this is a club members’ only event, it is not open to the public. A great weekend, however, and well worth joining the club so you can be part of a well organised event with a very light hearted (and not too serious) set of competitions to take part in.
June 28, 2023 at 10:37 am #40941trusty220KeymasterAs Andy says, do not use the three legged puller on the outside edge of the flywheel- at best you run the risk of distorting it.
Make up a puller which exactly matches the three holes in the flywheel centre. Mild steel plate 1/4″ thick should be enough, then drill three holes to match the flywheel holes. You will then need to find three bolts of the correct thread (JAP engines normally used Cycle Thread, known as CEI) which you can put through the puller holes and thread into the flywheel. Once you’ve tightened them firmly a sharp tap over the end of the crankshaft should unseat the taper holding the flywheel. If you put the flywheel nut on the crankshaft threads first it helps to avoid damaging the crankshaft threads if it proves a little stubborn; a little heat is also useful if it doesn’t come off straightaway.
I hope that helps a little. Good luck.
-
AuthorPosts