Forum Replies Created
-
AuthorPosts
-
July 24, 2016 at 5:43 pm #21562
 ransomes256Participant
Gareth,
Welcome to the forum and good luck with your search. In the meantime I have manufactured a replacement jet holder for your carburettor and it is ready for you. DC is aware.
Neil JarrettJuly 21, 2016 at 12:49 pm #21544ransomes256ParticipantHello,
Yes I have both these dipsticks available.
Please drop me a mail for a list. njarrett@btinternet.com
NeilJuly 8, 2016 at 7:15 pm #21395ransomes256ParticipantJonathan,
15367 is shown on the register. Maybe Dave can offer more info.
NeilApril 20, 2016 at 6:49 am #20633ransomes256ParticipantJoe,
The floor and the toolbox were originally made from pine with some steel reinforcing edges etc.
I have some drawings to help make some replacements to the correct pattern.
The level of restoration is always open to debate. I feel the most important thing is what you are happy with and what you intend to use the tractor for. If it is staying at home for some fun the level is less important than going to shows and ending up with a broken bolt in a track and getting stranded or using it for ploughing and doing some increasing damage due to heavier loading.
With the MG2 the maintenance of the flywheel assembly is very important as a miss fire or kick back can easily break the flywheel and these are not available.
Hope this helps
NeilApril 18, 2016 at 11:10 pm #20609ransomes256ParticipantJoe,
As the supplier of the parts I would prefer to not advise although please feel free to call me.
However, I would like to point out you should try and keep the track sections the same way round relative to each other. The reason for this is that over the years the tooth sections will have worn more on one side than the other so if assembled randomly you may get some tracks pitched as current, others with a larger pitch and some with a tighter pitch. This I am sure you can see may lead to drive wheel engagement and smooth running and track retention an issue.
NeilApril 17, 2016 at 4:42 pm #20551ransomes256ParticipantMarch 10, 2016 at 2:22 pm #20212ransomes256ParticipantThe reduction box cover is the most difficult item to remove.
First the entire box must be removed and this requires the PTO coupling to be removed in the operator seating area first. It therefore means if a PTO is installed it needs to be removed.
The reason for this is the shaft drive for the PTO comes direct from the reduction box.
Once the reduction box is removed you can access and release the nut on the input shaft and then you can remove the cover.
It would be well advised to replace the input shaft seal as this often fails and is a nightmare to replace as you have to do all the above to get to it. If the journal is heavily grooved I would fit a 2 lip design.
NeilFebruary 3, 2016 at 5:08 pm #17306ransomes256ParticipantMy passes arrived today so just need to get all the spares ready to take and display.
NeilJanuary 24, 2016 at 9:35 am #15836ransomes256ParticipantGraeme,
For an entry form visit http://www.tractorworldshows.co.uk
The contact arranging the MG display is Jonathan Cox 01697 478292
You will still need to fill in an entry form and send to the organisers for passes etc.
NeilJanuary 11, 2016 at 8:31 am #15726ransomes256ParticipantJonathan,
Is the magneto too far in advance? It may be worth retarding it mechanically rather the using the mechanism to see if it improves the situation. Warming the spark plug can help and I assume there is sufficient fuel reaching the plug. Not a favourite product but try some Easy Start or similar Ether to try and pick up a few more bangs.
I know you had the magneto rebuilt but is coil resistance and condenser charge / discharge time all good? These could still show a spark at slow engine rotate.
Good Luck
NeilJanuary 6, 2016 at 10:30 am #15679ransomes256ParticipantJonathan,
Why not try a complete working MG2 carburettor first before you try swapping slides and other bits.
Seems you have to much compression which may also be a problem if the inertia from the flywheel does not keep the rotational speed up.
NeilDecember 20, 2015 at 11:15 am #15551ransomes256ParticipantThis is a little misleading taking workshop manual build info and comparing it to strip and diagnosis findings.
The manual requirement to set gaps spaced radially around the piston is based on new build and assumes initial bedding in of the ring has not yet occurred. If all the gaps on one piston are in line it can give an easier initial route for ignition gases to pass by and burn the piston edge. If the rings are a little dry and tight on initial start and fail to rotate straight away this can lead to an early failure especially on higher compression and performance engines.
It is true that as the rings are free to rotate at will they will inevitably line up at some point but in the case of a multi cylinder engine unlikely to be on multiple bores at the same time.
Before retirement I was supervisor on engine testing and inspection for a major motor manufacturer and when we identified one piston with gaps in line we would only note it but when you find all 6 or 8 pistons with rings in line after 1 hours running something is wrong.
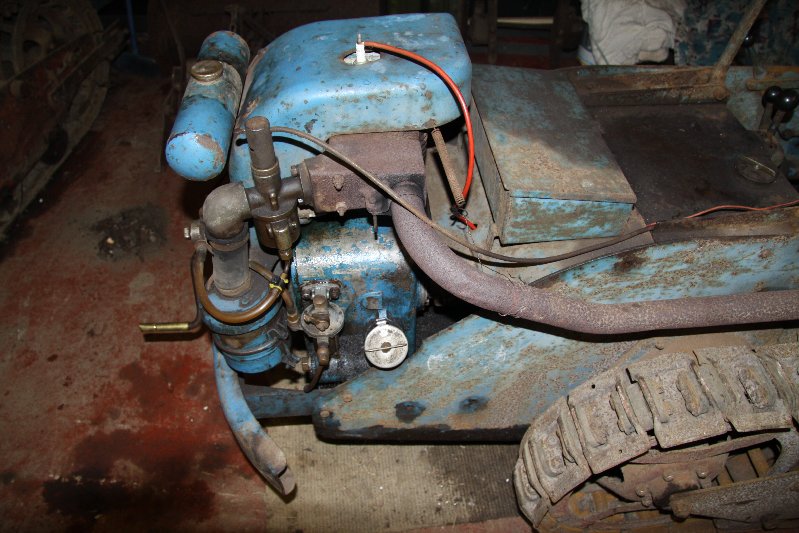
NeilDecember 15, 2015 at 6:09 am #15517ransomes256ParticipantJames,
The exhaust fitting is a simple design but due to burning can be a poor fit in the barrel. As the engine is hard mounted in the chassis there is no relative movement between the two so the clamp around the pipe to the manifold suffices plus add a little exhaust paste for a good seal.
Hopefully a photo attached of an original installation.
NeilAttachments:
November 14, 2015 at 11:02 am #15198ransomes256ParticipantThe big end nuts should be tightened to 42 lb/ft but is very difficult to apply due to very limited access for any suitable tooling.
A new main bearing bush requires reaming in situ. It is a dual purpose bush and should be reamed 1.500″ if running standard bearing size or 1.490″ if running a reground main bearing.
I have an original 1.490″ reamer which is used in conjunction with the main roller bearing in the rear cover to maintain alignment.
NeilOctober 19, 2015 at 5:15 pm #14884ransomes256ParticipantAndy,
Vehicle wiring products list this. http://www.vehicle-wiring-products
If not Speedy Cables http://www.speedycables.com will certainly have what you need but tend to want to make up cables. http://www.speedycables.com
Neil -
AuthorPosts