Forum Replies Created
-
AuthorPosts
-
September 6, 2022 at 11:34 am #39919
 trusty220Keymaster
My two older brothers used to mix up their own fuel for their model aircraft and boats; they used a mixture of ether and castor oil (presumably after reading too many Biggles books!). The house used to smell of ether for days and mom got a very strange look when buying the castor oil in the quantities that my brothers needed.
Of course any lubricating oil would have served the purpose, but then Biggles would only use castor oil in his Sopwith Camel so that it didn’t emulsify at altitude. I don’t know how high my brothers thought they’d get! Happy days, now long gone.
I think I’ll ‘phone my brother and ask him, though!
September 5, 2022 at 11:27 am #39913trusty220KeymasterKeep in touch and let us know how you get on.
September 5, 2022 at 8:36 am #39911trusty220KeymasterIt may even pay to buy another donor Motor Triple to provide a source of spares for the future. These machines used a lot of spare parts when they were in current use and common sense would suggest that the supply of spares is going to get less as time goes on.
My experience of the Motor Triple cutter clutch was that the friction material that was bonded to the drive plate was extremely thin but I’ve never seen any worn out. Once the clutch is engaged it wouldn’t slip- all three cutting units had a V-belt at some point in their drivelines and these would be the first to start slipping if the load on the cylinders was excessive, so the clutch was protected. Besides trimming burrs off and filing grooves out of the cage that was all that was needed.
Good luck with your search for parts.
September 4, 2022 at 2:00 pm #39909trusty220KeymasterI never did measure the total thickness of a new plate but I know the friction material was only a thin layer, no more than 10 thou at the very outside. A shame there never was a workshop manual printed for these machines!
Some years ago when Ransomes sold off all of their redundant Motor Triple spares it was Bartrum Mowers who bought them all. Bartrums have now been bought out by Ernest Doe Ltd (or so I’ve been told), so it may be worth trying them.
September 4, 2022 at 11:22 am #39904trusty220KeymasterMy recollection of those friction plates is that the friction material was not 1mm thick so it sounds like you’ve got too much on there.
It may help to buy some new if you can get them. Part numbers are MBA2790 for the friction plate with the lining on (and the book says that you need 11 for a set), and the intermediate plates are MBA2791. They are called “Counter Face Plate” and a set is made up of ten plates which do not have friction material on them.
The friction plates have four ears on the periphery which used to burr over in use so one of the service points was to file the burrs off to make them flat again. The cage that they used to fit into used to have four cut-outs that corresponded to the ears; the ears of the plates used to wear grooves on the drive sides of the cut-outs, so another service point was to file the grooves flat so the the plates didn’t sit in them when the clutch was disengaged.
The best place to start looking for spare parts would be Ernest Doe Ltd.
Good luck!August 31, 2022 at 12:21 pm #39885trusty220KeymasterIf you’re sure that the valves are sealing make sure that the head is flat by getting a sheet of emery cloth, lay it out on something that you know is flat (like a piece of glass) and rub the underside of the head on it using a circular motion. It’s surprising how much some of these heads can distort over time and the rubbing marks will give you an idea how much- or how little- it’s out of true.
If it’s not the head, head gasket or valves then it has got to be the piston rings. Cylinder bores tend to wear more at the top than the bottom and if your engine has been standing it’s a good probability that the old oil will have glued the piston rings in. Turning the engine over will compress the rings on the piston as it moves down the tapered bore, then they don’t spring out again as the piston comes back up. Have you tried some engine oil down the sides of the piston to see if it raises the compression?
August 31, 2022 at 7:48 am #39882trusty220KeymasterThe Douglas SV54 isn’t one that I’ve worked on but most of the other engines from that era seem to have a solid aluminium gasket which can be re-used. If it’s gone too far at least you can use it as a template to cut a new one out of aluminium plate.
If you don’t have any compression- and the tractor’s been standing for some time- the most likely culprit is the exhaust valve being stuck open. Just about every Trusty I’ve rescued has had a stuck exhaust valve! Moisture will get in via the exhaust and cause the valve stem to rust, then it sticks in the guide when it’s turned over next time.
Let us know how you get on.
August 31, 2022 at 7:34 am #39881trusty220KeymasterIt definitely sounds like a valve problem. The best way to check if the valve timing is correct is to bring the piston up to TDC (Top Dead Centre) between the Exhaust Stroke and the Induction Stroke. The valves should be “on the rock”, where the exhaust valve has just closed and the inlet valve is just about to open. If the valves are doing anything else then move the camshaft around a few teeth until you get this condition.
If they are “on the rock” at TDC then have a look at the valve seatings as the exhaust valve may not be sealing properly and allowing gases to leak past.
August 31, 2022 at 7:20 am #39880trusty220KeymasterThanks for the offer, John, but you’re at the back of the queue behind Mrs. Geoff’s wish list!
The next two weeks will be fettling the three tractors that I did the filming with back in April. The Norton engine gave up halfway through the day so I’ve got to get that working again besides giving the other tractors the once-over and a polish. Then I’ve got to run the topper over a couple of fields at the farm, there are two big branches off oak trees that are blocking a public footpath, and that’s just for starters! Maybe one day….
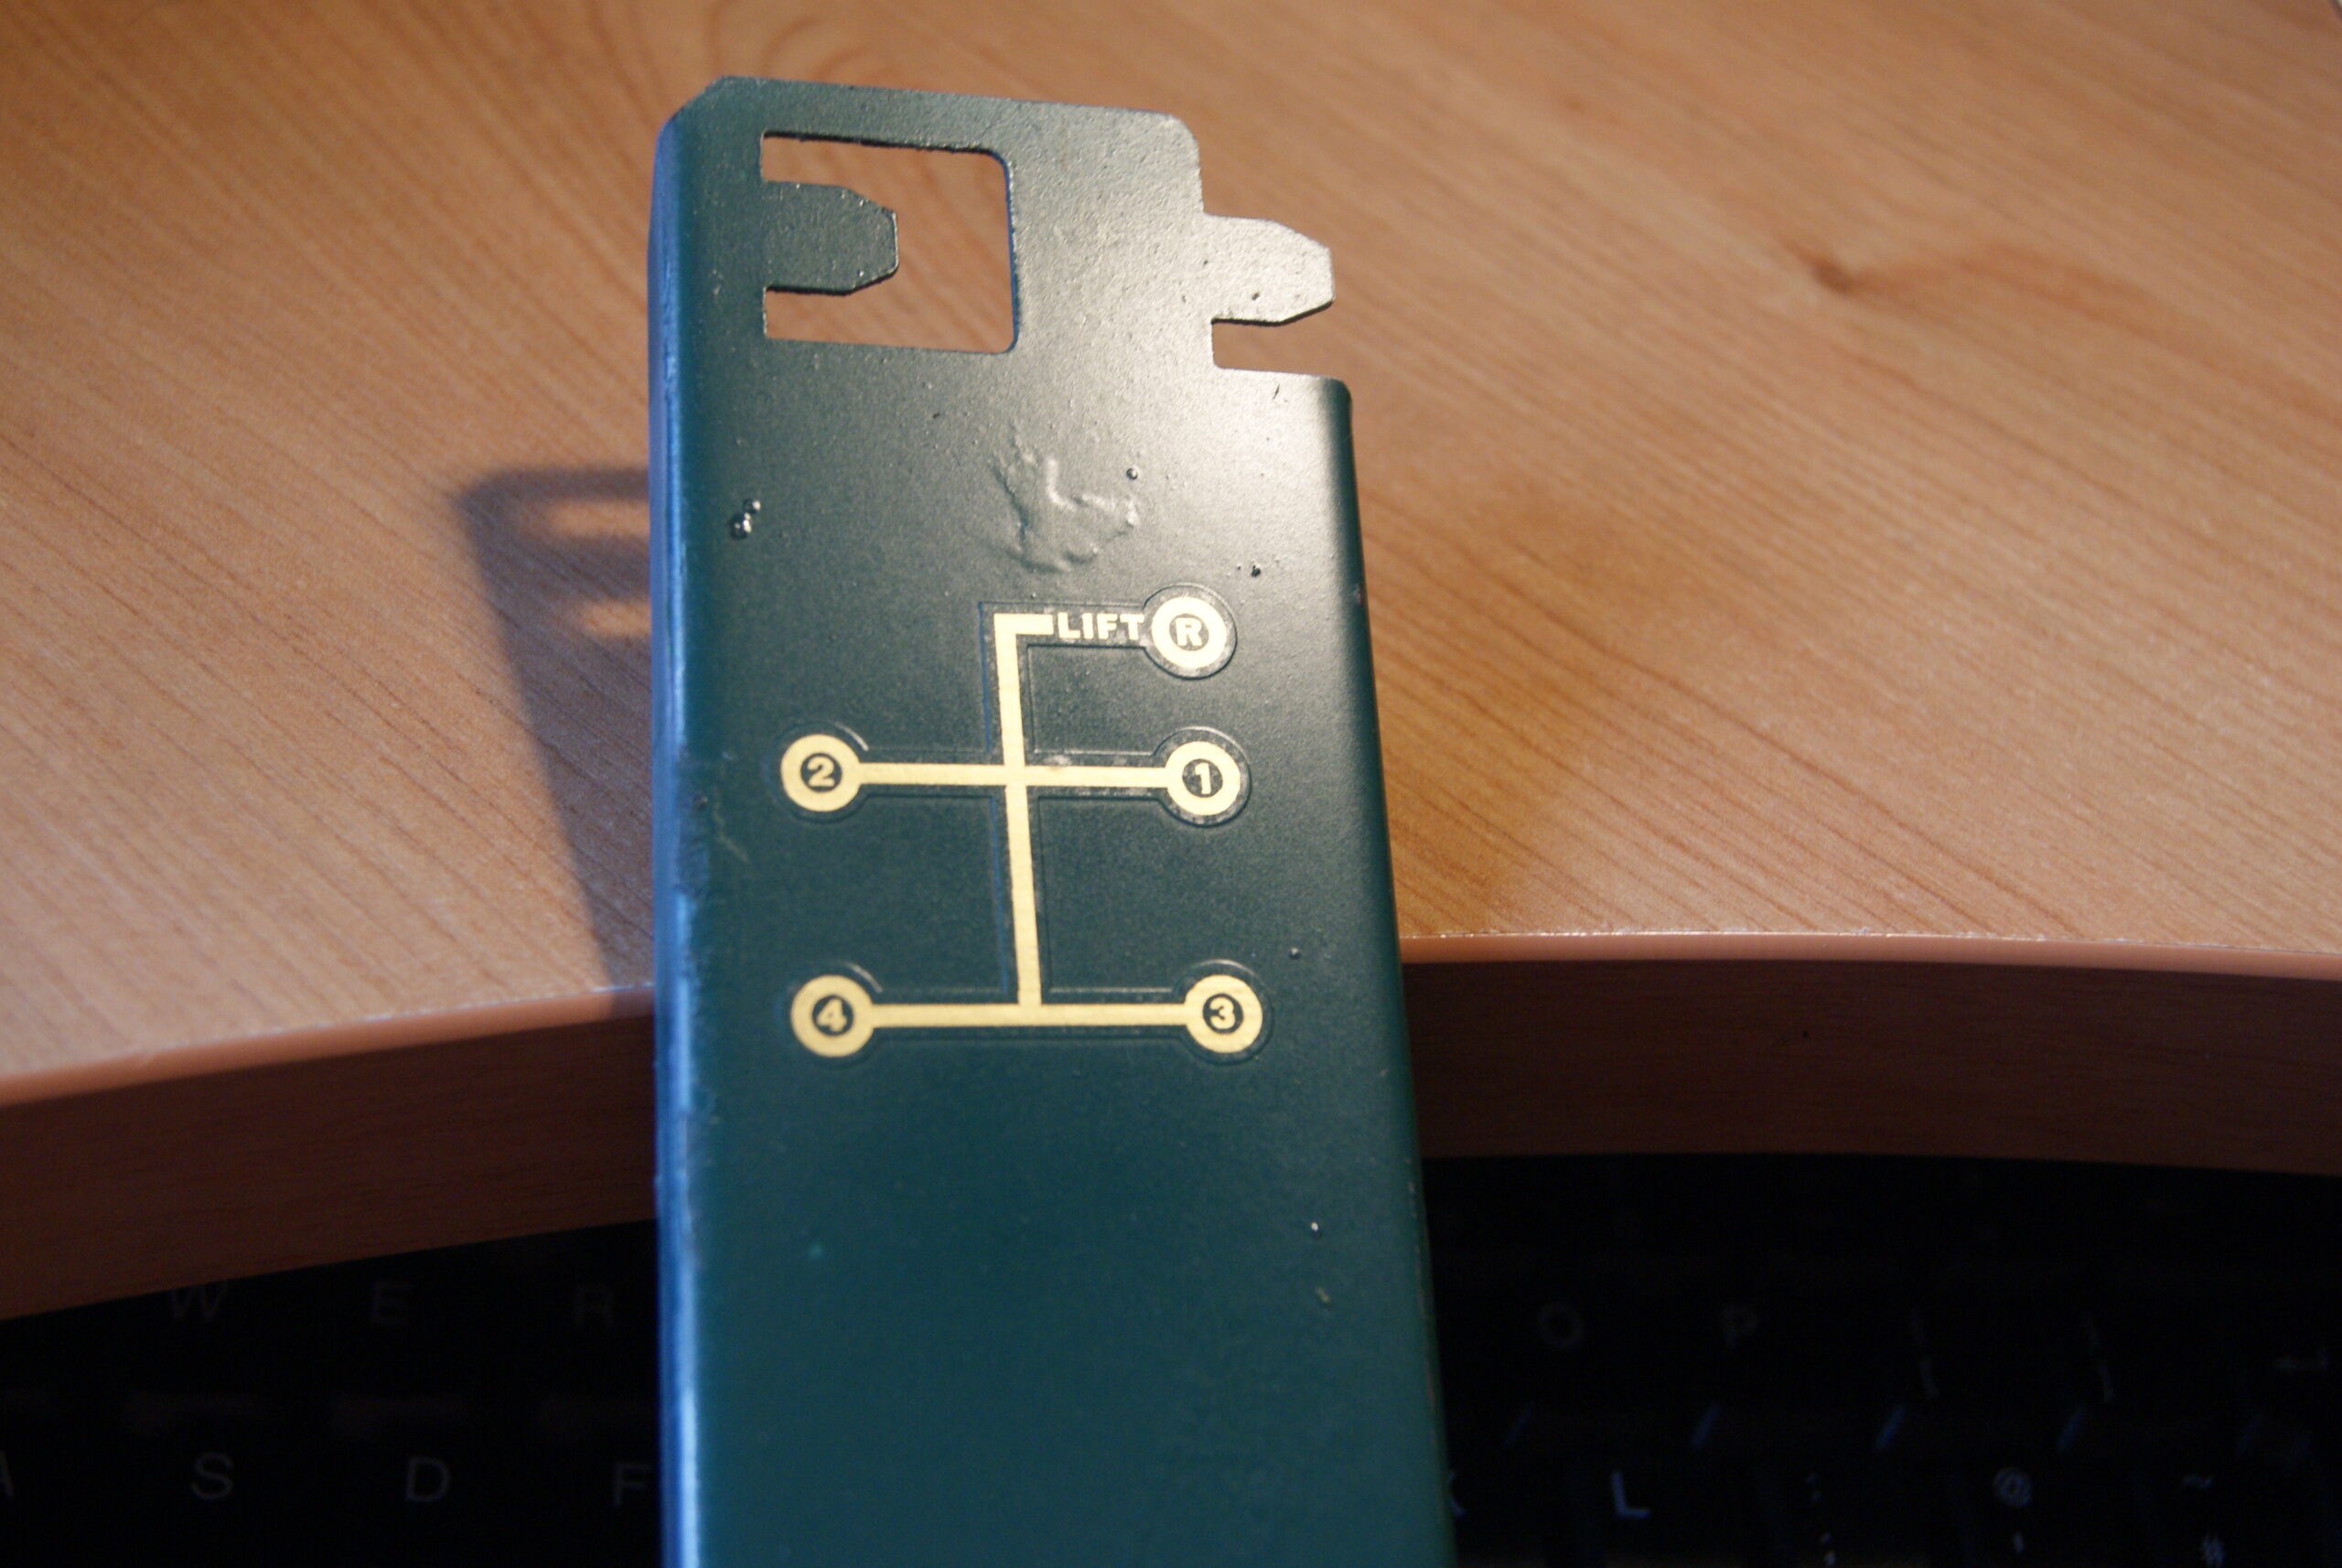
August 29, 2022 at 9:04 am #39873trusty220KeymasterThe inner slide should have a limited amount of movement in both directions so you can knock it backwards and forwards to get some of the rust out (and oil in). It does have a keyway to prevent the inner slide rotating inside the outer slide; this keyway doesn’t extend all the way through from one side to the other so if it stops moving suddenly try tapping it back the other way.
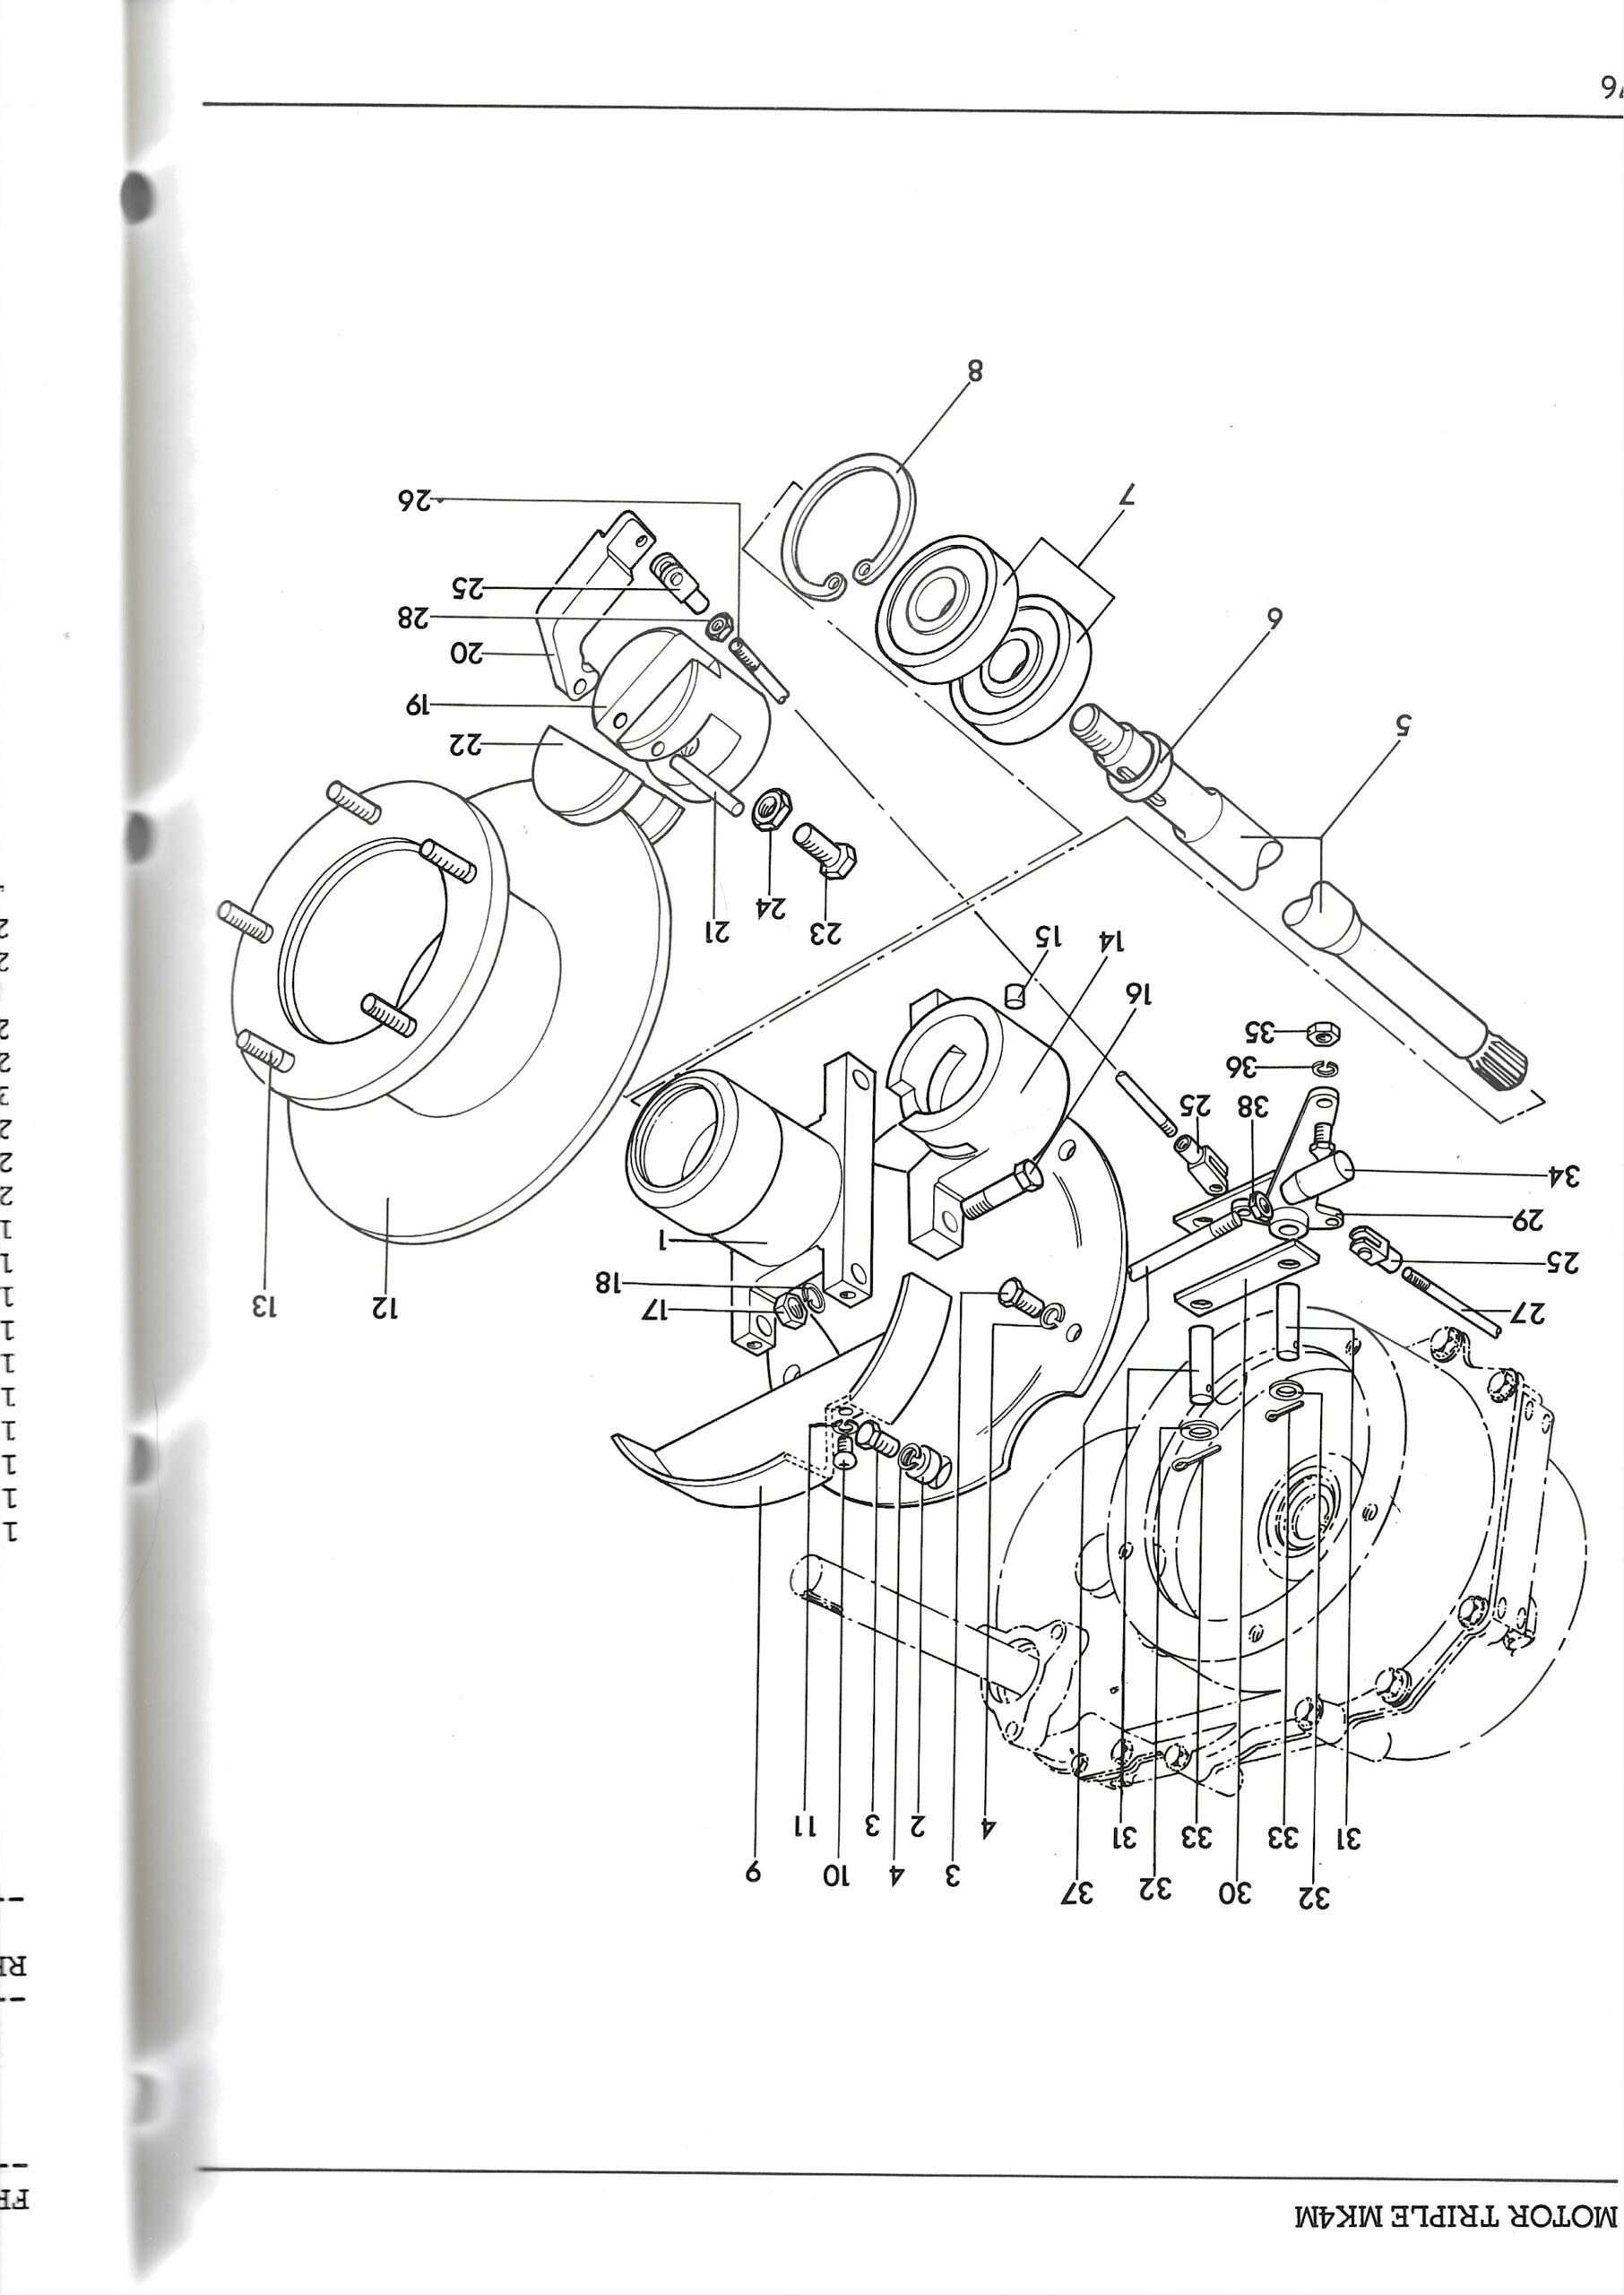
August 29, 2022 at 8:55 am #39869trusty220KeymasterFirst box I came to! Here are a couple of the drawings from the parts listing.
Attachments:
August 29, 2022 at 8:09 am #39868trusty220KeymasterThe round parts that you see from each end are all one piece and are joined in the middle. It has a large cutaway portion to fit the pads into and to allow the disc to reach the friction material. I’ll try to find the parts diagram and post a picture for you. Be patient, I may be in trouble later for making a mess!
August 26, 2022 at 12:00 pm #39845trusty220KeymasterEven though I haven’t posted anything for a while I’ve been very busy in the background- so busy, in fact, that I will have to post quite a few pictures to get you up to speed.
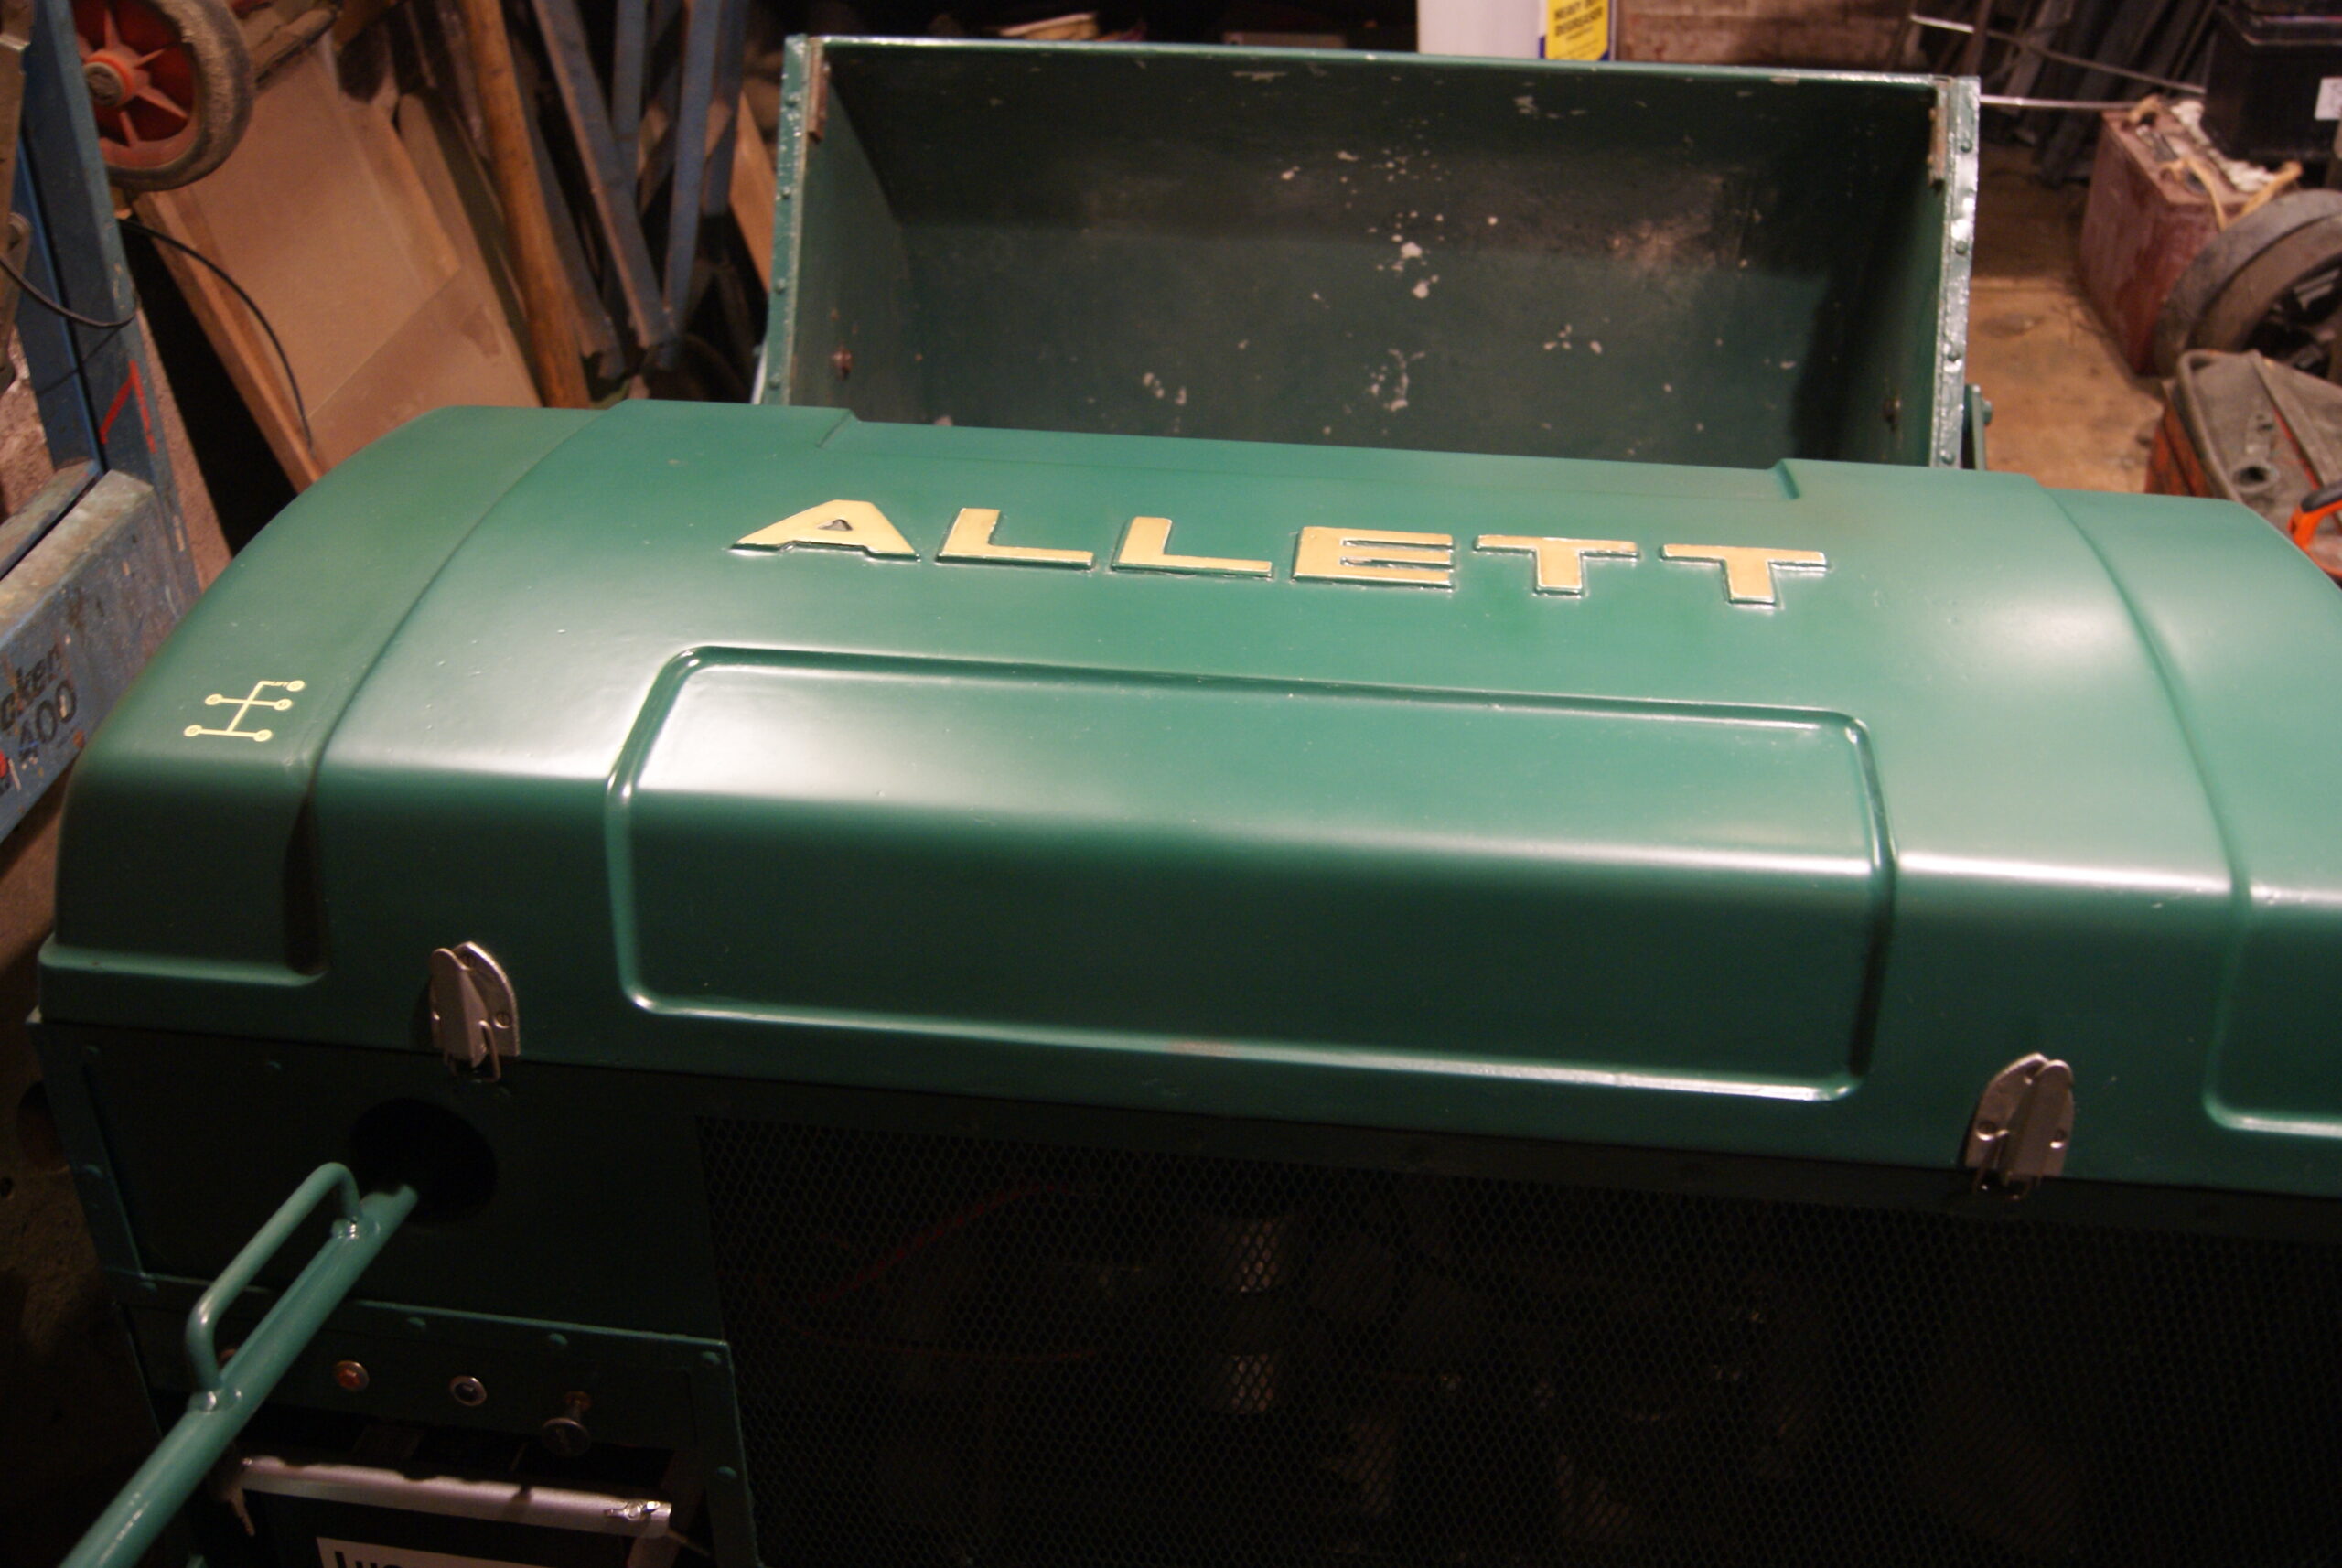
The last time you heard anything from me I had just re-painted the section of the engine cover. That is now finished with the addition of a new decal (courtesy of Classic Transfers) and it really does look better than if I’d left the original. I can sleep better at nights now that I know it was the right decision- sometimes these things can play on your mind when you’re trying to preserve as much of the original as you can.
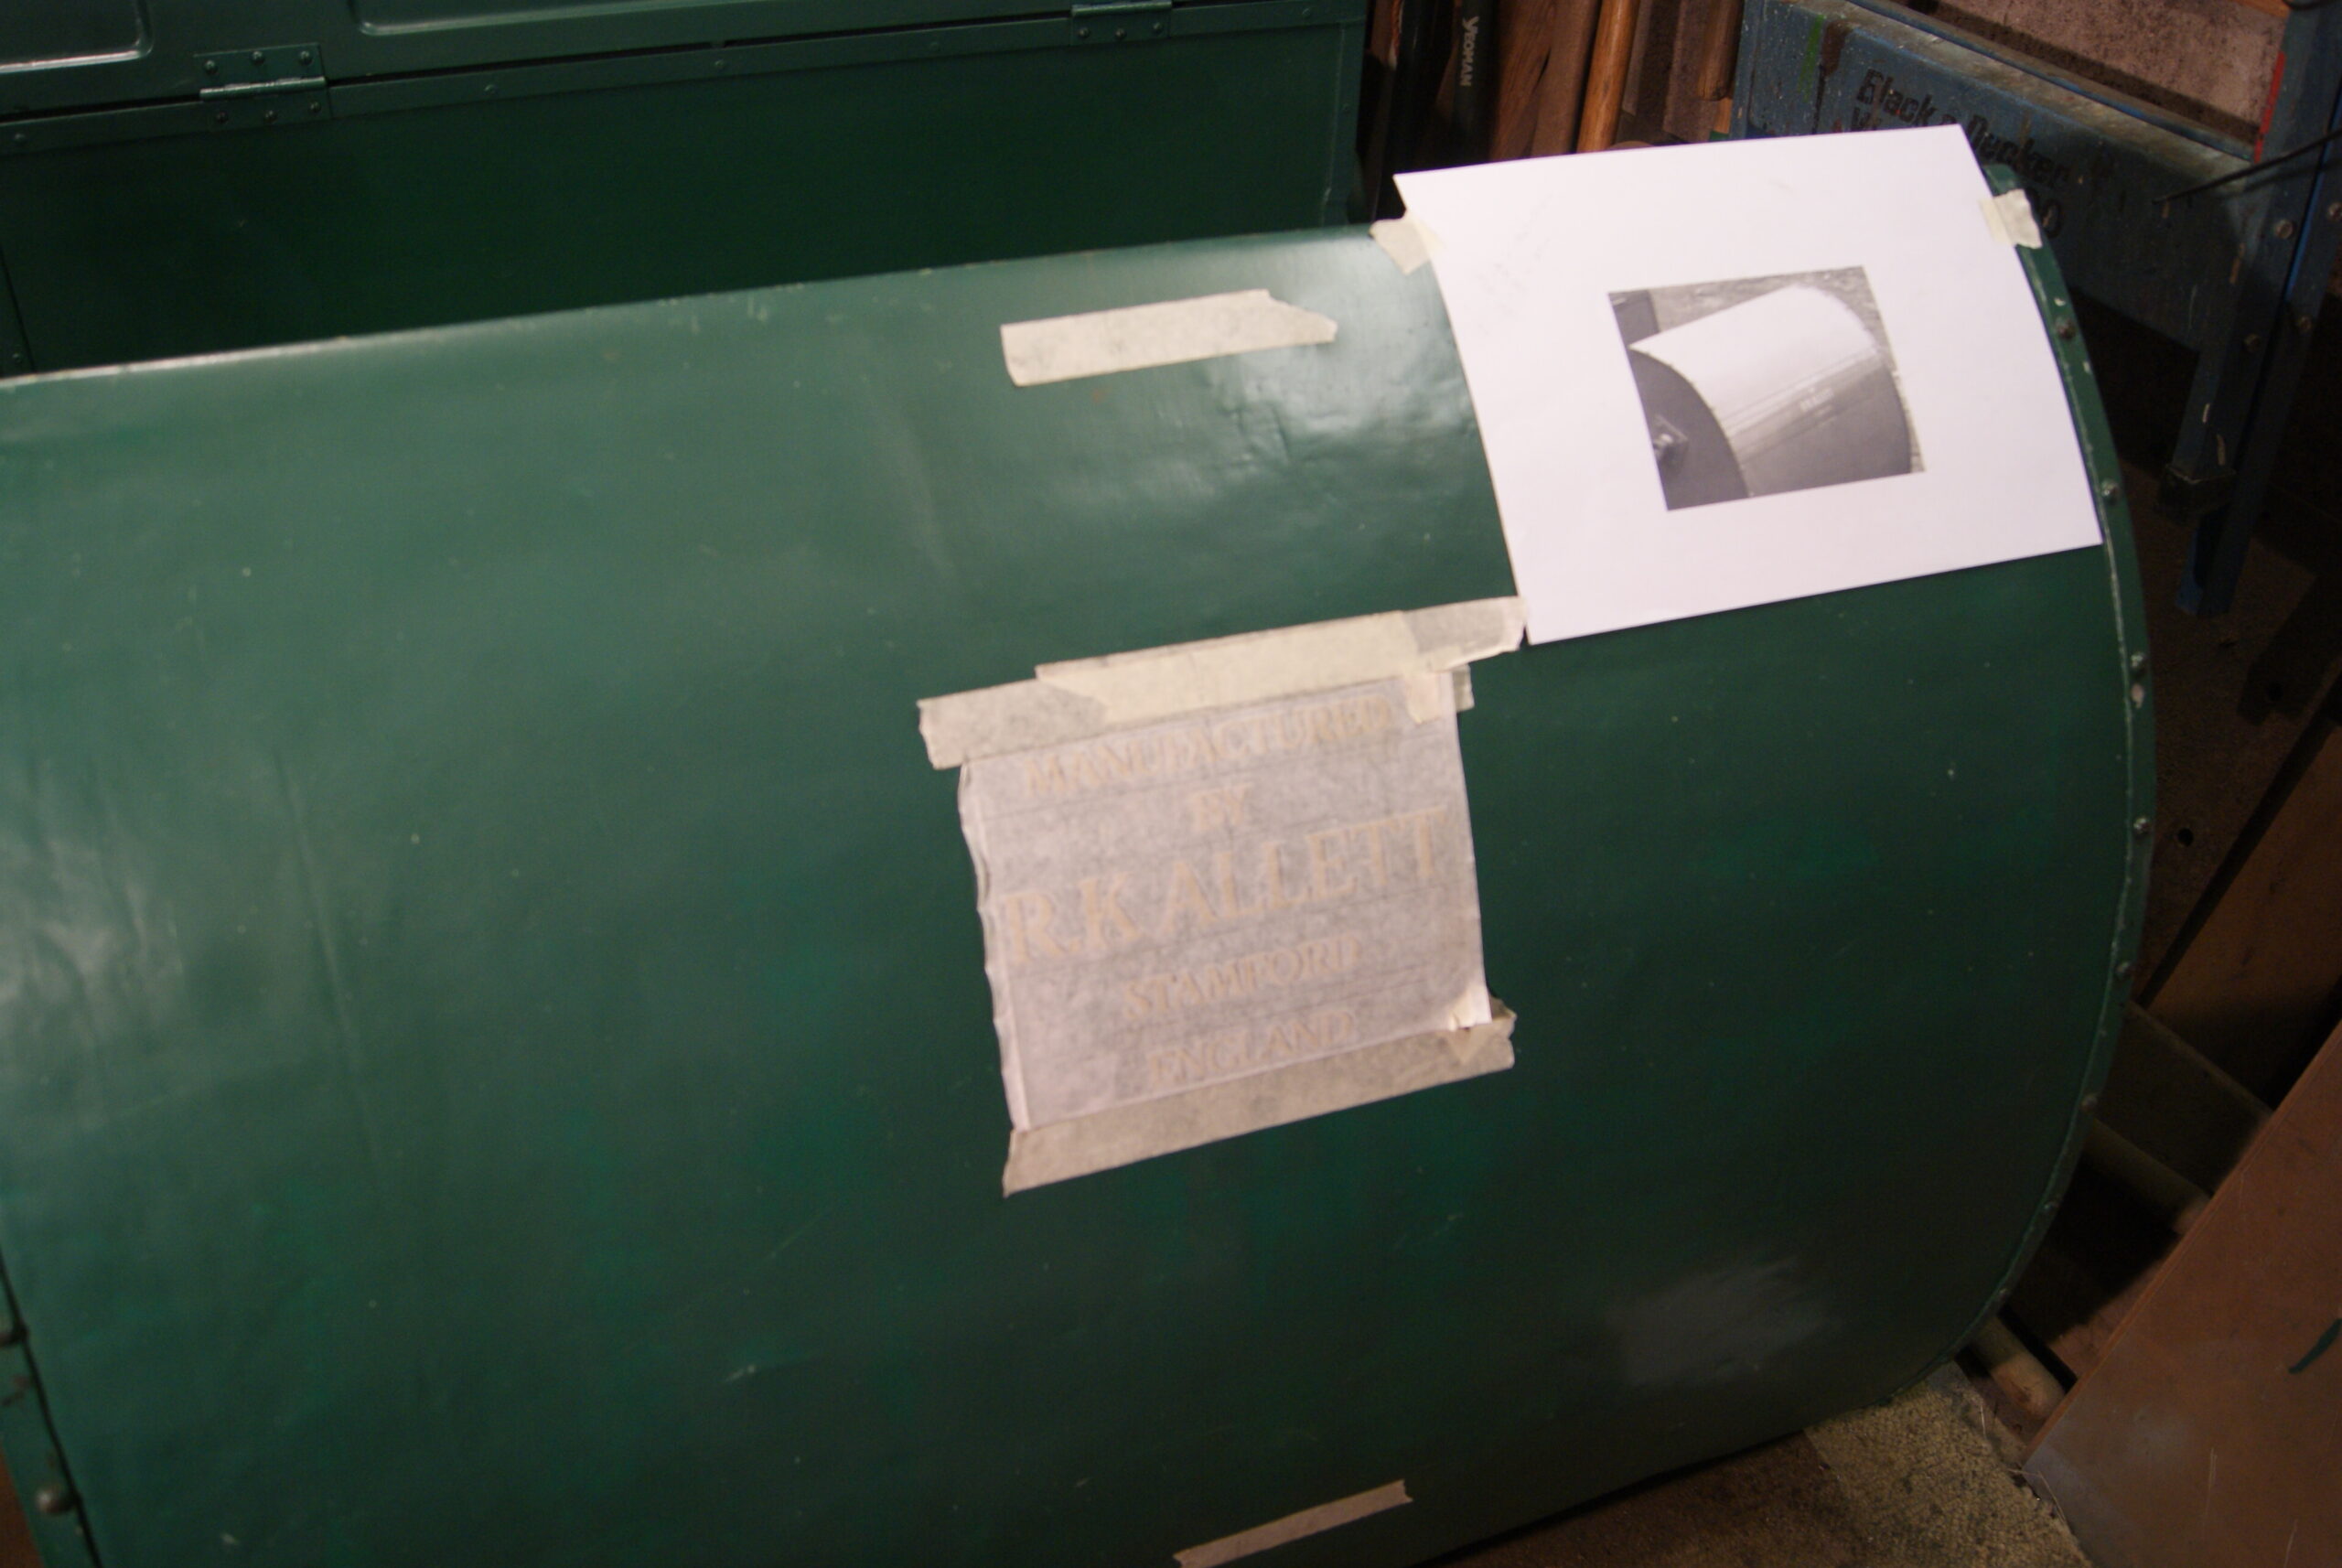
The large part of the background work was to thrash out the design of the grassbox decal; luckily Shaun Etherington at Allett Mowers did quite a lot of the preliminary work and Adam Wilson at Classic Transfers was absolutely brilliant, coming up with different ideas and schemes until we got the artwork as near to the original as we could work out from the grainy black-and-white photo. The decals arrived yesterday and I’ve been trying to work out the best way to apply them so that I keep them square to the top of the grassbox, square to the ground as well and plumb in the middle; it’s not as easy as you think especially when you’re looking at quite a bit of money if you get it wrong. Oh dear, back to the sleepless night again!
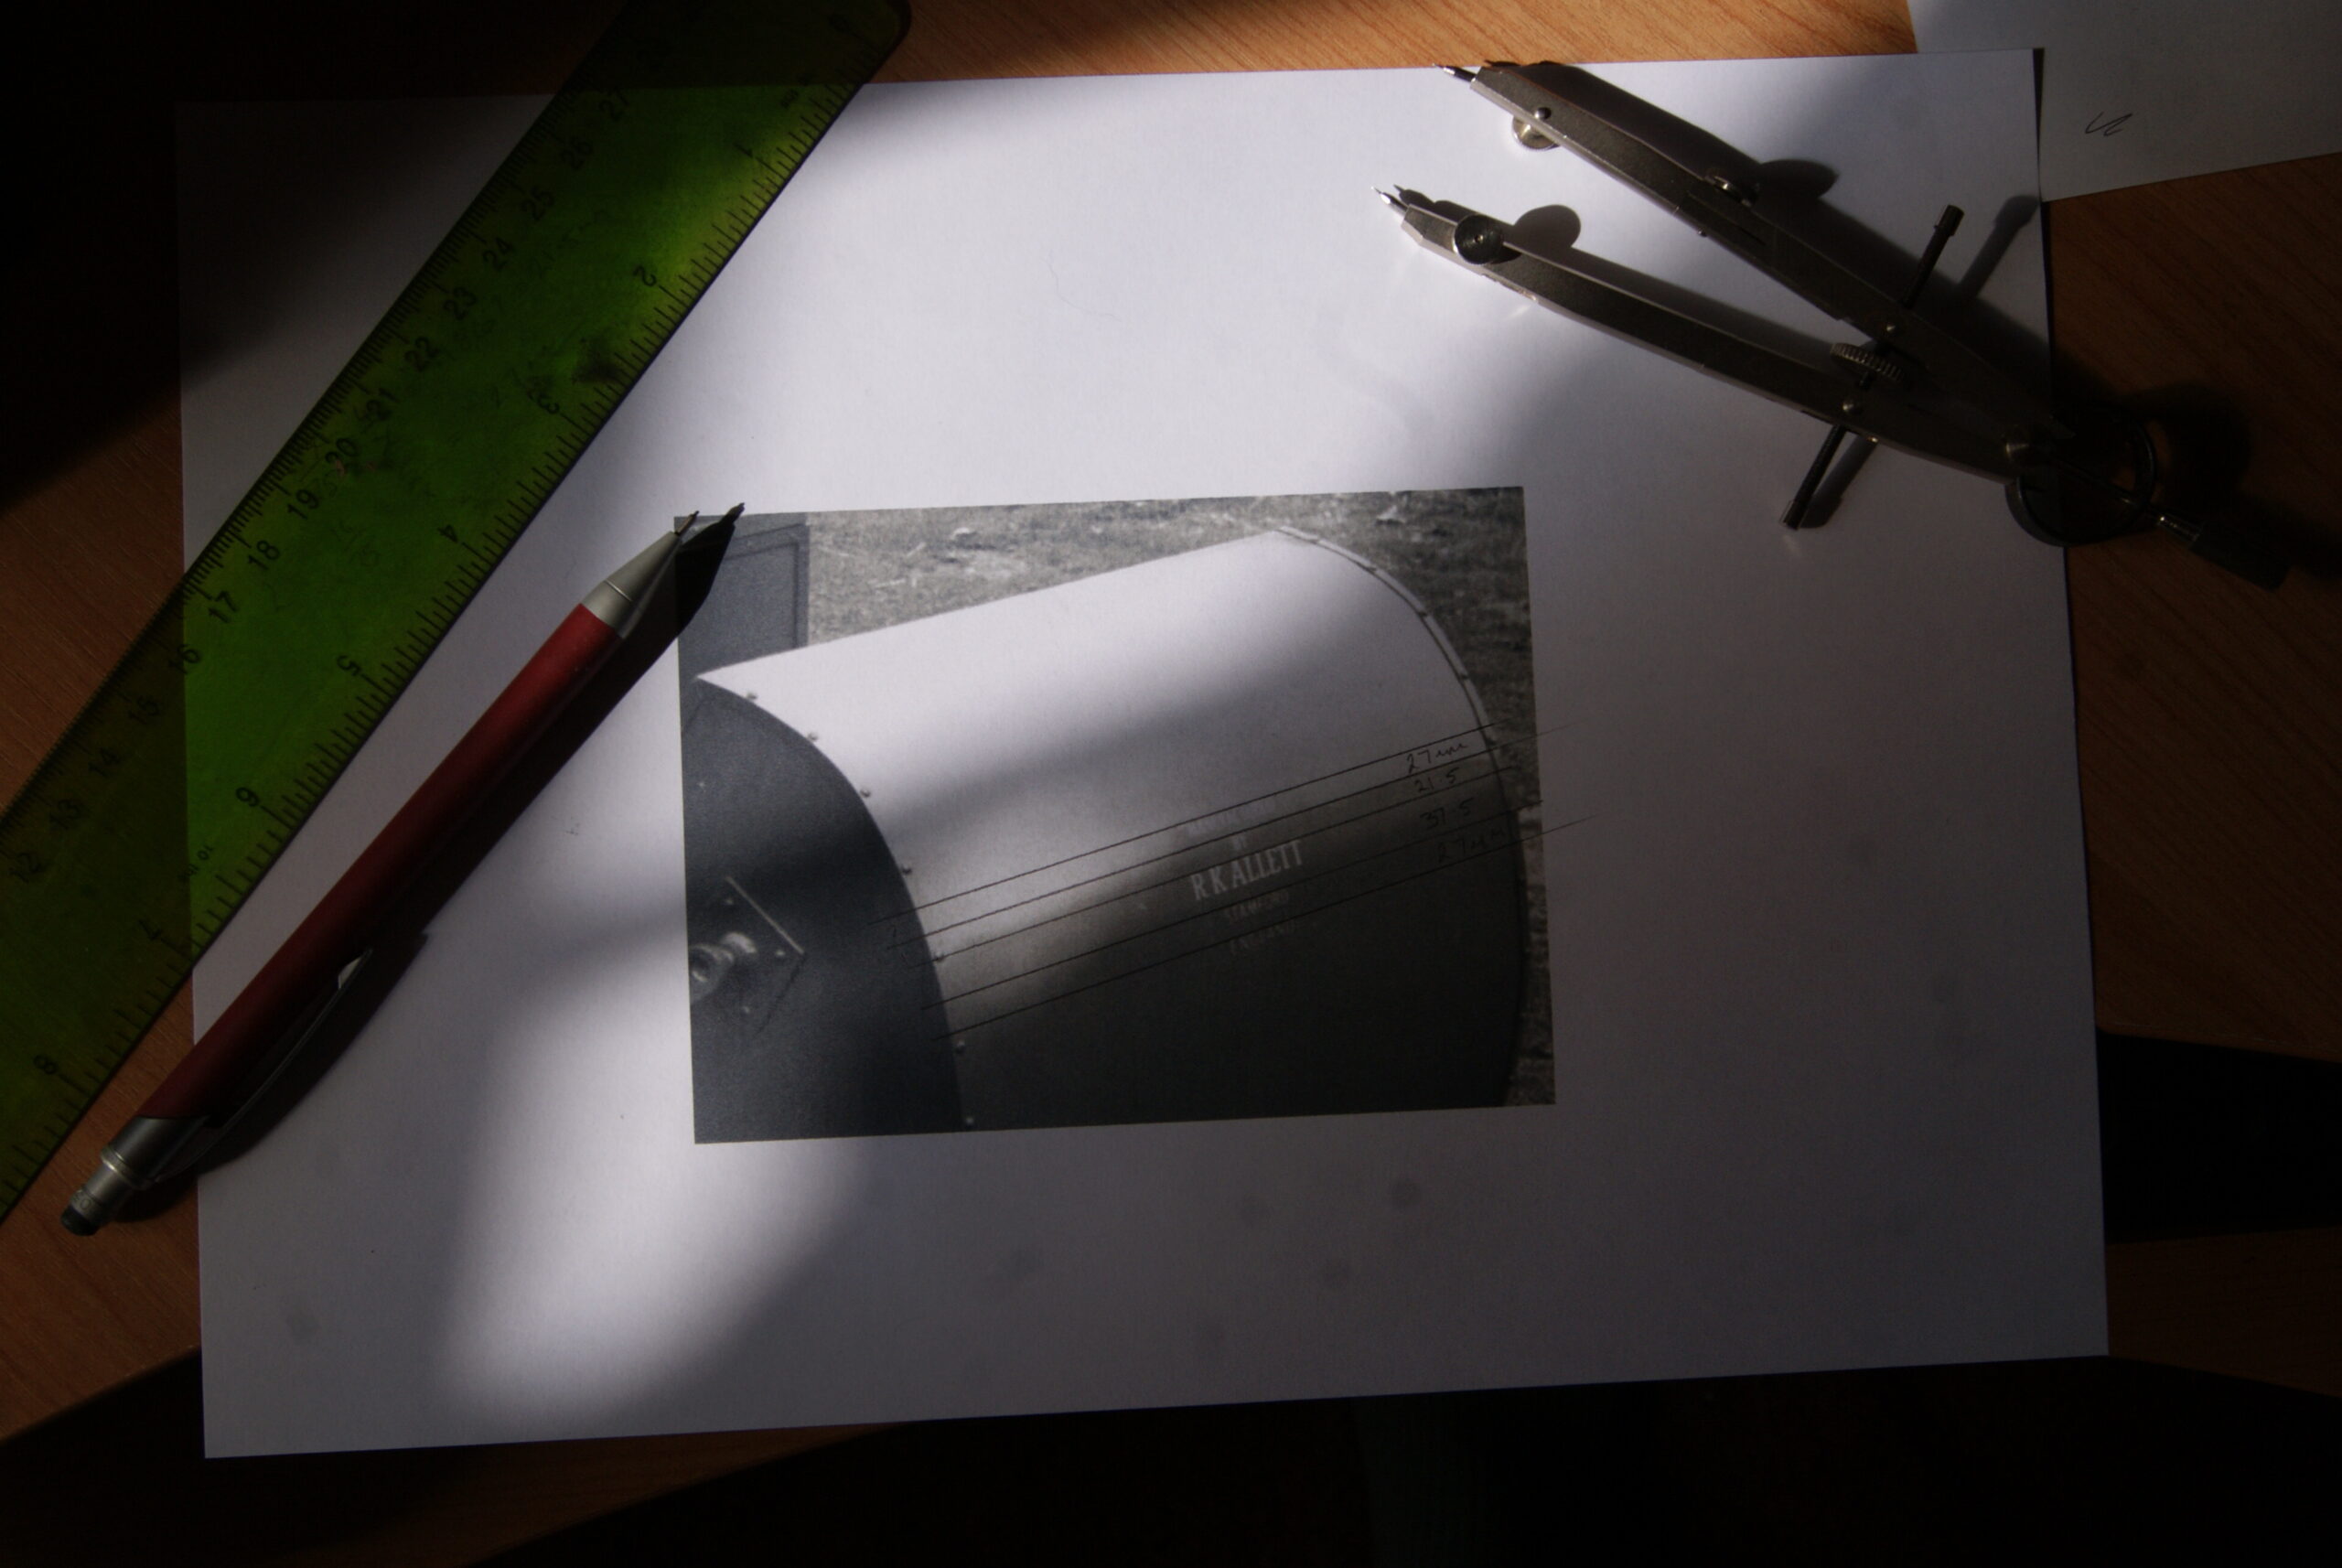
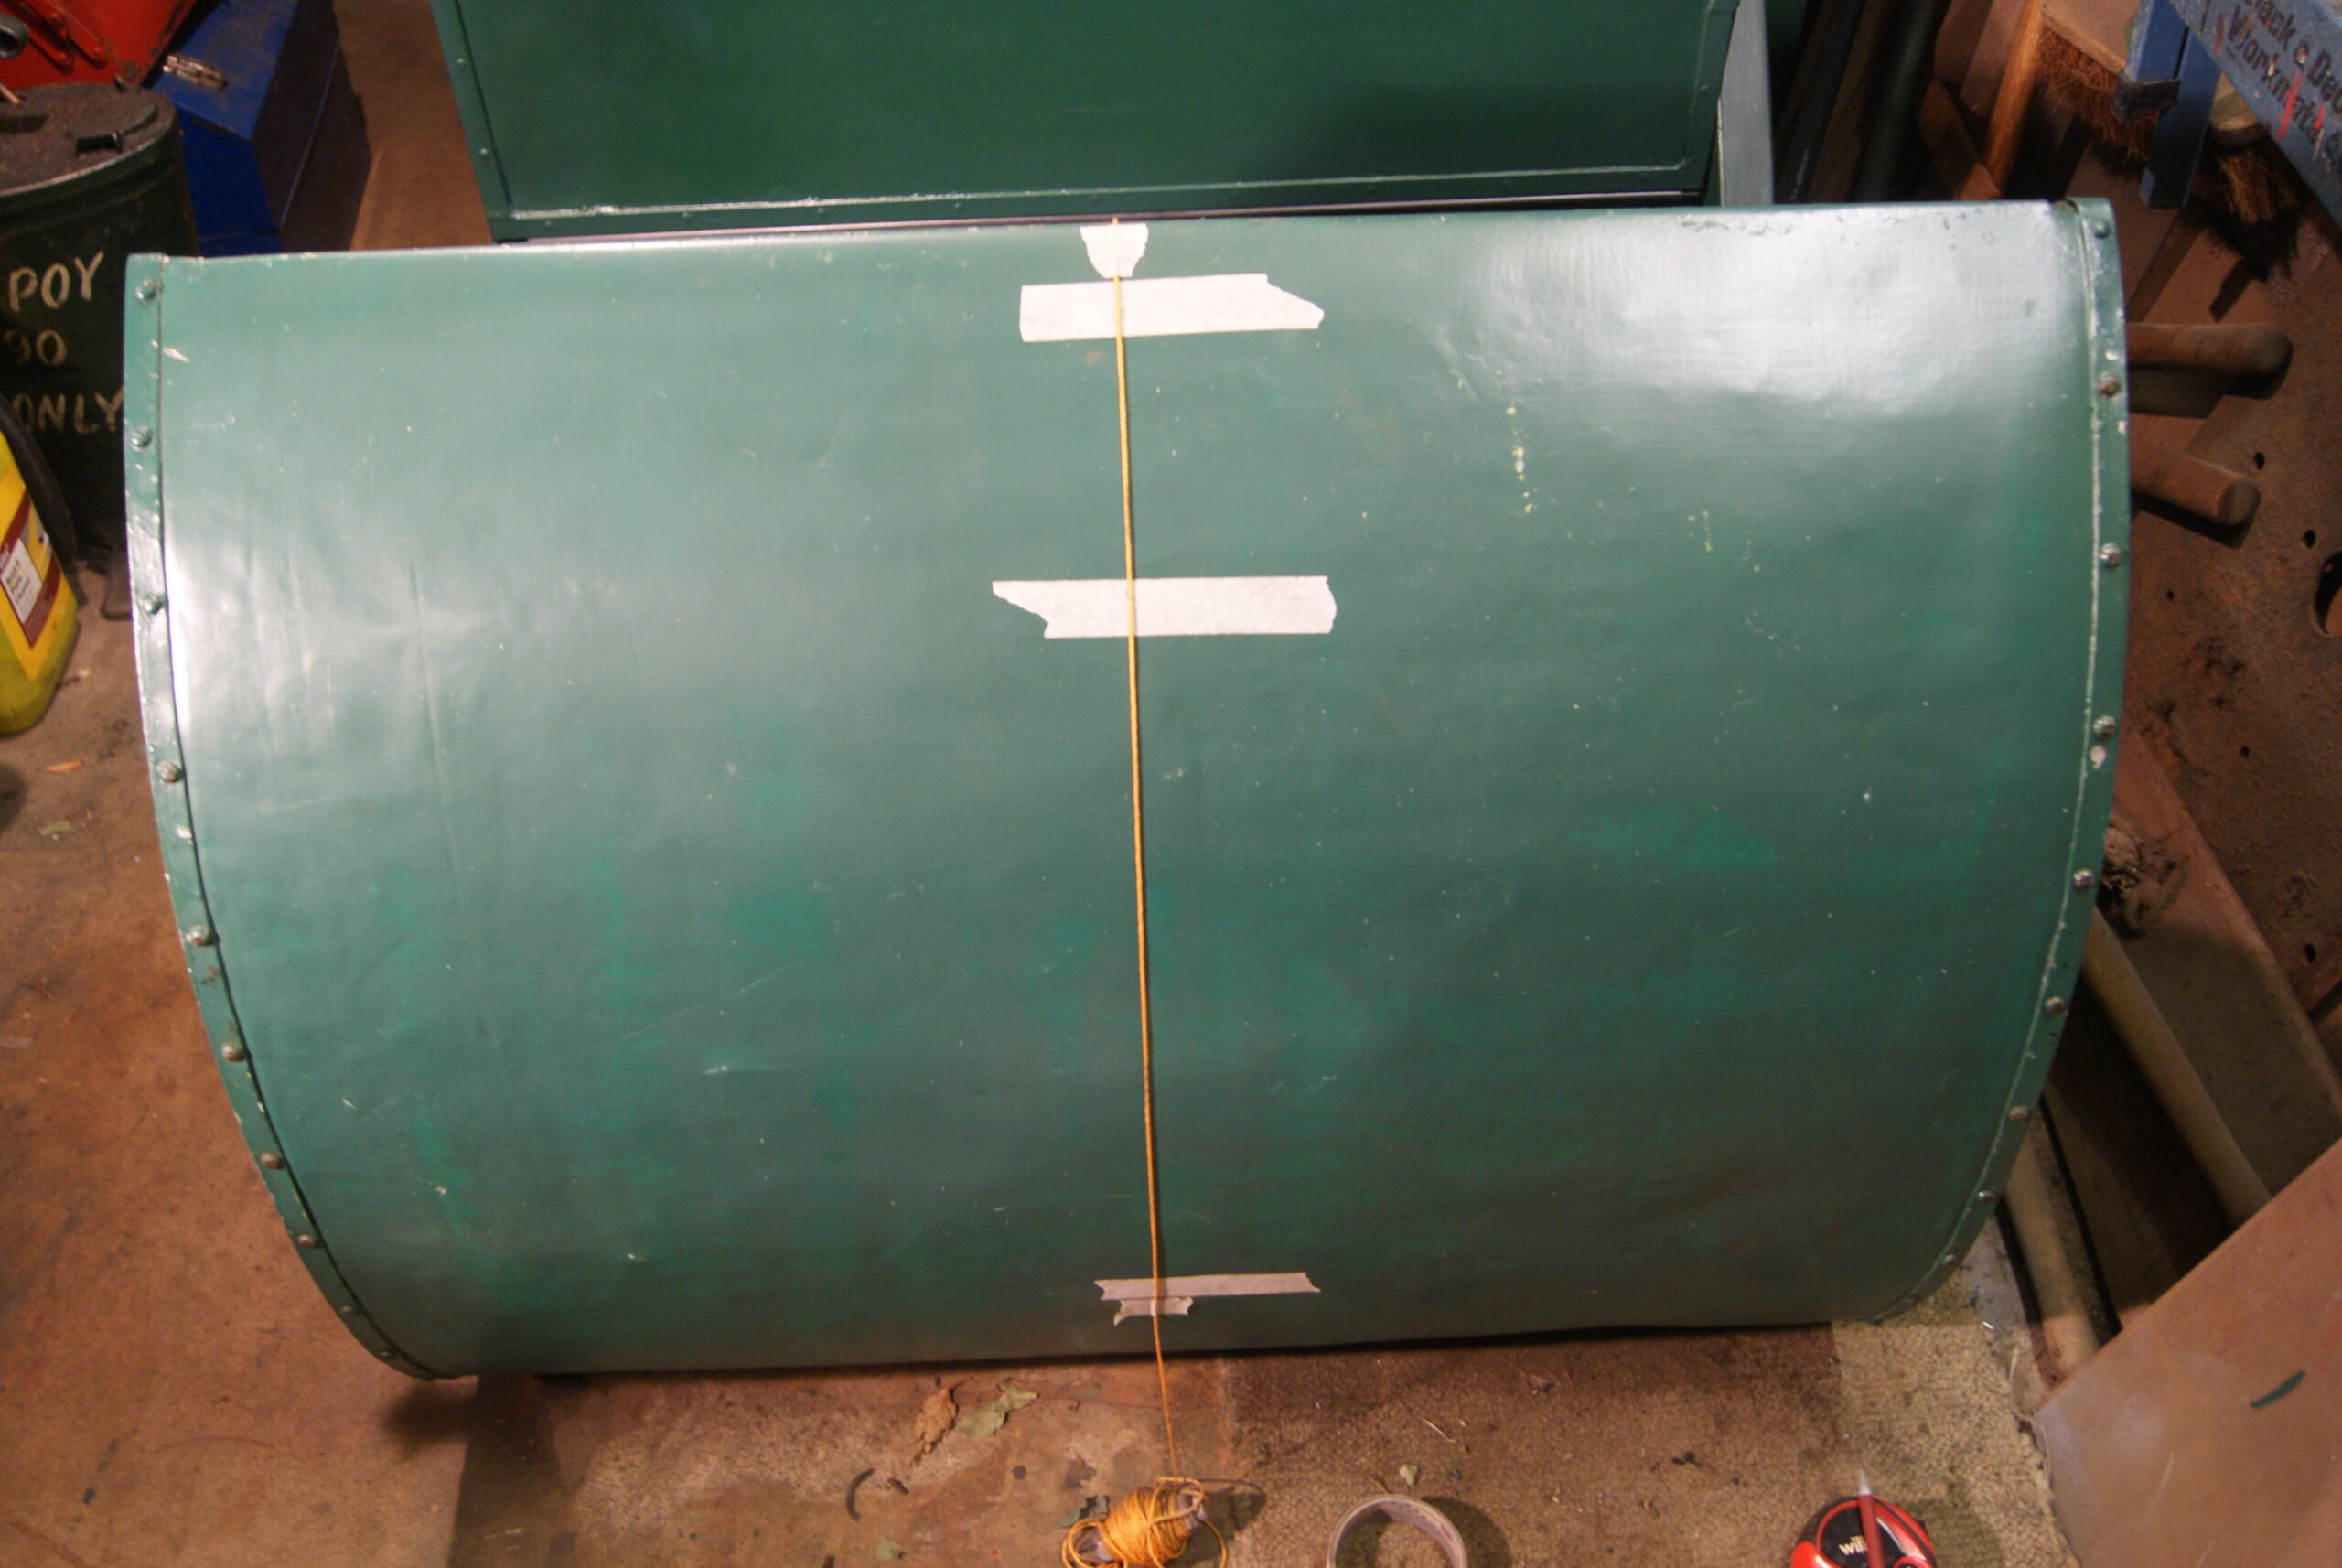
You will see from the photo’s that the first thing I decided to do was to lay down a datum line to find the middle of the grassbox; I did this with a builder’s plumb line which is basically a piece of string with a weight on the end, and I secured it to the grassbox top and bottom with masking tape. I did it this way because I didn’t want to mark the surface of the grassbox in case I couldn’t get the marks out again; next, a centre line was marked in pencil on the backing of the transfer so that I could centre the transfer under the string centre line- so far so good!
Now, how far down do we put the transfer? The original photo shows the top of the “R.K.Allett” name to be level with the fifth screw down on the right hand side, so that was where it all started to come together. One thing I did notice from the photo when I was trying to line everything up was that the grassbox is different in so many ways to the one I’m working on. The photo is of the prototype whereas the one I’m working on is the first production machine and so differences are to be expected- the top of the prototype grassbox is a lot flatter than on mine and when you look at the spacing of the woodscrews around the edge they are spaced at 3″ centres, but they don’t start in the same place at the top. This means that if you draw a straight line across the front of the grassbox between opposite screw heads the line is not parallel to the lettering so I had to take the screw heads on one side and use a square to project a line across. Once that was fixed I then used masking tape to mark the position of the decal, took a deep breath and started to apply it.
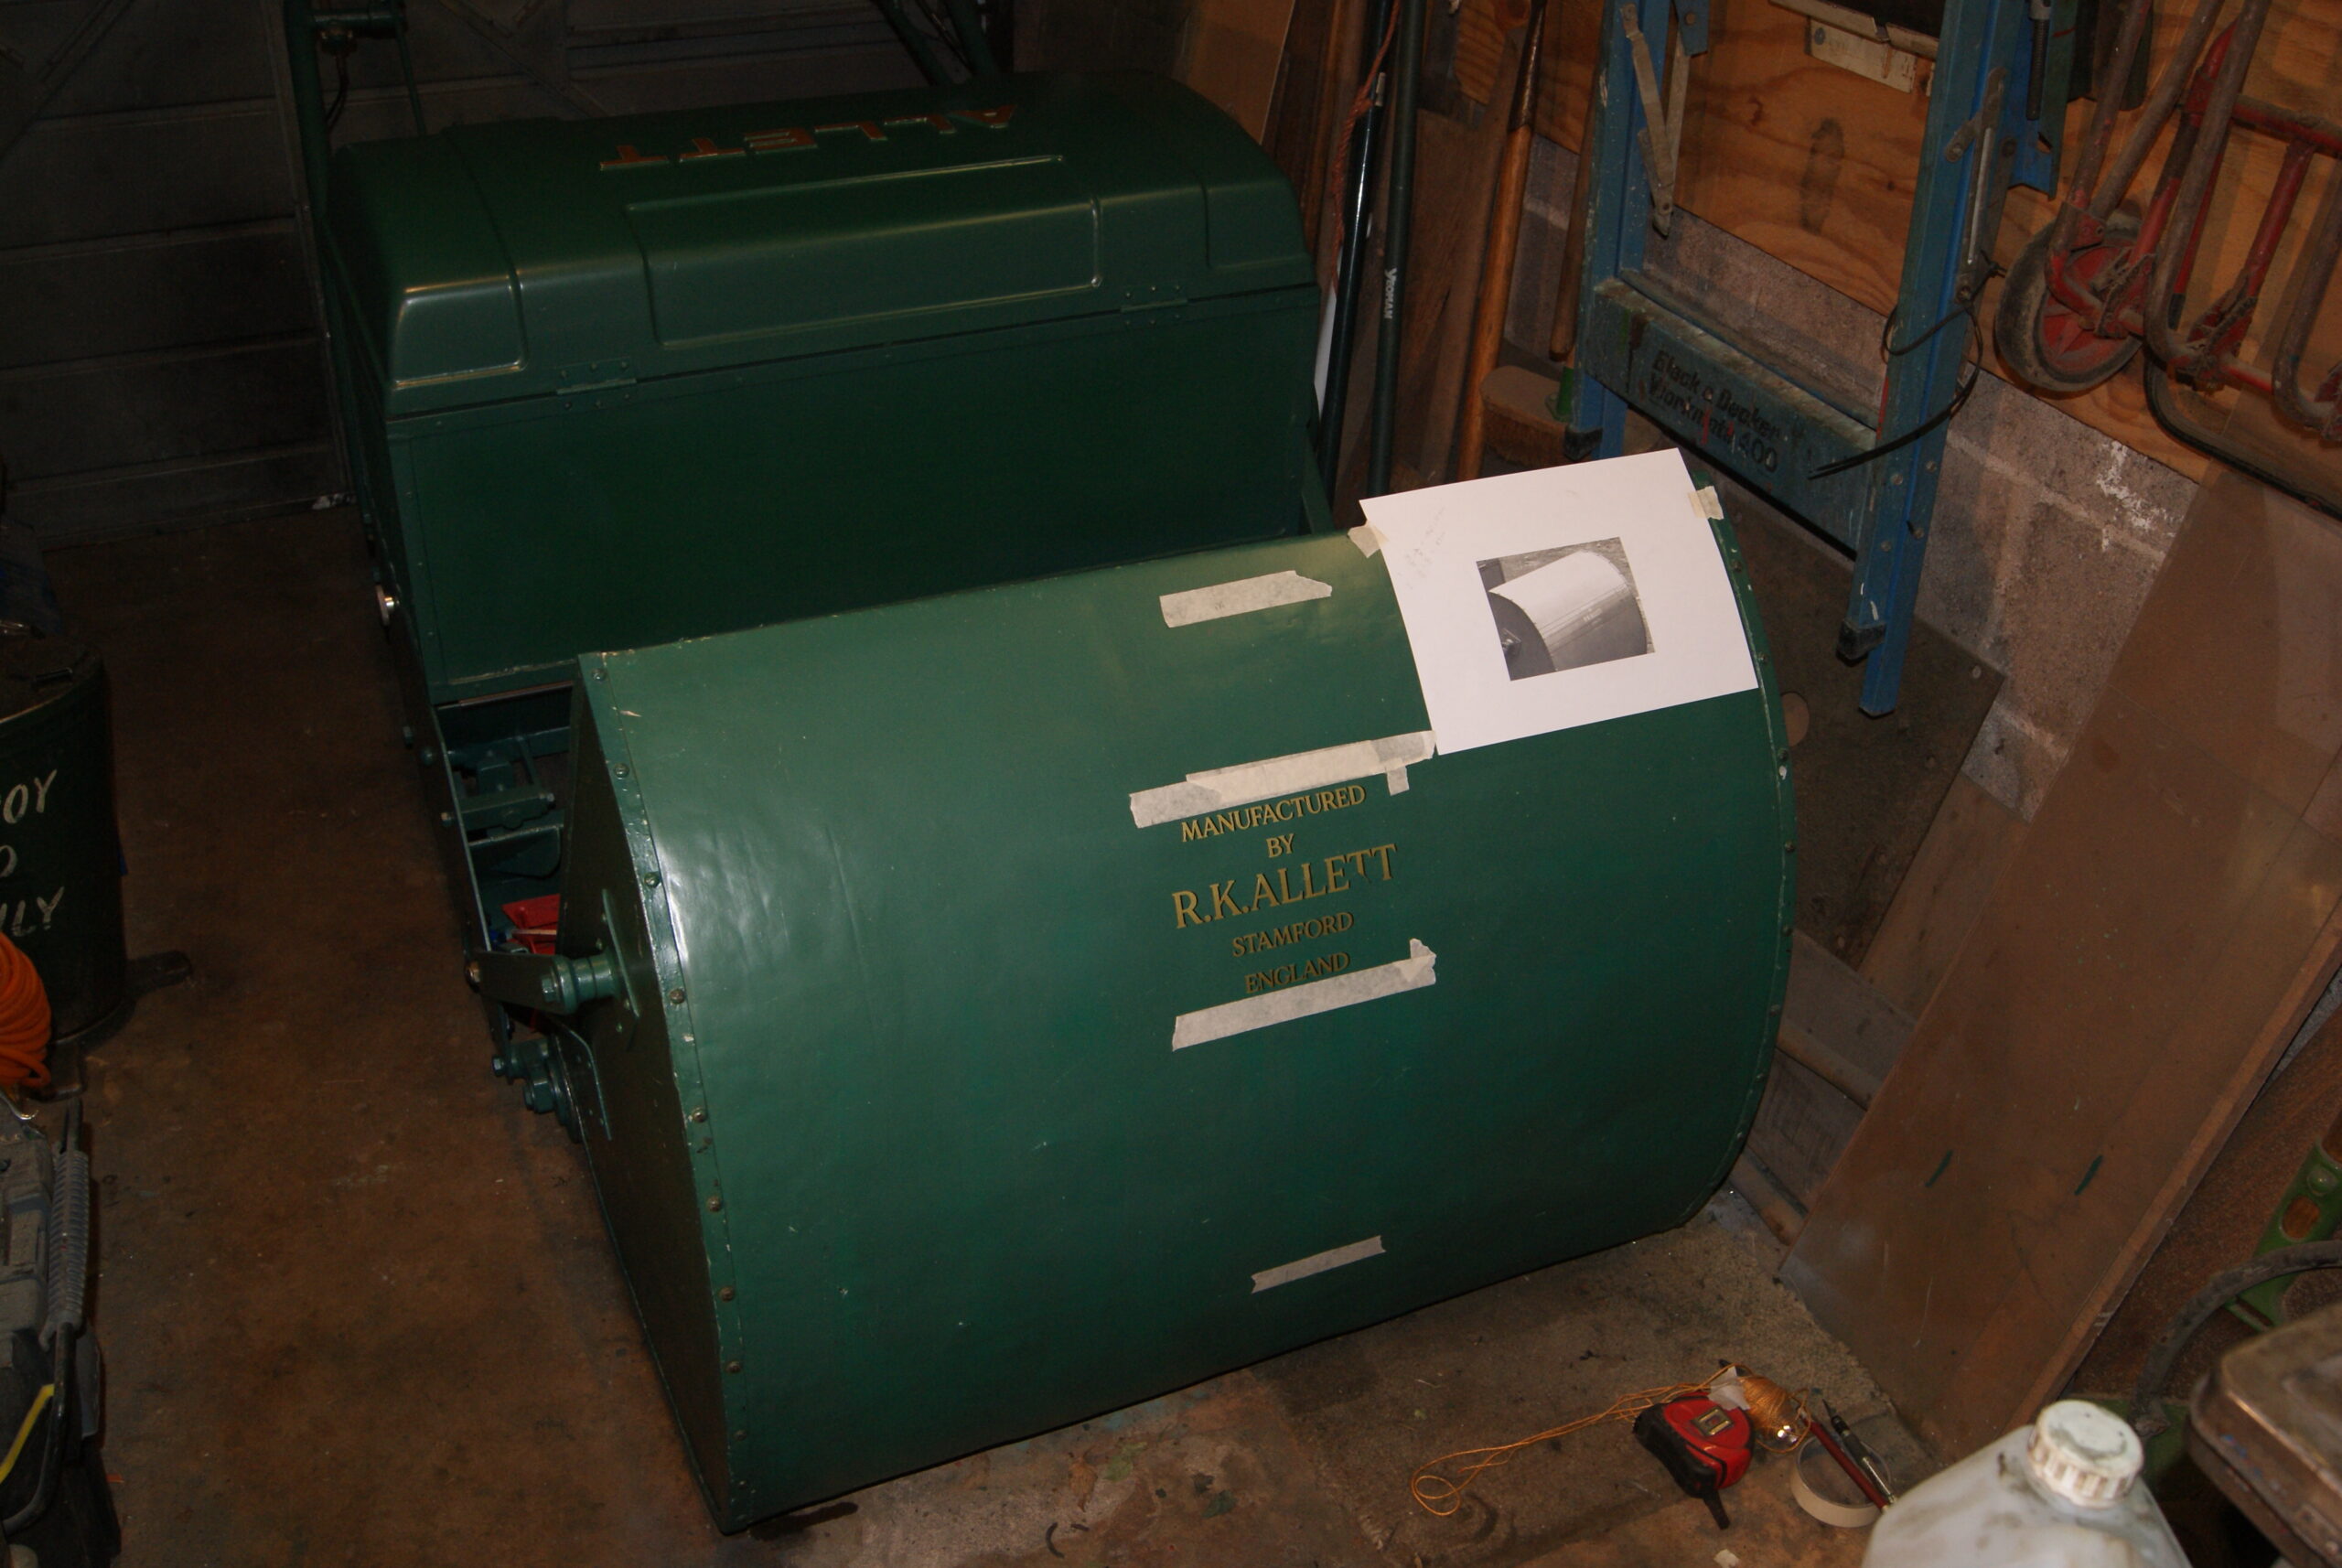
I don’t want to have to do that again! It came out perfectly lined up but my heart skipped quite a few beats before I was finished!
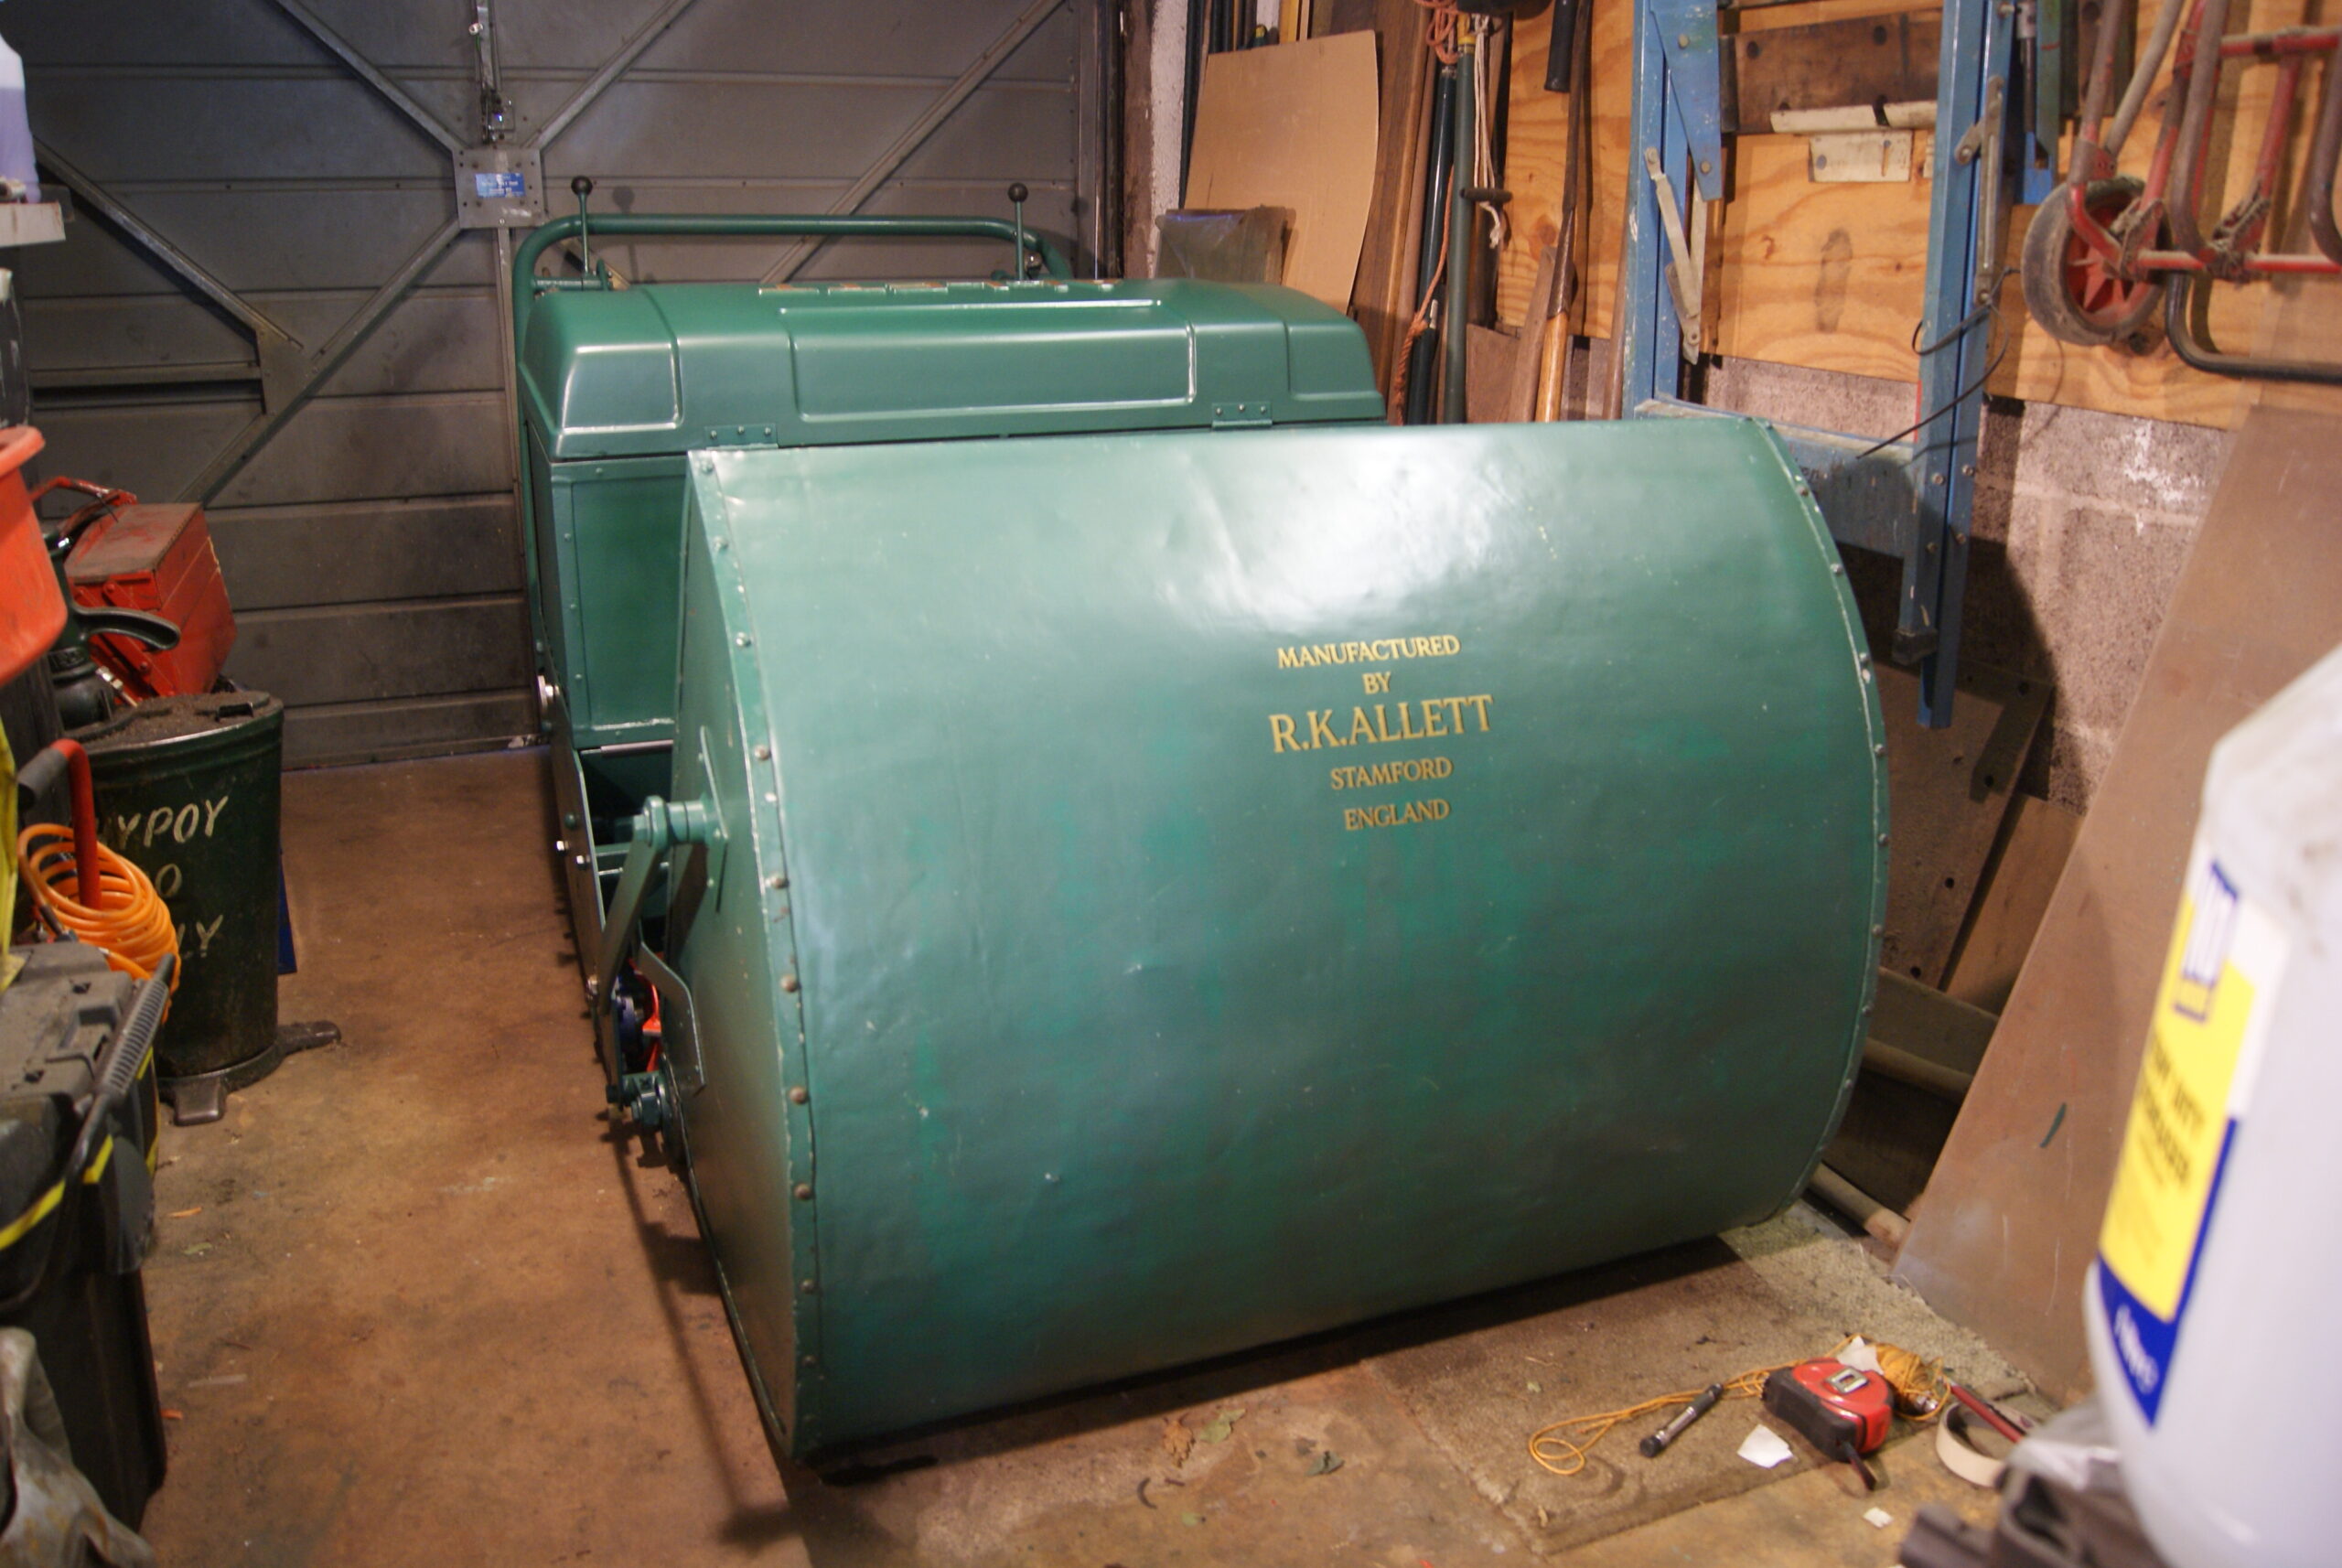
……..and on that note, I think the job’s finished! It’s been a happy distraction from restoring Trusty machinery and took me back to my mechanicking days working on Ransomes machinery. I can now see why so many clubs bought an Allett when I used to struggle to sell the Mastiff against it; it’s in a totally different league.
I would like to thank everyone on this forum- and at the factory- for the help given to me to bring this project to a conclusion. I hope they like it back at Hixon! If they don’t I can always find a place in my vintage collection for it!
Now, what am I going to do next?
Attachments:
August 23, 2022 at 11:40 am #39810trusty220KeymasterQuite right, Angus. I think I must have had a brainstorm when I wrote it!
Most of the proprietary products that you can buy from places like Jewsons are already diluted and do not need any further dilution. The stronger the better when de-rusting things and you can pour it back into the container to re-use a few times. Eventually it does lose it’s strength and you have to throw it away but please follow Angus’s advice when handling it, it can cause irritation to skin and eyes if splashed on exposed parts.
August 22, 2022 at 11:07 am #39798trusty220KeymasterYou are quite right, it’s the Bicarbonate of Soda that you use in cooking. It neutralises the acid after the pickling process- if you don’t neutralise the acid the metal will rust very quickly once it’s exposed to the moisture in the air.
Works every time for me but it gets expensive if you have a large item. That’s when I use electrolysis or the bonfire!
-
AuthorPosts