Home › Forums › Groundcare Machinery › Grass Cutting Machinery › Ransomes motor triple mk 4 brakes seized
- This topic has 20 replies, 3 voices, and was last updated 3 years, 10 months ago by
 wristpin.
-
AuthorPosts
-
August 1, 2022 at 7:24 am #39575
disco2
ParticipantHi I’m Will I have just joined this forum so I apologise if I’m going about this in the wrong way. I have recently become the proud owner of a mk4 Ransomes motor triple. I look after a 7acre estate and plan to use the mower to keep on top of the grass. I have fond memories of watching the council mowing the housing estate I lived in with a petrol motor triple and now I have one. I have a problem with the brakes which have seized I have freed some of the linkages but the calipers are seized. It’s difficult to see how they come apart so I am hoping there is someone who can help. They are a disc brake but rod operated.
Any help would be greatly appreciated
Best wishes WilliamAugust 1, 2022 at 7:51 am #39576 trusty220Keymaster
They do come apart very simply but you will have to remove them from the machine first. There are two calipers for each wheel- one does the foot brake whilst the other does the handbrake- both need to work for safety reasons.
Removal is simply done after you remove the road wheel then the cast iron cover over the top of the calipers. Disconnect the operating rods and then you can loosen and remove the two bolts holding them to the axle; from memory they are 3/4″ AF spanner size or 19mm if you’re younger than me!
Now is when the fun starts. If they’ve been left for some time the inner sliding portions will no doubt be rusted into their outer sleeves and so the best way to approach it is to remove the brake pads through the slot that the disc fits into; it helps to remove the large adjusting bolt on one side, then you can insert a pin punch down the hole to tap the back of the one brake pad to get it to move. The next stage will be to give them a good long soak in a penetrating fluid, then mount the caliper in a vice and keep tapping the inner slide backwards and forwards until it comes out. You may have to use progressively bigger hammers to start the inner slide moving, but be careful as the slide locates in a key in the outer sleeve- the slide will only come out on the side of the actuating arm, so hit the side with the adjuster bolt in. We always used to leave the bolt in the hole to stop any distortion of the metal if you have to use excessive force.
It reminds me of one of Charlie’s sayings- “Don’t force it, get a bigger hammer!”
On re-assembly use grease on the inner metal to metal surfaces to stop it happening again. Calipers used to seize up regularly in service as the metal heats up and the grease melts, so keep them lubricated on a regular basis but don’t put too much grease on or it gets on the friction surfaces.
August 1, 2022 at 9:27 pm #39593ParticipantHi it’s Will thanks for the quick reply and taking the time to give such a detailed explanation I will have a look tomorrow. I need to free off the reel adjusters as well it’s been standing for several years. A bit of heat a penetrating fluid worked well on 2 of them already. This one has the Kubota diesel engine . I might have to change the engine to first pulley belt as it’s fully adjusted but still slips in 2nd transport speed. Do you happen to know the belt details or where I can find one in Essex?
Thanks for your help and advice
Best wishes William.August 2, 2022 at 11:22 am #39597trusty220KeymasterWe used to change them as a pair when the need arose, but just in case the part numbers you may need are:-
Engine to Variator Belt = MBA4471
Variator to Gearbox Belt= MBA4472Before you go to the trouble and expense to replace the belt have you tried to adjust it? The recommended way to adjust the belts is to start the engine up, then with the gear stick in neutral rev the engine so that the belts spin. With the belts spinning away happily move the Transport Lever so that it’s midway between top and bottom- there’s no corresponding hole for the peg to sit in so you’ll just have to judge it by eye.
Stop the engine, engage parking brake and get off the machine. Remove the fibreglass safety guard and check the position of the belts in the variator pulley- if they are adjusted correctly they should be sitting at the same depth on each side of the pulley. If they are badly adjusted you will find that one is deeper than the other and you must move the engine backwards or forwards to correct that situation. The engine is fixed to the chassis with four big bolts- slacken them off ( a lot, not just a bit) then go to the adjuster bolt on the front left hand side of the engine. Moving the engine forward increases tension on the engine drive belt and it will consequently sink deeper into it’s side of the variator pulley when the engine revs up again; moving the engine backwards will decrease tension on the engine belt and it will climb up the pulley sheaves.
Obviously you will need to start the engine after each adjustment so that you can check what effect it’s had on the belts. Be extremely cautious of the moving parts and replace the safety guard before attempting to start the engine. Even if you replace the belt or belts you will need to follow this procedure to set them up; the adjuster on the centre bolt of the variator pulley is only there to tension both belts evenly once you’ve balanced the tensions properly by moving the engine.
It sounds complicated but it’s really quite a simple operation. Above all, use plenty of common sense and don’t forget to replace safety guards before starting the engine; there are loads of moving parts under there and any one can snag loose clothing, so be extremely careful.
August 2, 2022 at 11:24 am #39598trusty220KeymasterOh, I forgot, your best contact for finding parts will be Ernest Doe Ltd., your local Ransomes agent.
August 4, 2022 at 11:48 am #39637ParticipantHi it’s Will thanks that’s great I have replaced the long belt and was lead to believe that the other one had been recently replaced but the engine is a far forward as it will go and it still slips in high transport speed.I wonder if its the wrong belt. I might replace it with a new one as per your numbers. I was planning on working on it on Tuesday but there was a fire in the field behind my house and we had to be evacuated . Everything is fine so will have a look another day.
Best wishes WilliamAugust 21, 2022 at 7:55 pm #39785ParticipantHi it’s Will I have managed to remove one of the calipers today and can now see how it all works. The plunger are well and truly stuck I wondered about using some heat on the caliper but it is iron so I’m thinking probably not. I have been successful in removing lister d flywheels using a propane torch and gradually heating it all up but this feels a bit risky I don’t want to crack or distort the caliper. I wondered what your thoughts are. It’s soaking in penetrating fluid for a week now so it might free up anyway.
Thanks for your help and advice
Best wishes WilliamAugust 21, 2022 at 8:19 pm #39786trusty220KeymasterIt sounds like the rust has taken hold. On machines that had been laid up for a while we used to have to knock the slide backwards and forwards in the housing, each time getting a little bit more movement until the slide came free. Have you removed the brake pads? If not you may find they are binding inside the housing.
Assuming you’ve removed the pads and the slide still won’t move I would try a couple of things. In these situations I tend to soak the assembly in Brick and Patio Cleaner; this is a weak Sulphuric Acid but it does get the rust moving. The downside to this is that it needs to be handled carefully so you don’t get it on your skin, it gives off hydrogen gas so you need to do it in a well ventilated area and you need to neutralise the acid by soaking in Bicarbonate of Soda afterwards. Despite these precautions I find it very useful and still use the method for de-rusting iron and steel items.
As an alternative you could always light a bonfire and put the assembly in the middle of it. I’ve used this method for large items that would use too much acid; an old oil drum filled with pallet wood usually does the trick. The aim is to heat the whole assembly to an even temperature so that the moisture in the rust is evaporated; the rust is converted to dust and the caliper will come apart easily once it’s cooled down but you must ensure that the whole assembly is heated to a cherry red otherwise you’re wasting your time. The even temperature throughout the metal prevents any distortion, something that you can’t achieve with a blow torch, and leave the caliper to cool down gradually overnight before trying to dismantle it. Plenty of oil is also a good idea.
I found penetrating oil is not much use on these parts as the rust tends to be very deep-seated and there is a great deal of surface area inside the caliper for the rust to take a hold of.
I hope one of these methods will work for you. If all else fails I’ve found that they will put up with quite a bit of hammering!
August 22, 2022 at 7:54 am #39796ParticipantHi it’s Will thanks for getting back to me I never thought of using brick cleaner before and funny thing is I have a friend who has about 1000ltrs of the stuff. Yes the pads are out but I don’t think the assembly has moved in years the previous owner said he never used the brakes. When you say bicarbonate of soda do you mean the stuff you use in baking or am I confusing it with something else? Sorry if that a stupid question.
Thanks for your help and advice
Best wishes WilliamAugust 22, 2022 at 11:07 am #39798trusty220KeymasterYou are quite right, it’s the Bicarbonate of Soda that you use in cooking. It neutralises the acid after the pickling process- if you don’t neutralise the acid the metal will rust very quickly once it’s exposed to the moisture in the air.
Works every time for me but it gets expensive if you have a large item. That’s when I use electrolysis or the bonfire!
August 22, 2022 at 10:29 pm #39807 wristpinParticipant
Brick and Patio Cleaner; this is a weak Sulphuric Acid
Most of the proprietary brick cleaning products are Hydrochloric acid based, not Sulphuric. It should be noted that when diluting any acid it should be added to the water and not water to the product. Long gloves, full face protection, and do it out side in the fresh air!
August 23, 2022 at 11:40 am #39810trusty220KeymasterQuite right, Angus. I think I must have had a brainstorm when I wrote it!
Most of the proprietary products that you can buy from places like Jewsons are already diluted and do not need any further dilution. The stronger the better when de-rusting things and you can pour it back into the container to re-use a few times. Eventually it does lose it’s strength and you have to throw it away but please follow Angus’s advice when handling it, it can cause irritation to skin and eyes if splashed on exposed parts.
August 29, 2022 at 6:48 am #39867ParticipantHi it’s Will thanks for the advice on the brick cleaner I gave one assembly a good cook in a fire yesterday so fingers crossed I might be able to start a course of hammer treatment later. I just wanted to clarify does both of the round under parts come out (adjuster bolt side and lever side ) and do they both come out on the lever side. I can’t get my head around how they actually work I can’t find any parts diagram for them. I’m sure once apart it will be obvious.
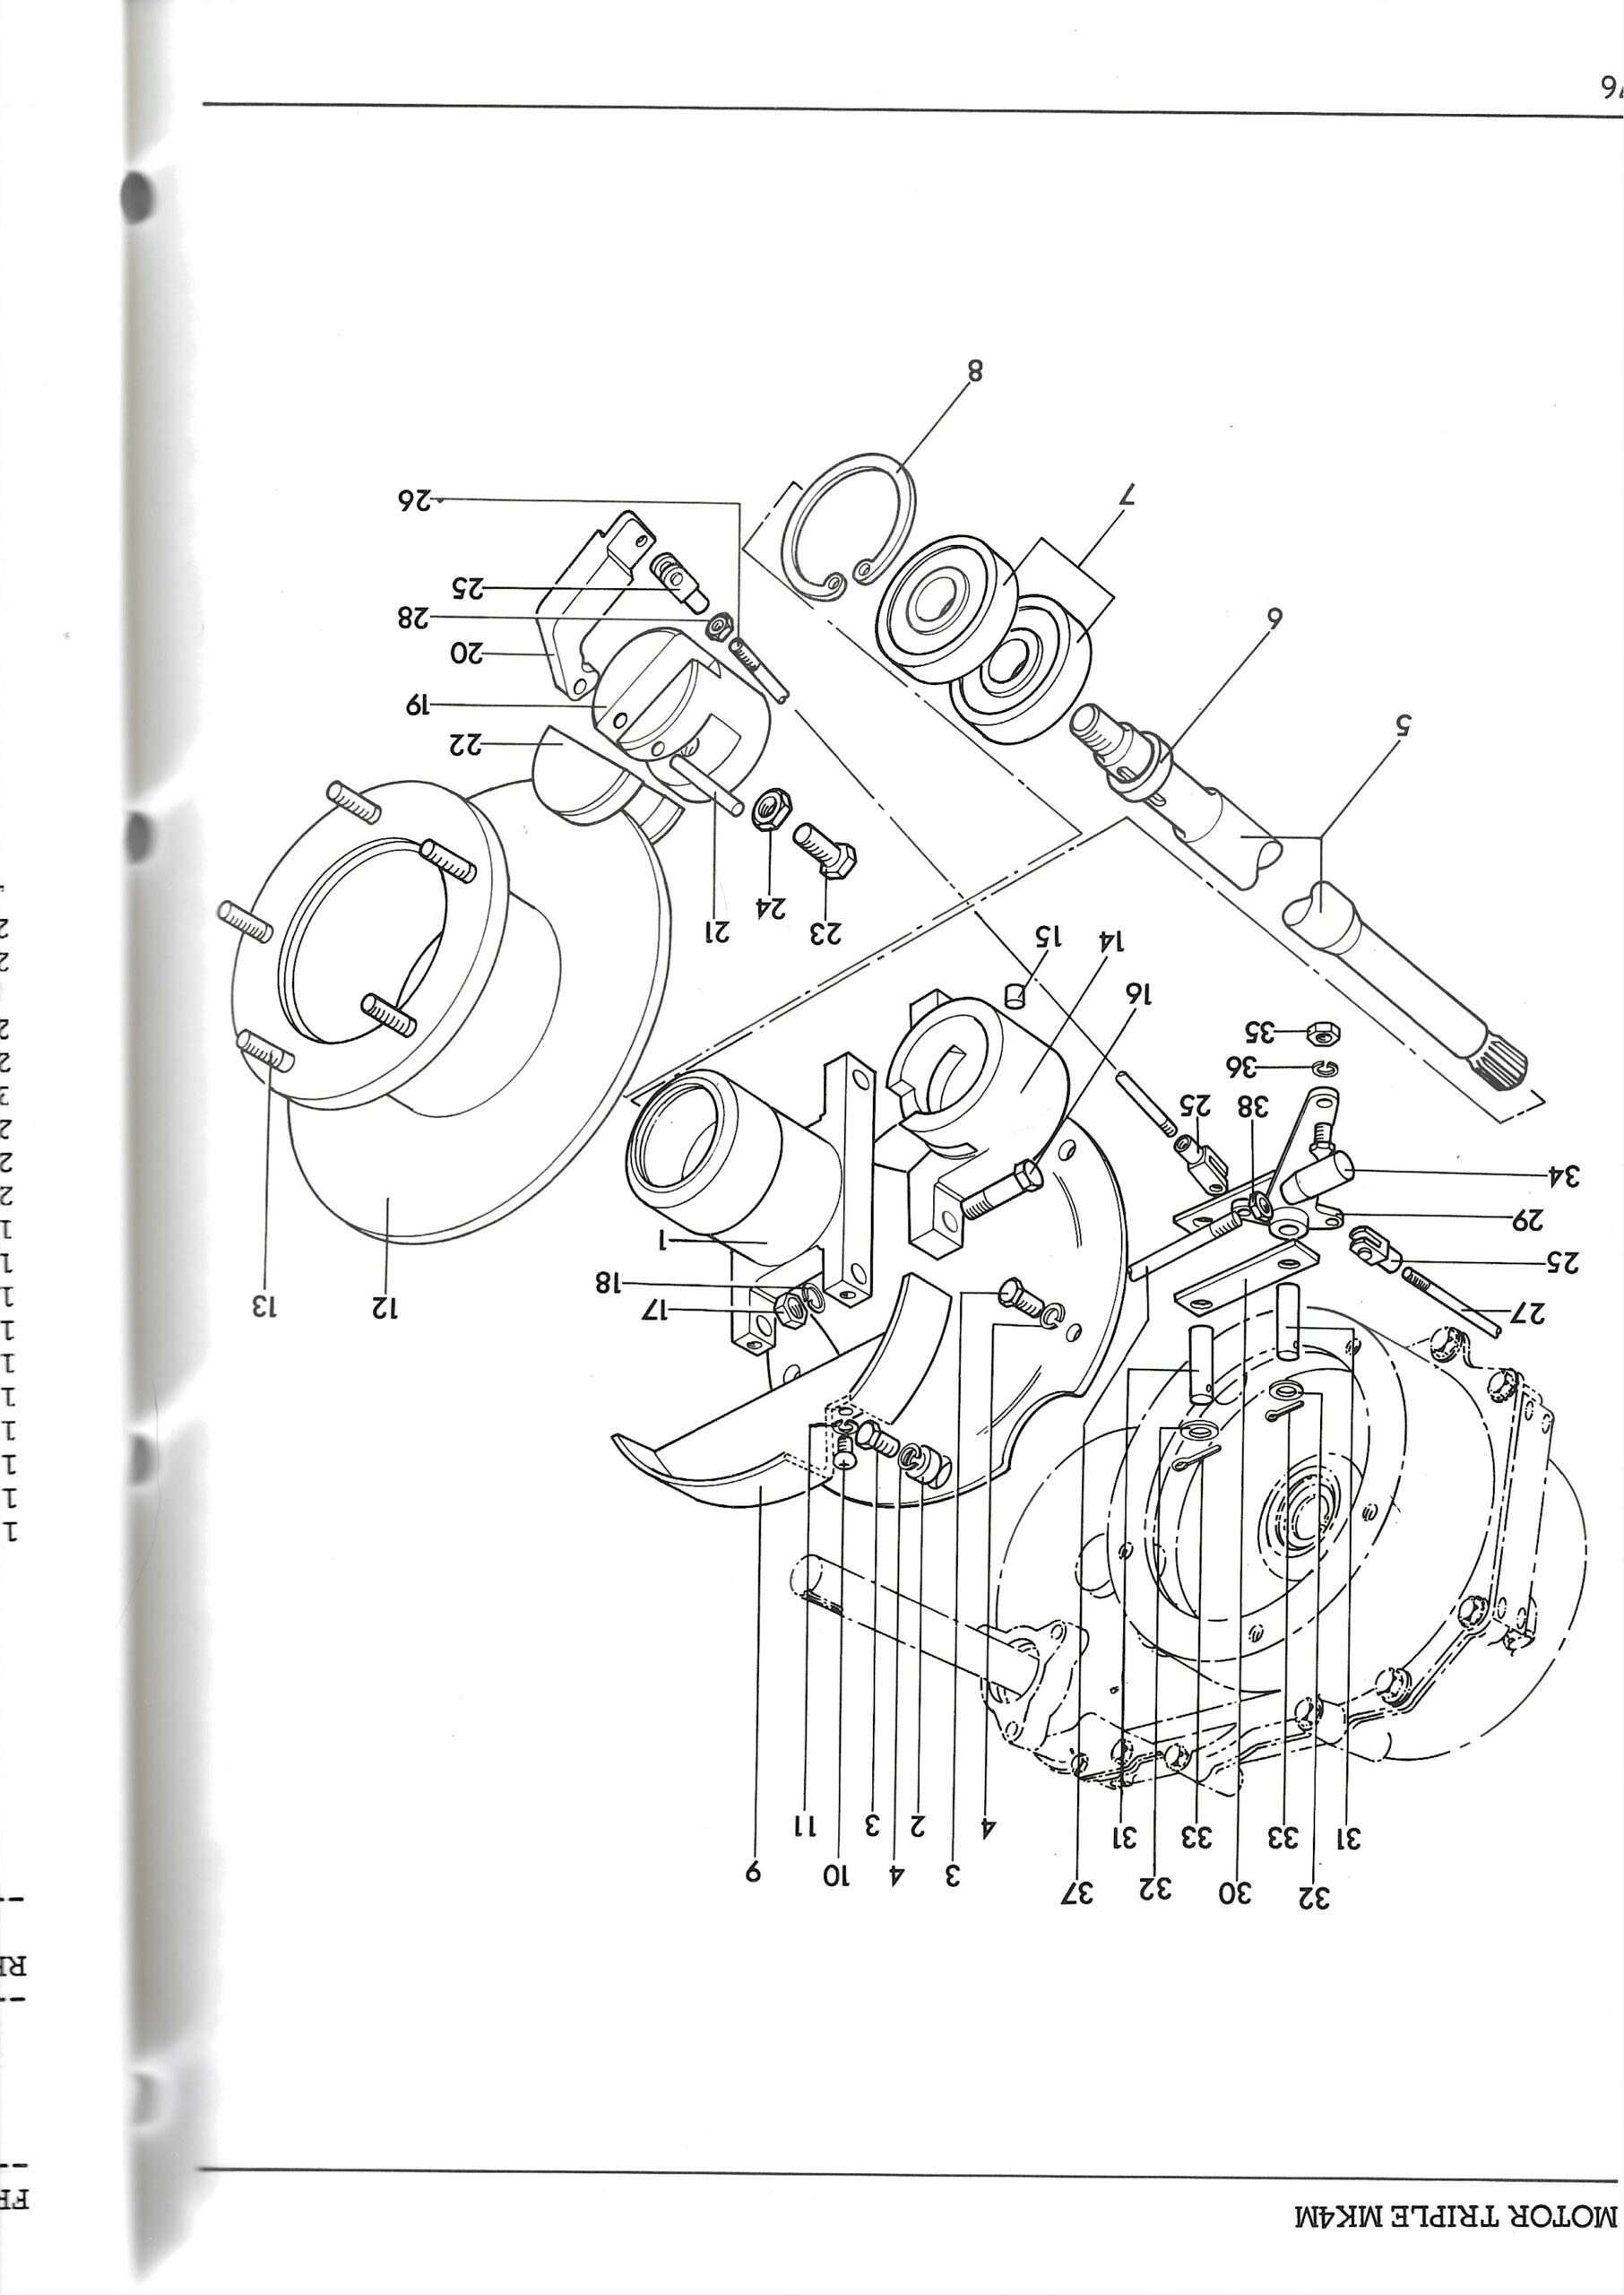
Best wishes WilliamAugust 29, 2022 at 8:09 am #39868trusty220KeymasterThe round parts that you see from each end are all one piece and are joined in the middle. It has a large cutaway portion to fit the pads into and to allow the disc to reach the friction material. I’ll try to find the parts diagram and post a picture for you. Be patient, I may be in trouble later for making a mess!
August 29, 2022 at 8:55 am #39869trusty220KeymasterFirst box I came to! Here are a couple of the drawings from the parts listing.
Attachments:
-
AuthorPosts

- You must be logged in to reply to this topic.