
Forum Replies Created
-
AuthorPosts
-
April 7, 2015 at 10:04 pm #12480vhgmcbuddyKeymaster
Thanks both
April 7, 2015 at 9:47 pm #12479vhgmcbuddyKeymasterStuart
I will keep that in mind if I cant find a flo jet carburettor.April 7, 2015 at 6:29 pm #12471vhgmcbuddyKeymasterIhe engine has started again after 2 days of starting troubles. learnt a couple of things; easy to get the contraption stuck with its nose down. In that position repeated failed attempt to start causes the oil filled air filter to become more a petrol filled air filter. Eventually came to the conclusion that I could not start in that position so I removed the plough and leveled the Trusty. After much churning got it started – refitted plough. engine ran roughly for ten minues and stopped. throughout all this i checked i had a spark – yes. Time for G&T. Next day sat and looked and thought. After doing nothing I tested spark – no spark. Left it. Next day – no spark. I have been twiddling engines for the past 58 years. I know all about “change the plug” and, of course, I have done that whenever I explored starting problems. But in all that time I have never ever found that the cure and came to regard it as a most unlikely “too easy cure”. Today I changed plug and it started easily. A tale of delightful hubris.
I am now concentrating on getting it to tick over without activating the centrifugal clutch. I checked the springs, they seemed good, rusty and strong. I feel sure I need to slow the engine.
I am now looking out for an attachment to flatten the increasingly lumpy field.
What fun
April 6, 2015 at 9:44 pm #12463vhgmcbuddyKeymasterI think I’m needing the bottom end as the thread is buggered. Only problem is getting a bottom end(no funny comments lol) had a quick look thru ebay but couldn’t see any. Do any you guys have any idea where I might get one, it would be much appreciated.
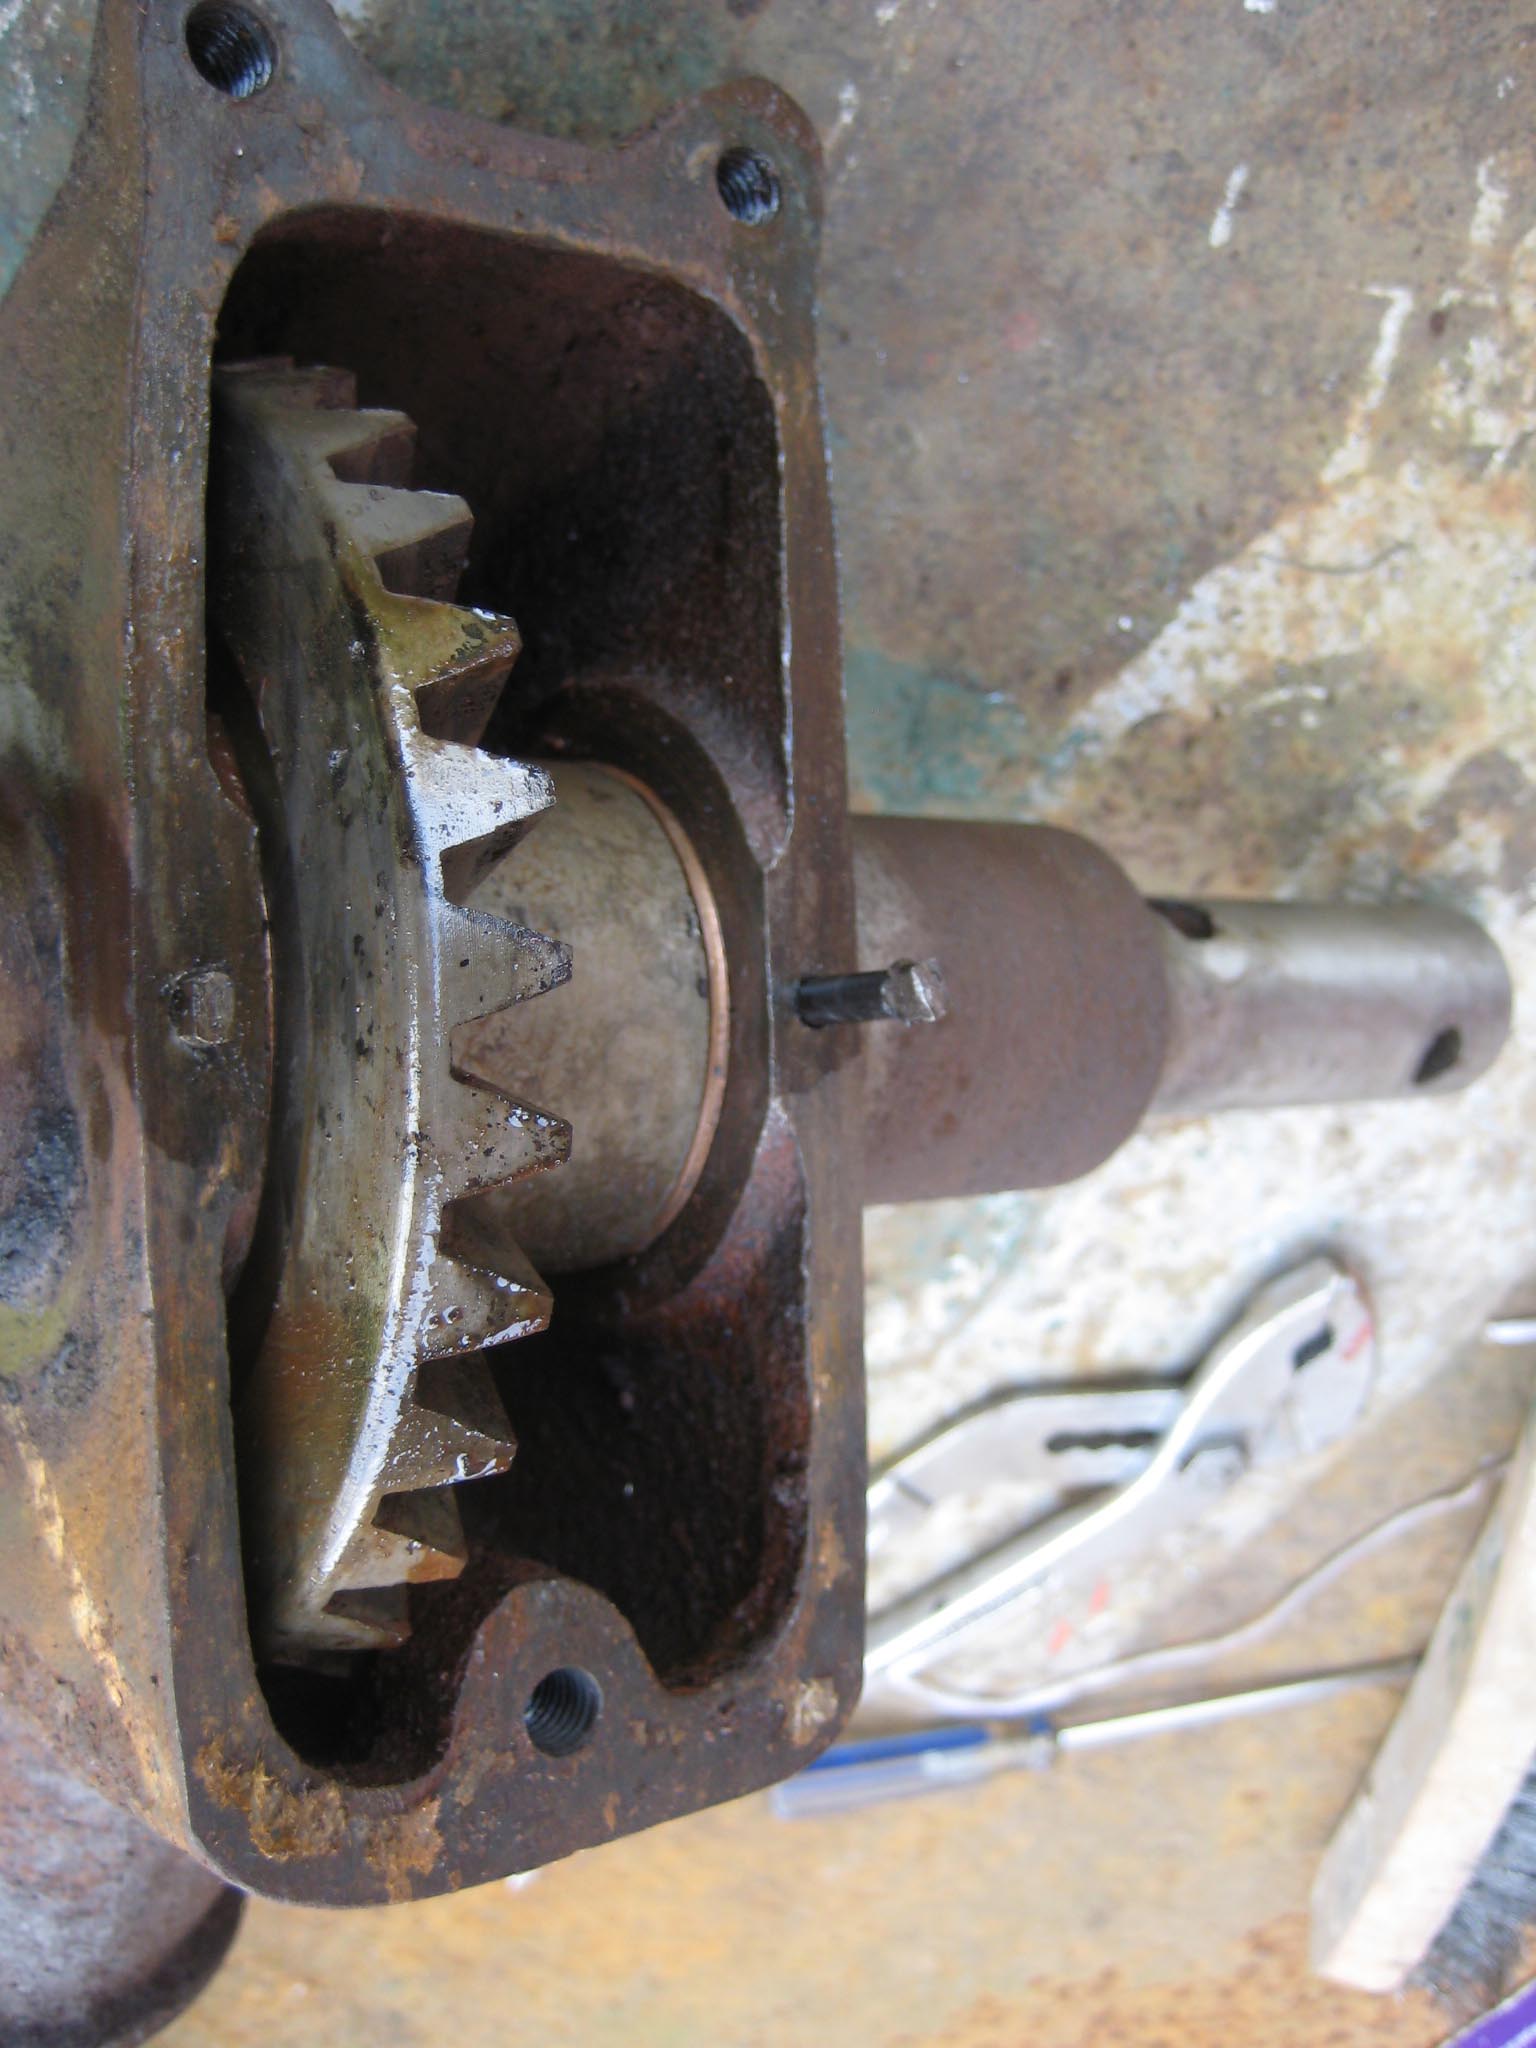
April 6, 2015 at 5:17 pm #12448vhgmcbuddyKeymasterAfter much head scratching, I finally took the plunge and dismantled the miller drive. There was some trial and error involved, which did result in some damage, so thought I would share how I did it, so you can avoid the mistake I made.
With the miller drive cover removed to expose the gears, there are two locating pins on the axis of the miller drive shaft (see picture 1). These secure the bronze bushes in place and must be removed. When the drive shaft is pressed out, the keys which locate the crown wheel cannot pass through the bushes, therefore the bush is pressed out along with the shaft.
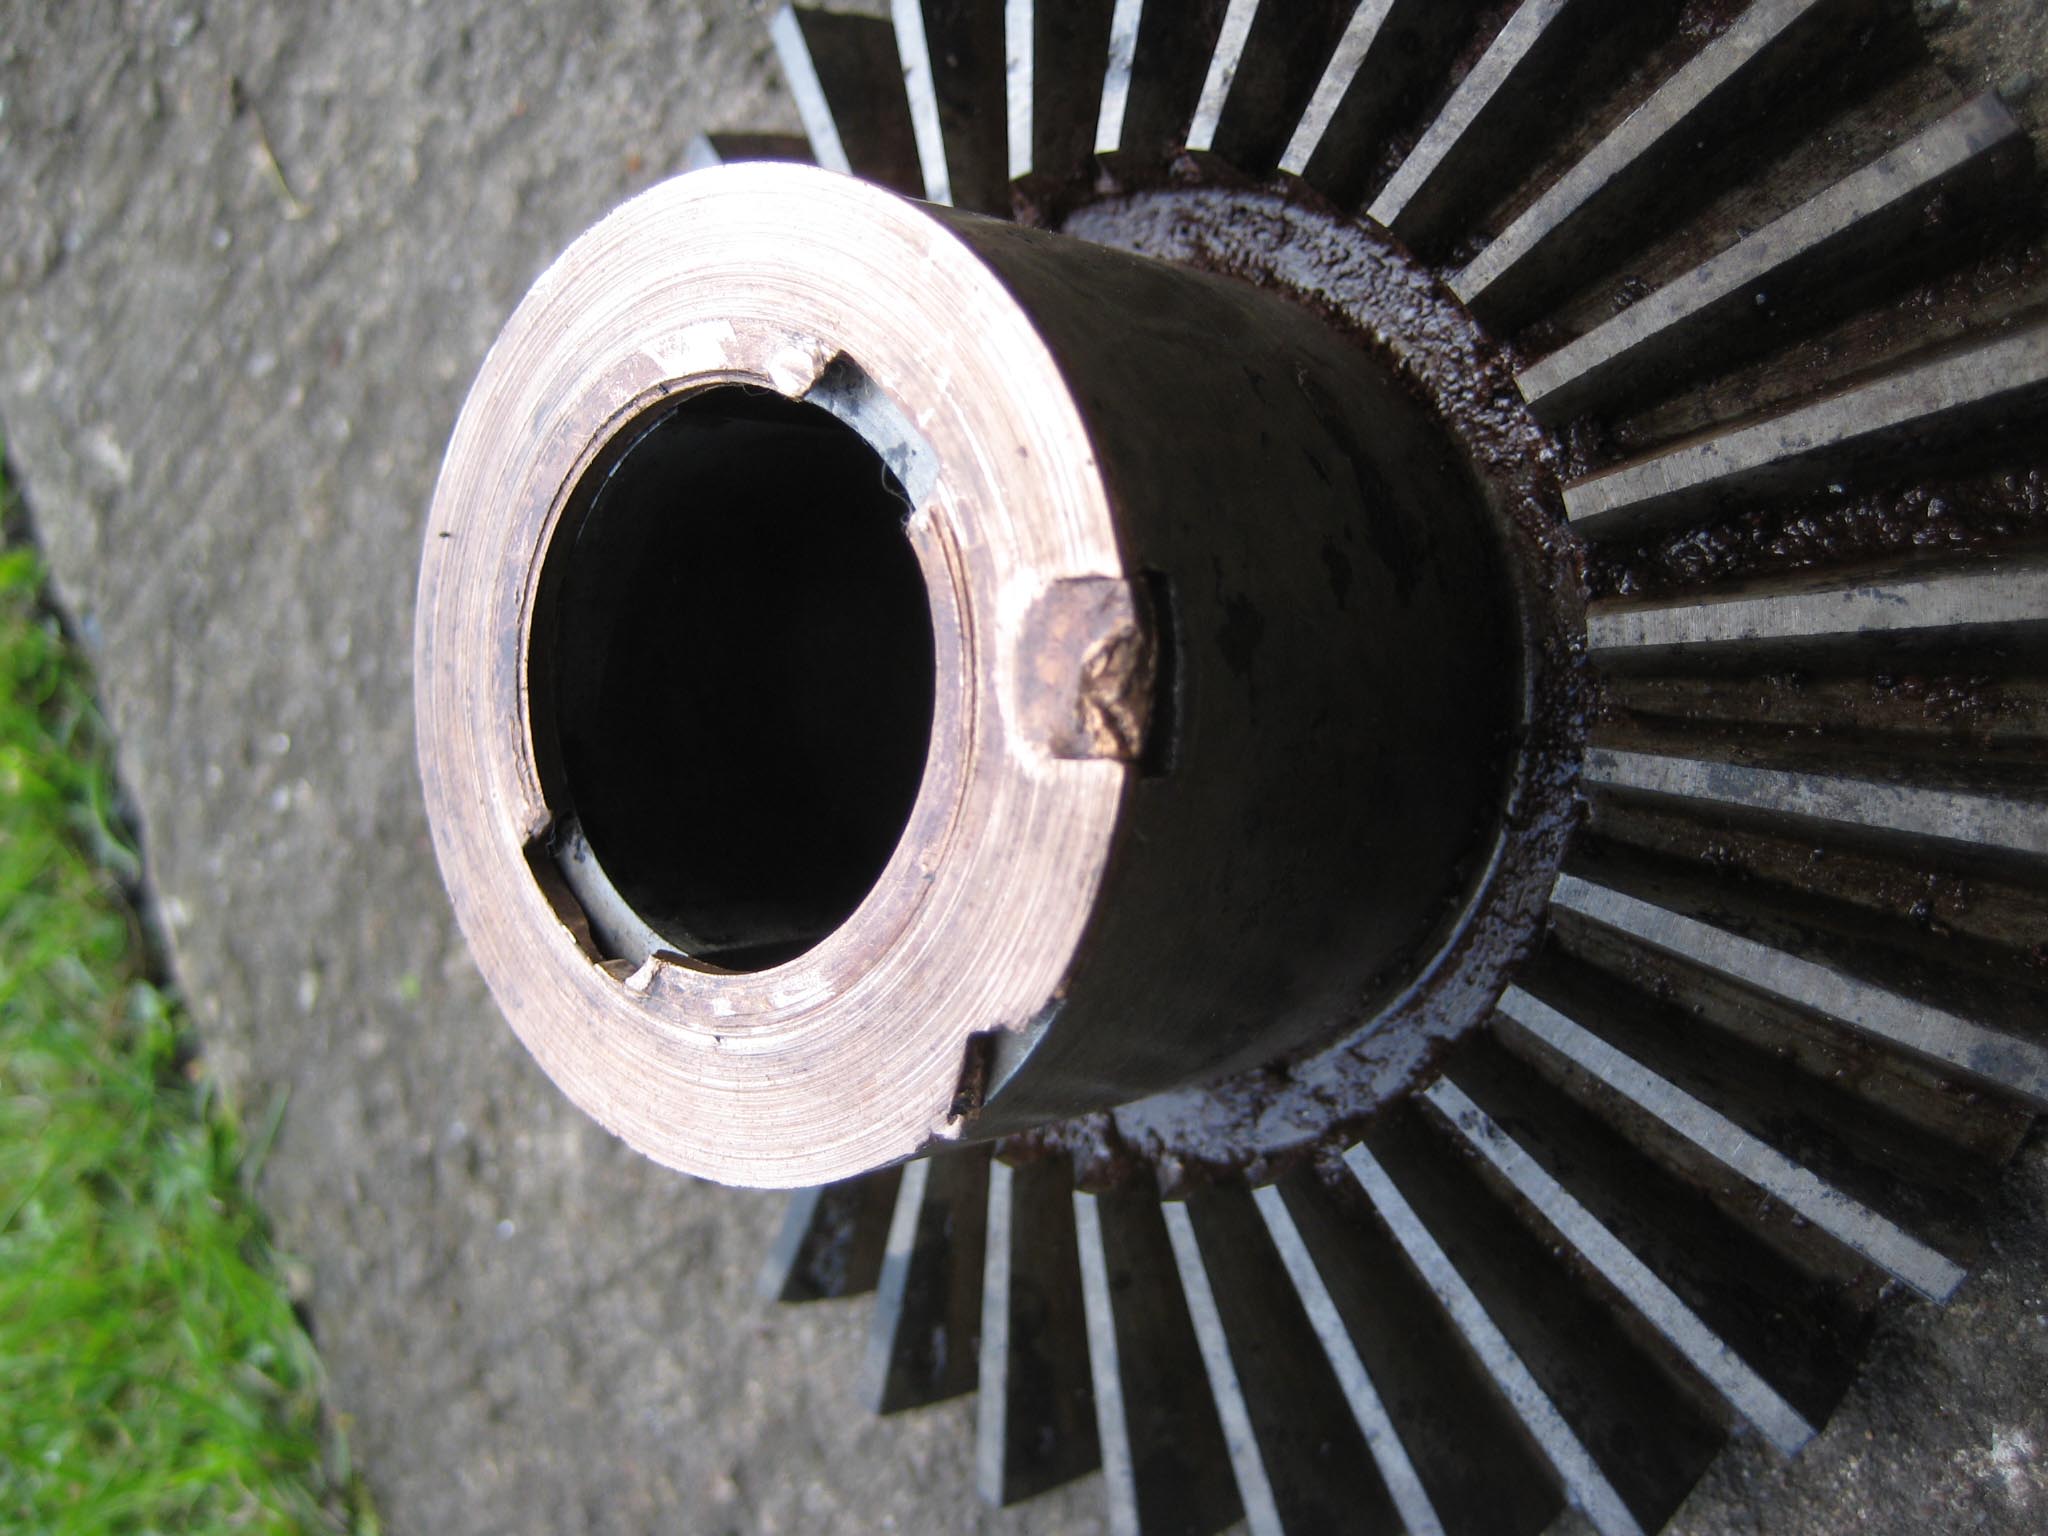
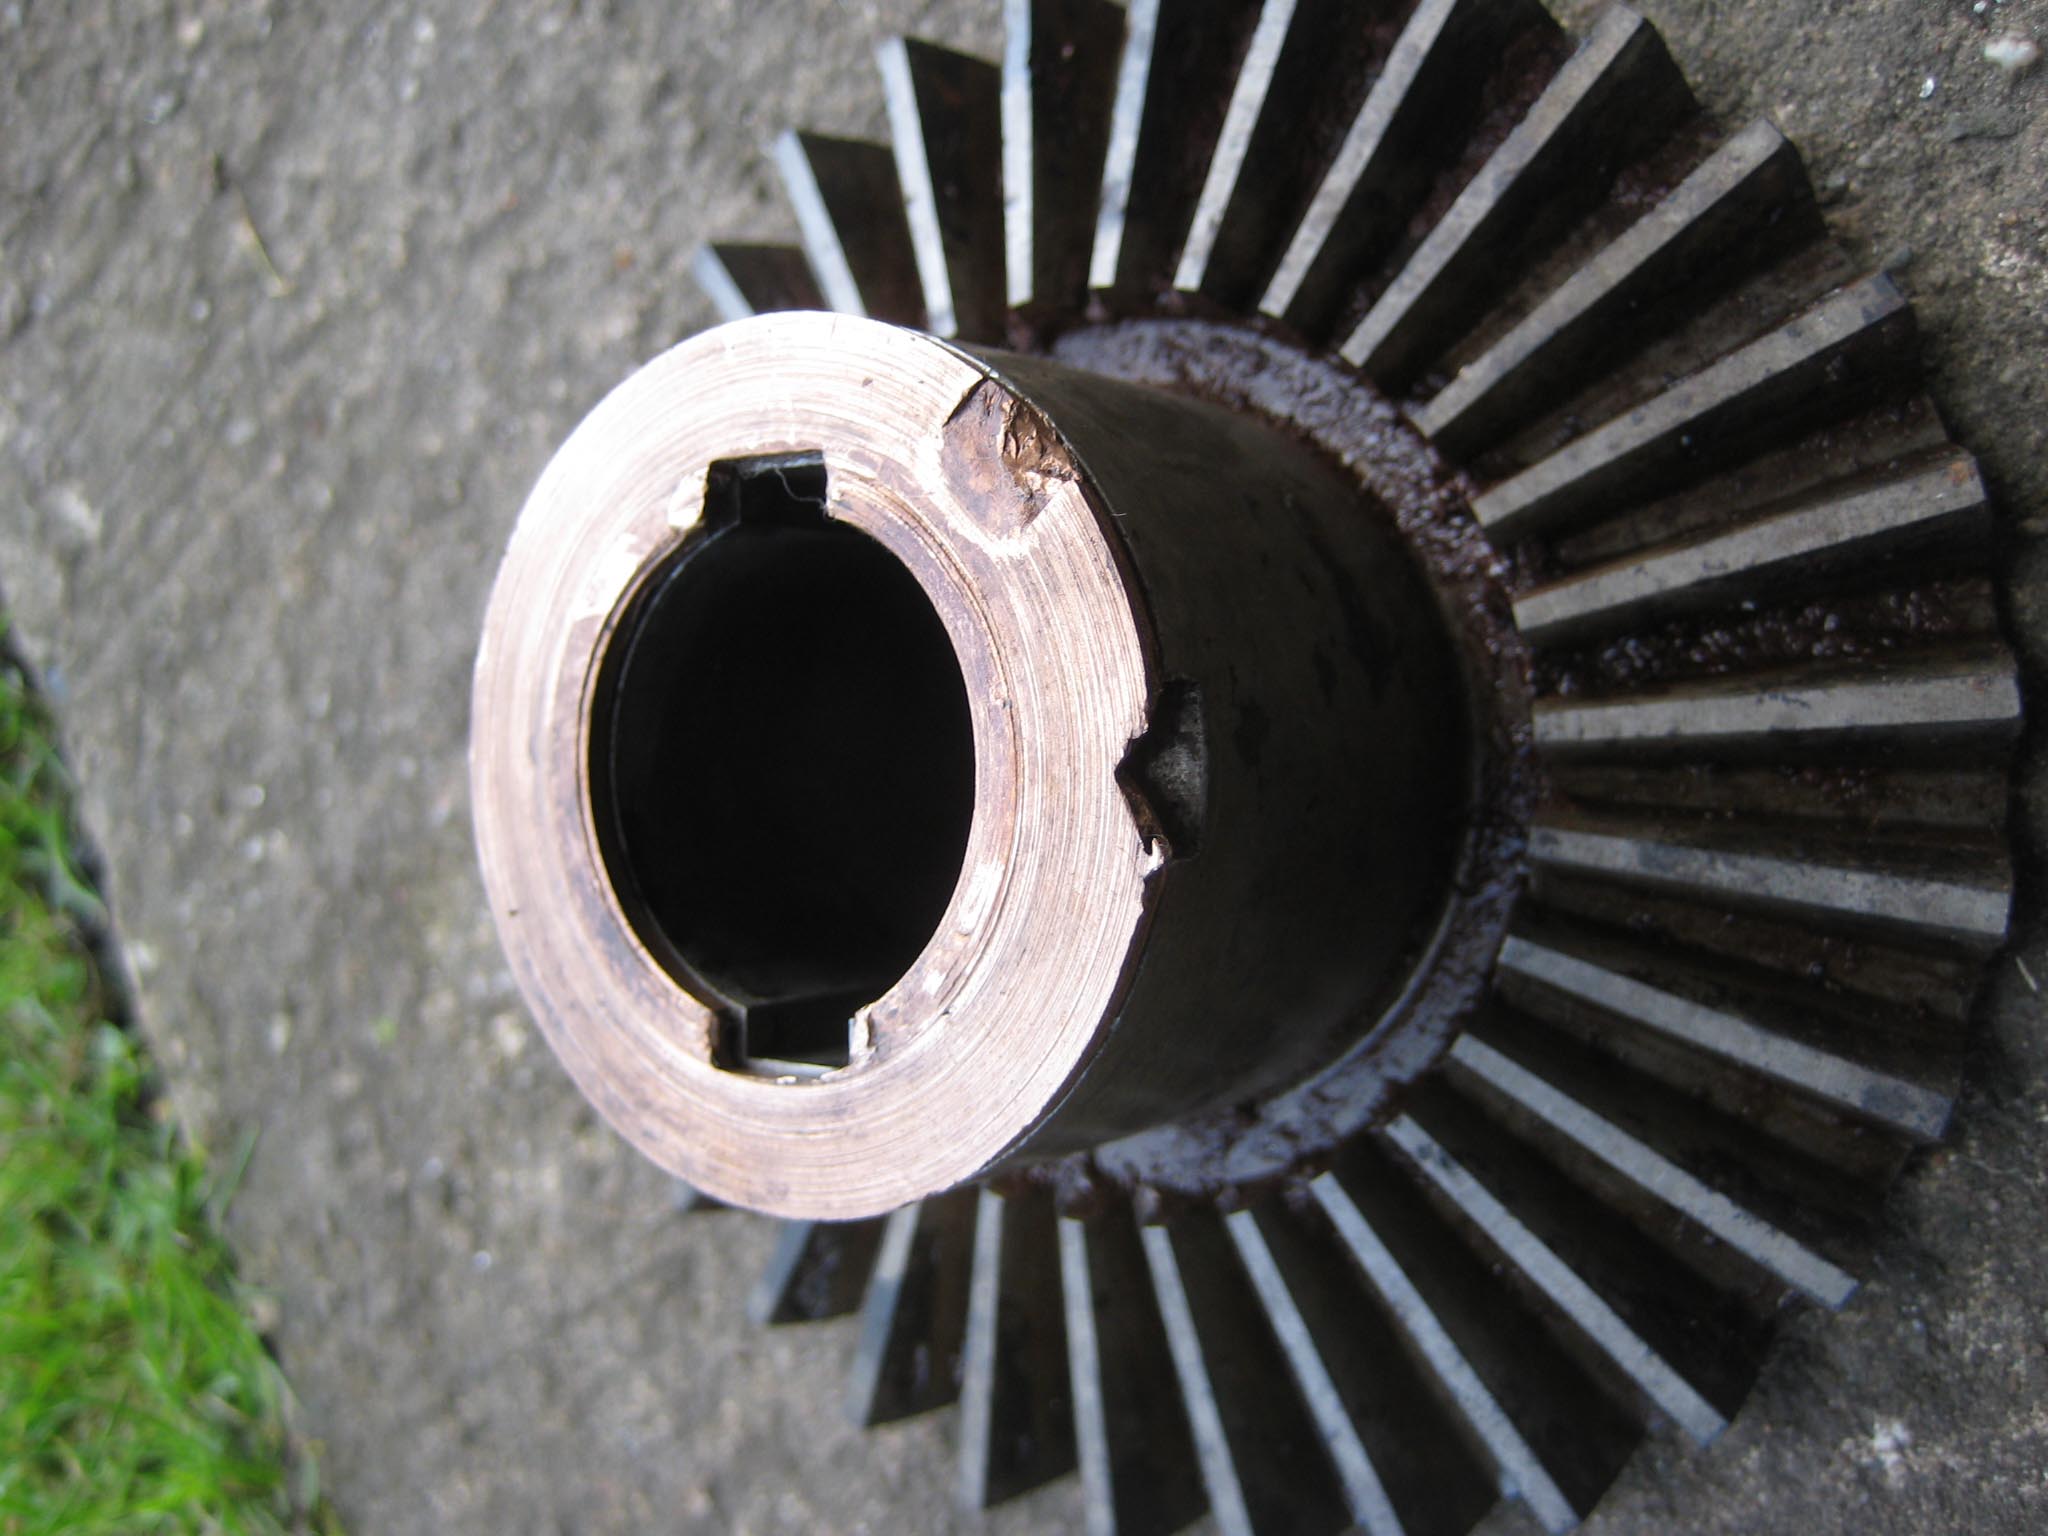
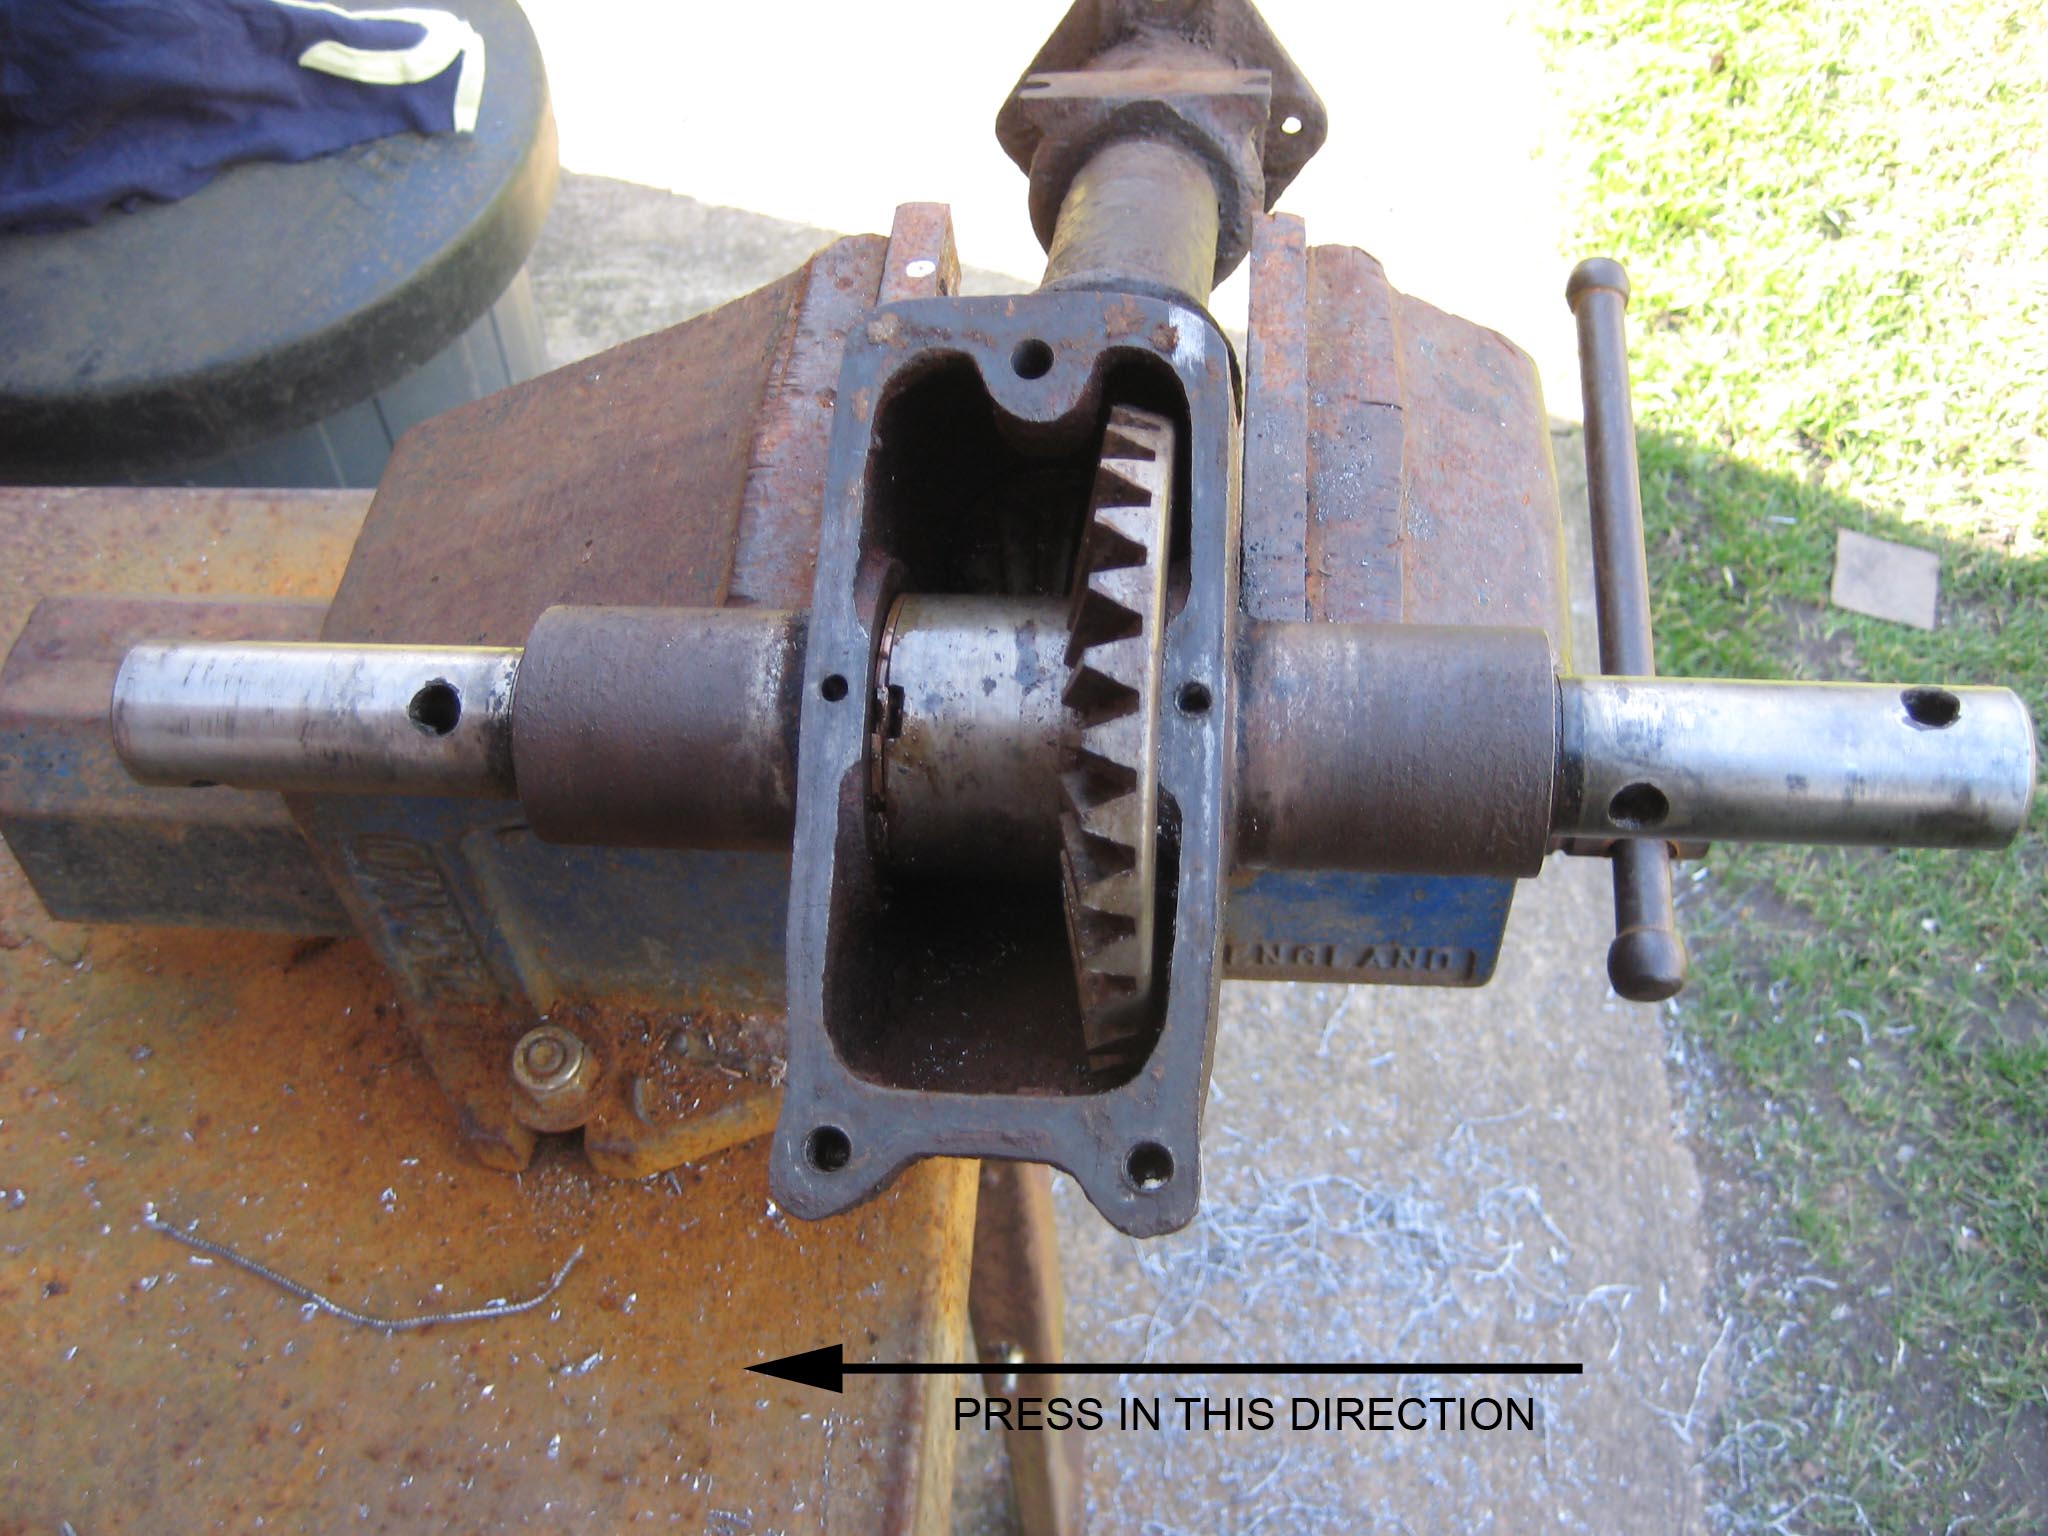
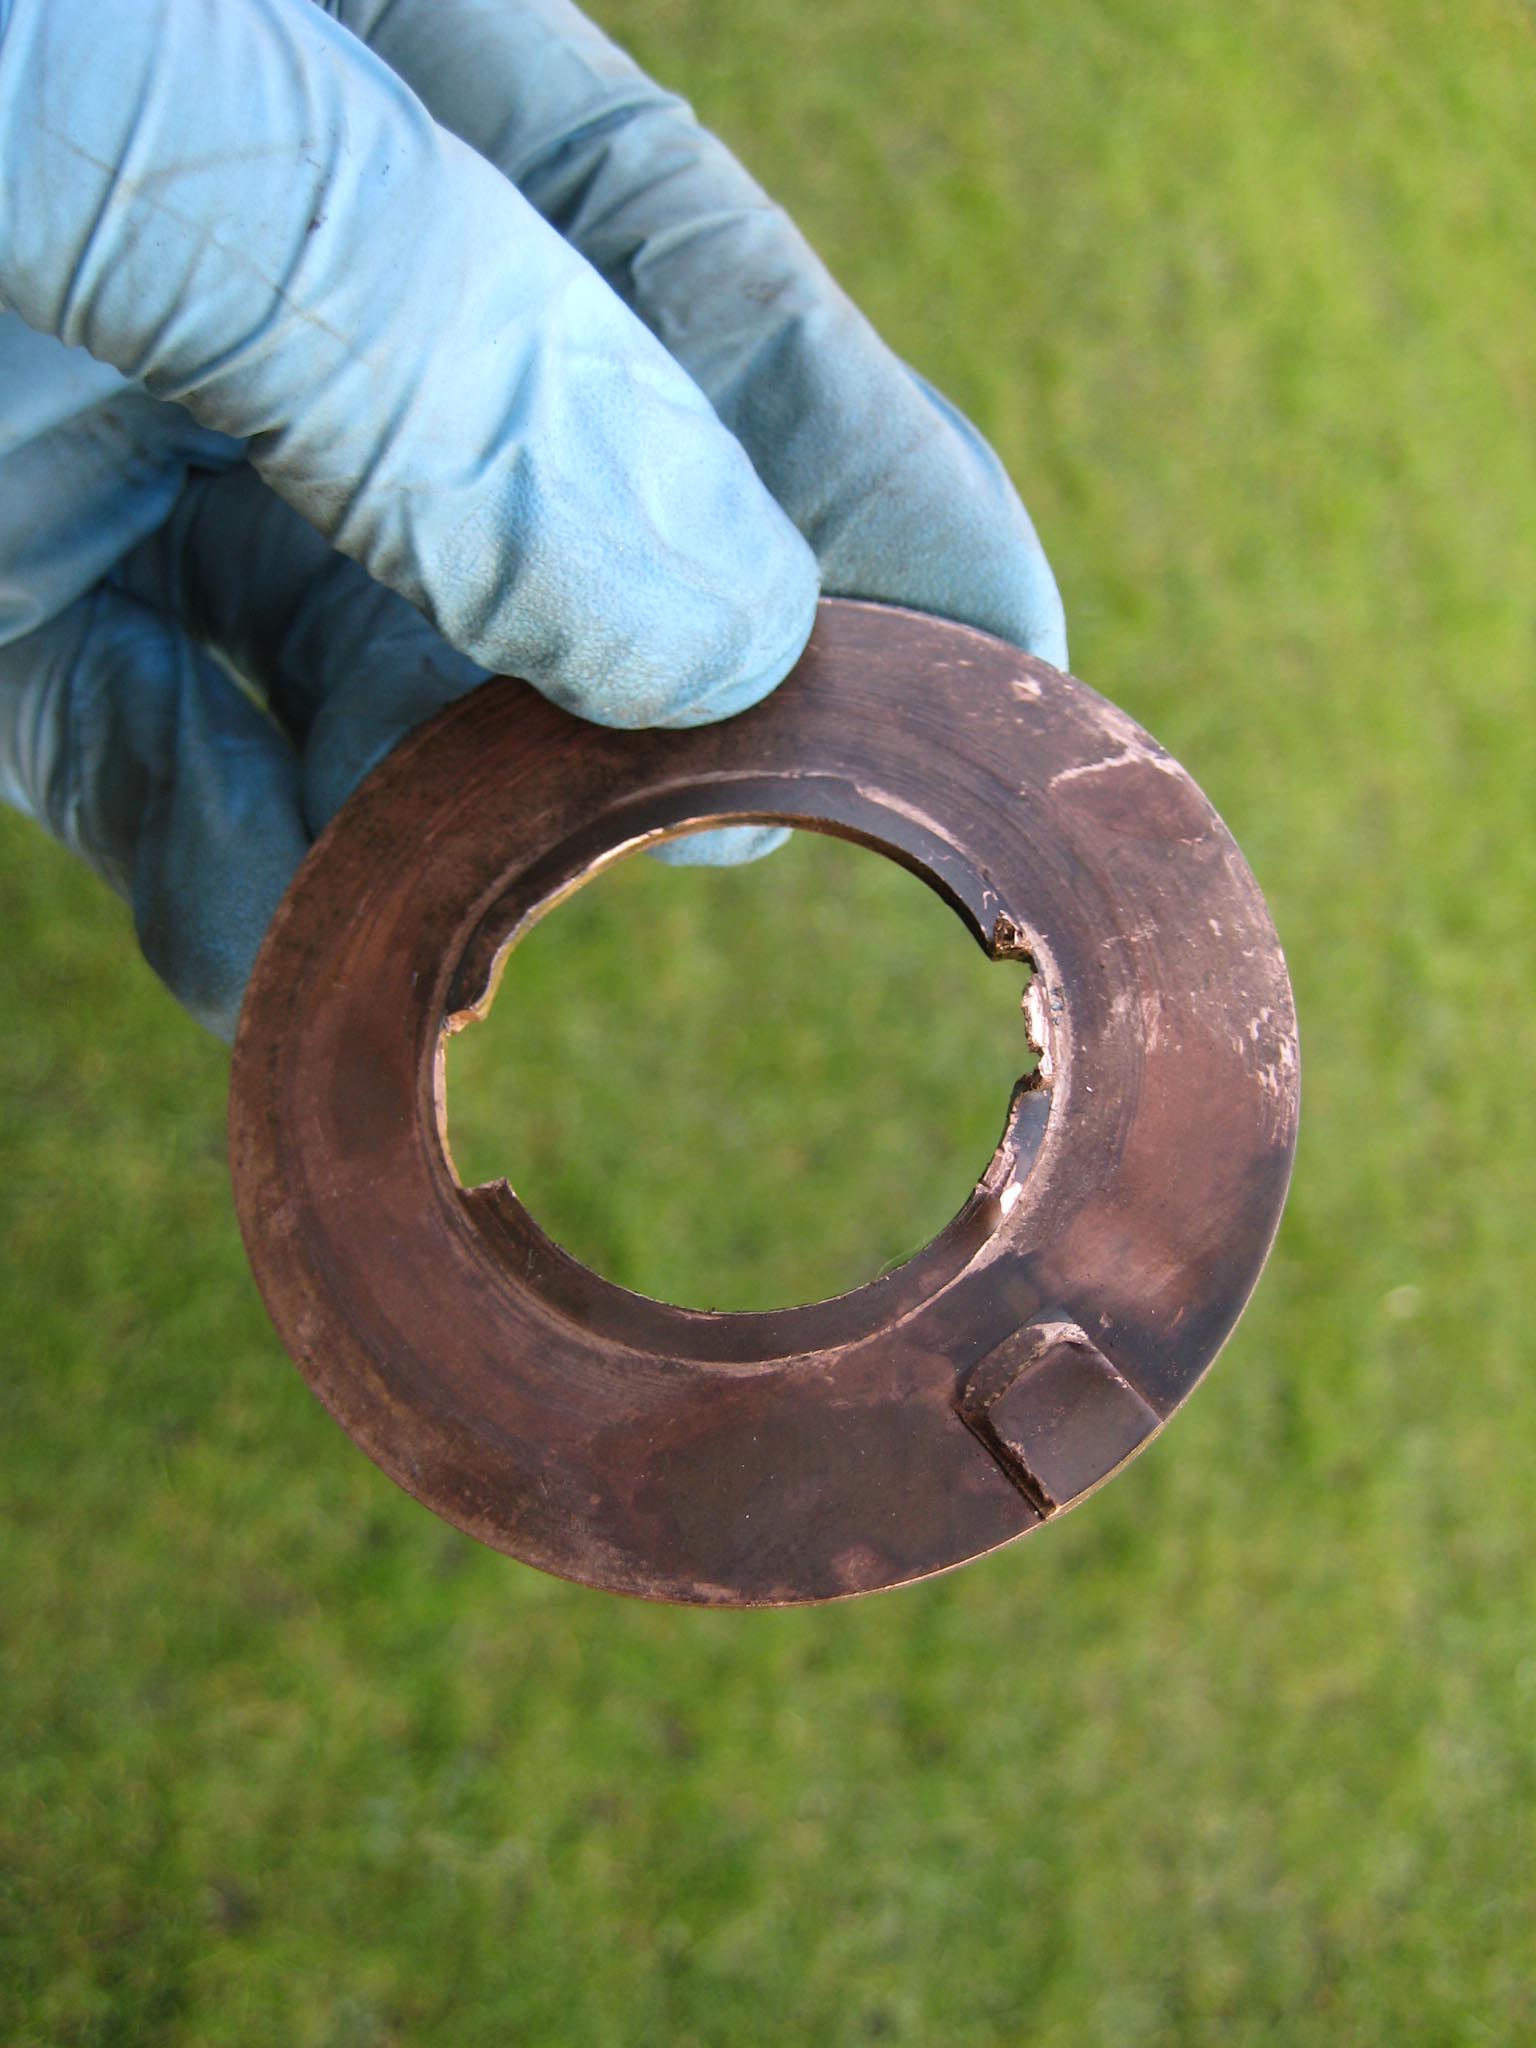
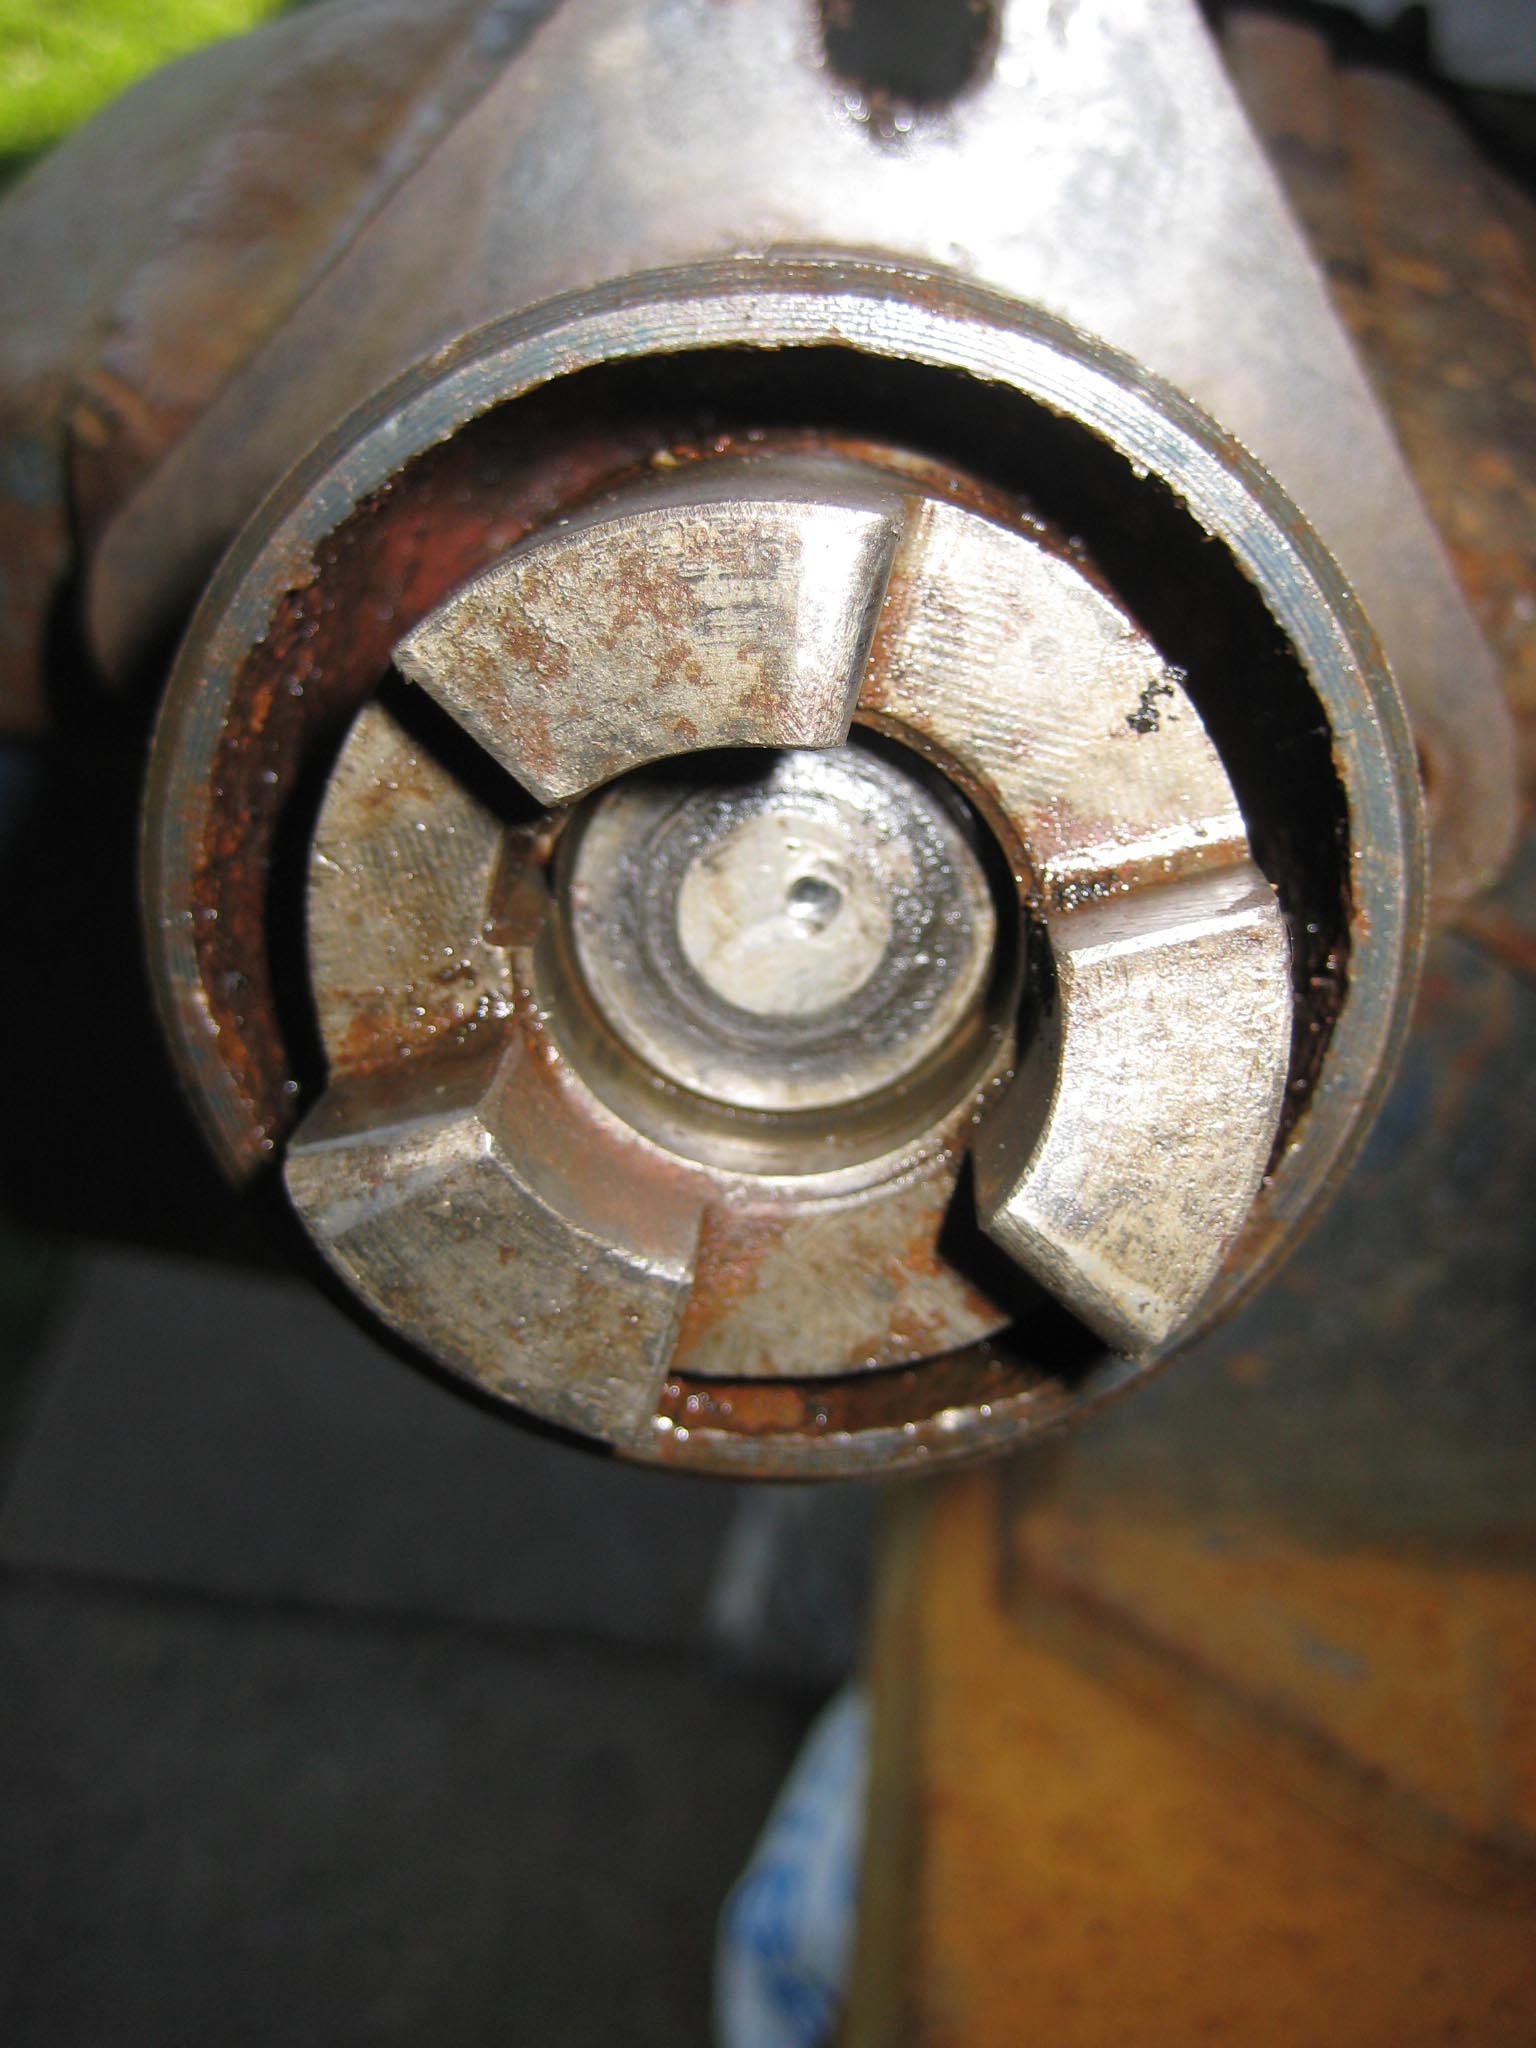
Next step is to align the bronze spacing washer at the left hand side of the crown wheel. This is done by rotating the crown wheel until you can see the locking tab on the washer which is bent over into a matching recess in the crown wheel. Bend the tab on the washer until it is flush, so the washer can now turn independently of the crown wheel. You should also see a ‘V’ shaped notch close to the locking tab. Insert a flat bladed screwdriver into this notch and gently tap the washer around until the notch lines up with the locking tab recess in the crown wheel. The washer has two rectangular notches cut out so the crown wheel keys can pass through. (see pictures 2 & 3). This means the miller drive shaft can only be pressed out in one direction (see picture 4). Unfortunately, all of the above did not become apparent until I had everything dismantled. Being blissfully unaware, sods law came into effect and I pressed the shaft out in the opposite direction, which damaged the bronze spacing washer which is on the right hand side of the crown wheel and does not contain the necessary key slots cut into it (see picture 5).
As previously mentioned, the left hand bush will be pressed out along with the drive shaft. If also removing the right hand side bush, do not get them mixed up as they are handed. They have a helical oil way machined on the inside which carries oil outwards along the shaft as it rotates.
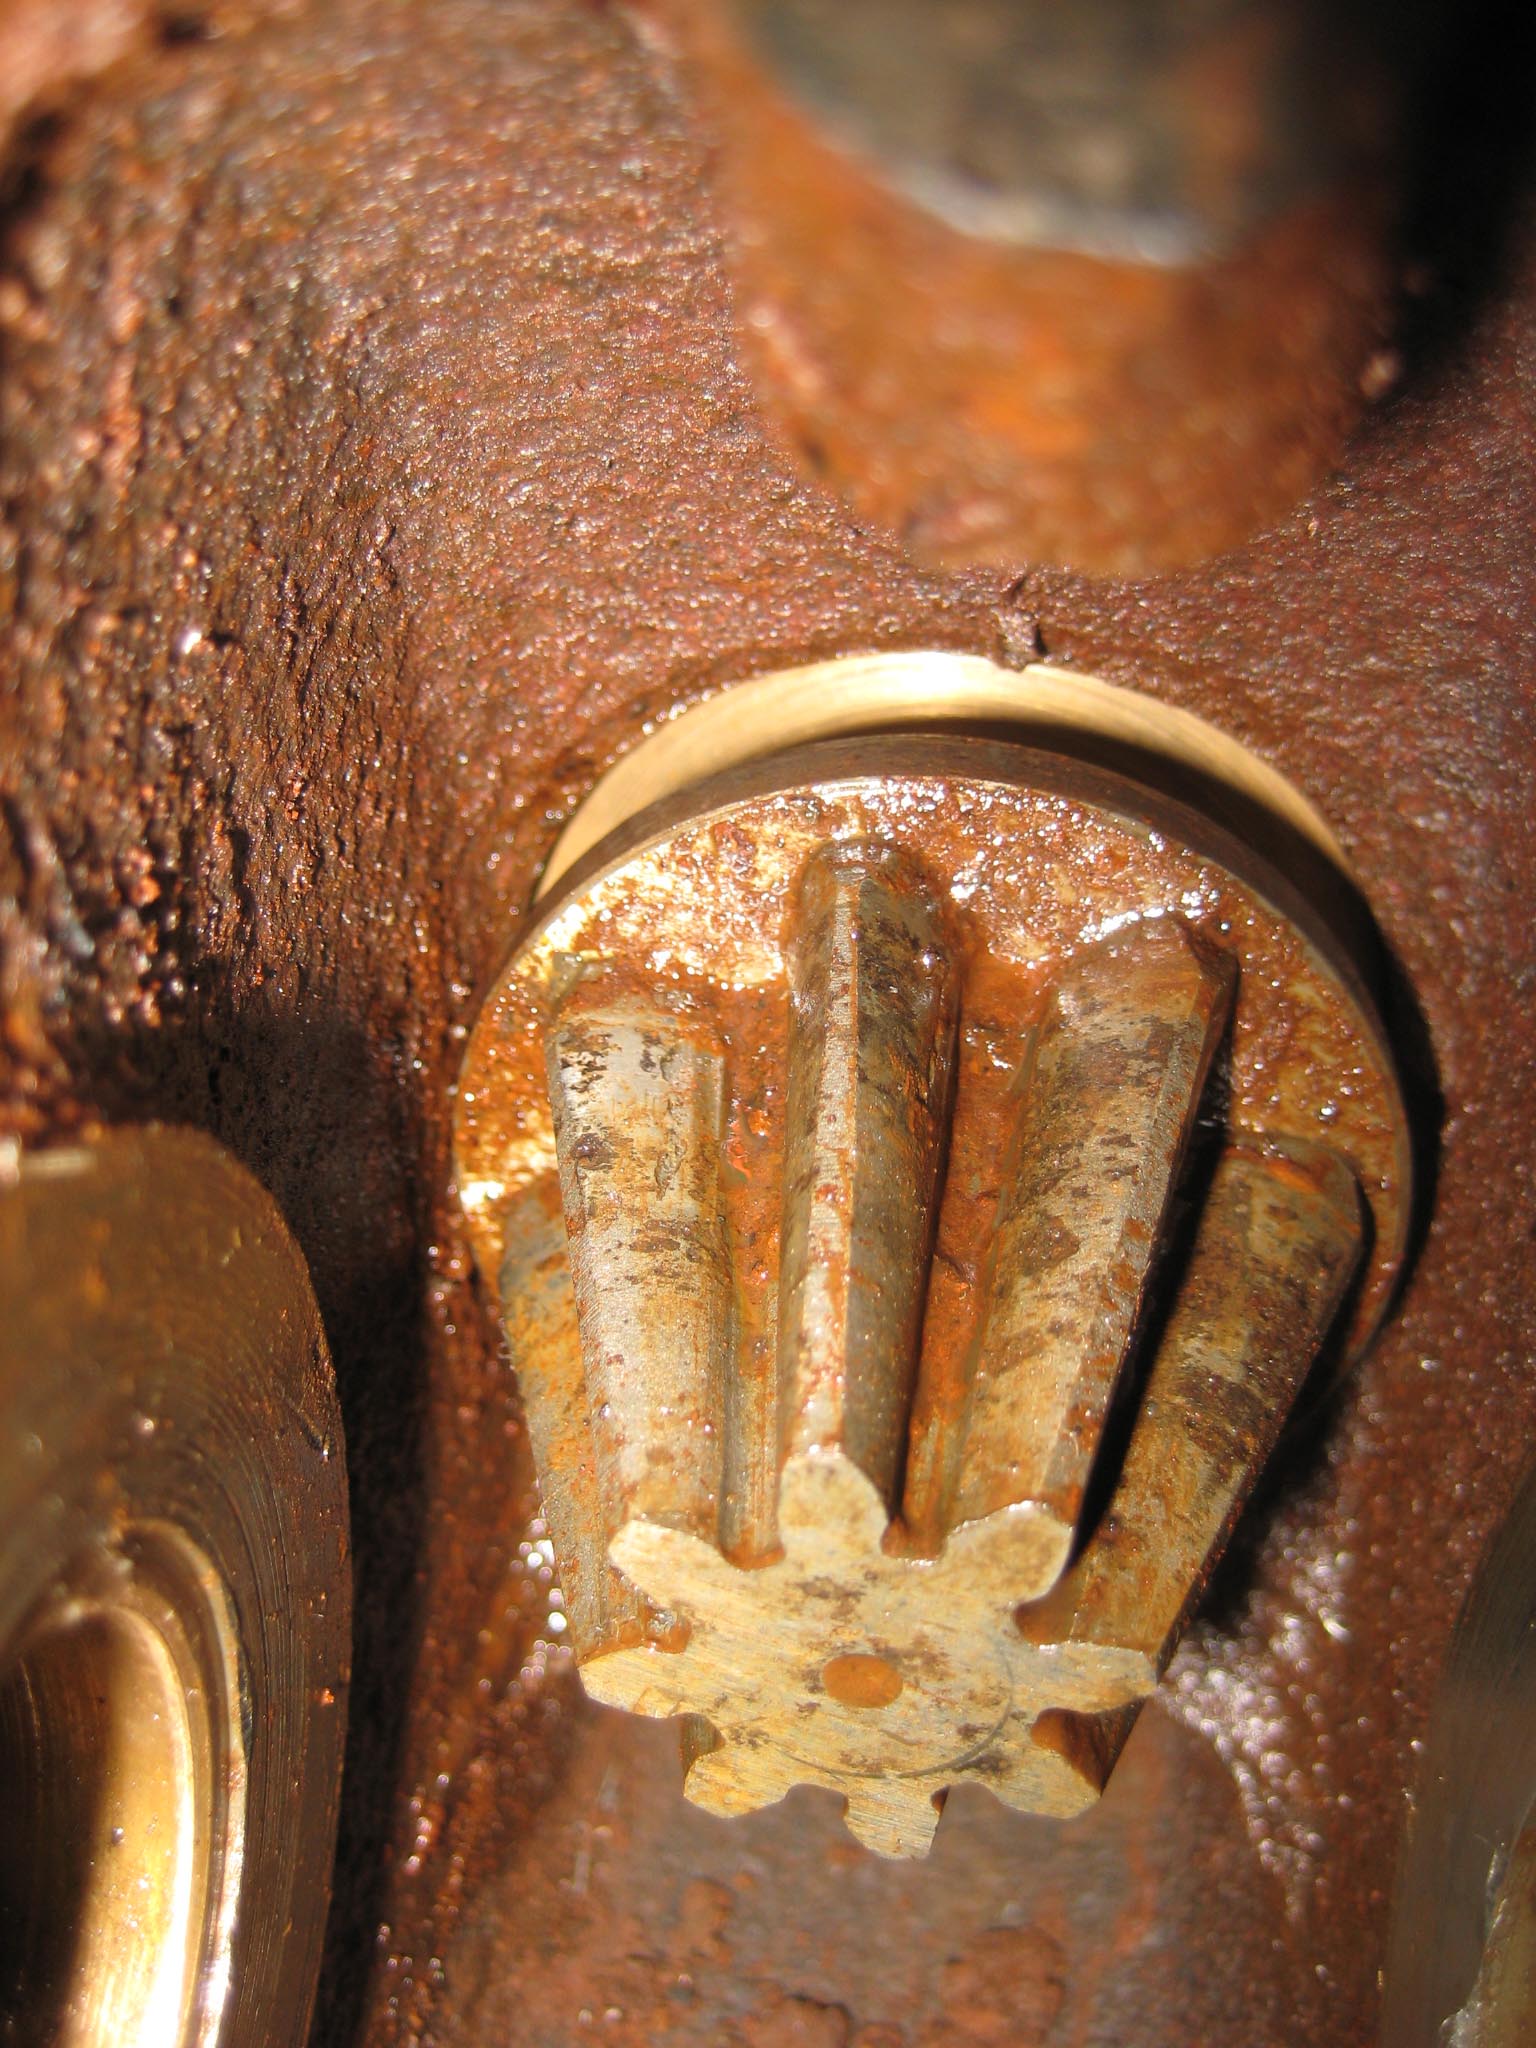
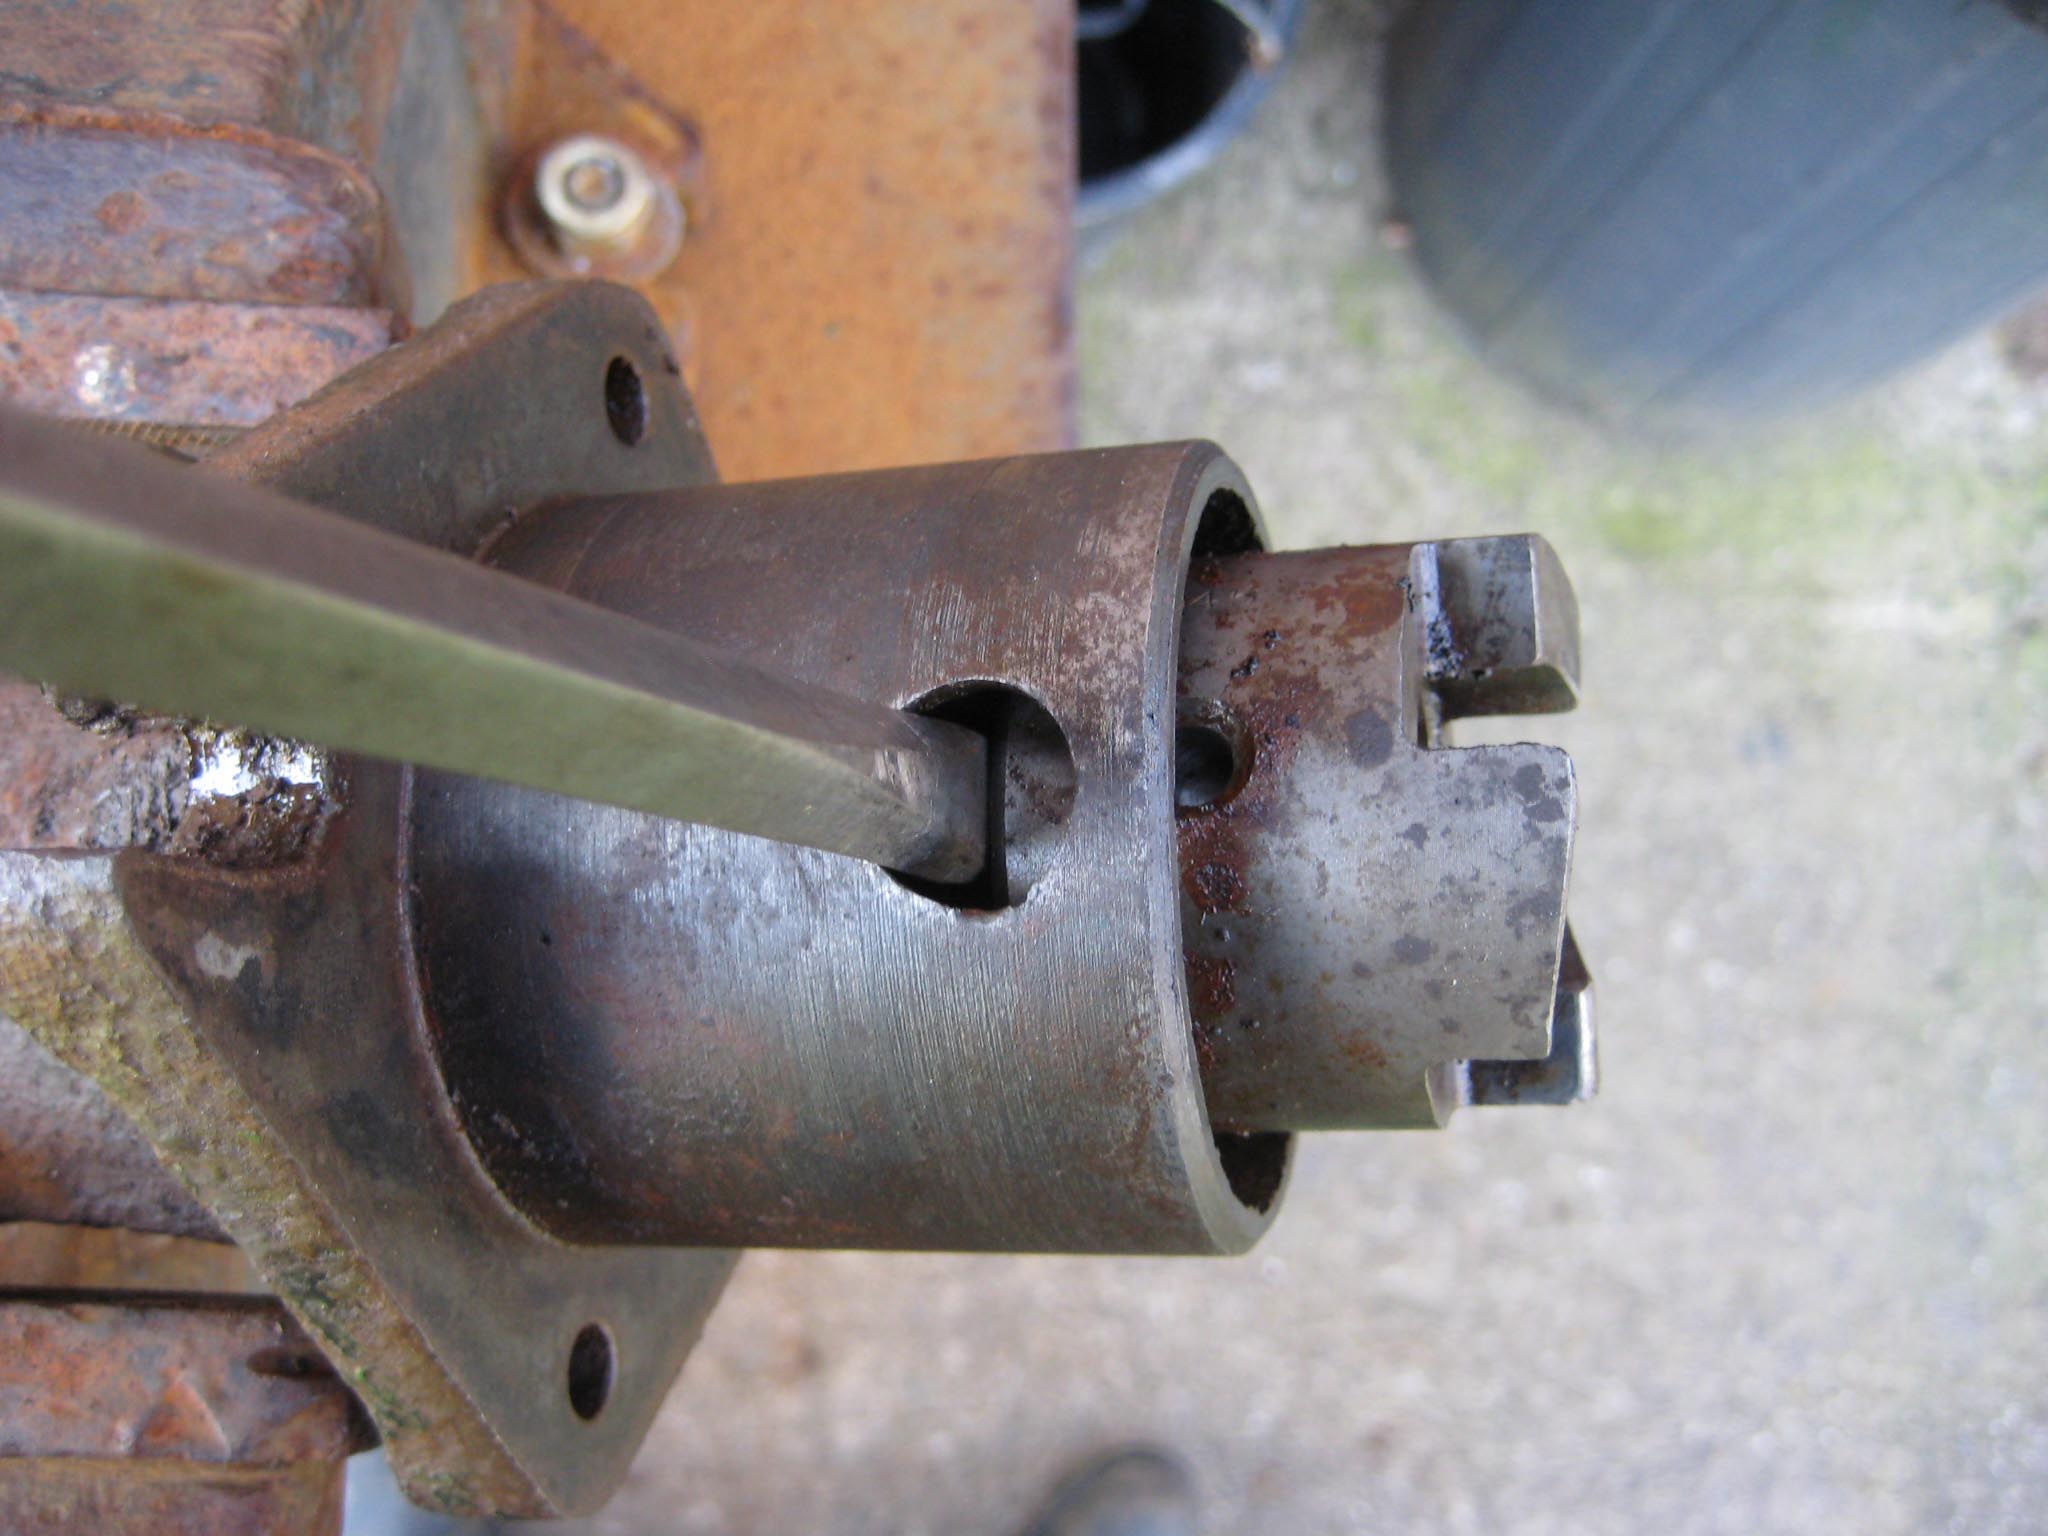
With the crown wheel and miller shaft removed, the pinion can be tackled next. Rotate the dog clutch until the roll pin lines up with the access holes and punch it out. The dog clutch needs to be pulled from the end of the pinion shaft. This is very awkward to do as the puller arms have to fit down the gap between the outside of the dog clutch and inside of the housing (see picture 6). An alternative method is drive the pinion shaft inwards a few millimetres, then from the pinion gear end (see picture 7) drive the shaft back the opposite way. What you are trying to achieve as enough room at the back of the dog clutch to insert a lever (in my case a stout screwdriver) through the roll pin access holes (see picture 8). It may take a few attempts of driving the shaft one way then the other to get the required gap, but it is important to do this in small increments as there is a bronze bush behind the dog clutch which will be damaged by forcing the dog clutch key into it. If you are not replacing the pinion shaft bush, make or buy a suitable puller. Lever the dog clutch from the shaft (penetrating oil and heat to expand the dog clutch may be required).
With the dog clutch out of the way, remove the dog clutch key and the pinion shaft can then be driven out from the dog clutch end.Attachments:
April 6, 2015 at 4:43 pm #12447vhgmcbuddyKeymasterThank you Dave, very helpful. Confirming I have not missed something is half the battle.
Cheers
GraemeApril 6, 2015 at 9:11 am #12445vhgmcbuddyKeymastermany thanks for the answers I am away from home for the next 4/5 weeks but on my return will strip it off the machine and have a good look. the part No. is 7259 and is still available but is not a returnable once purchased though it would be a spare.
April 6, 2015 at 8:01 am #12443vhgmcbuddyKeymasterThanks Steve. I spent some time last week getting it so that it started fairly easily and the tick over was ok. 2 days ago we ran up against a piece of wood and it is now a bugger at starting and. when started the tick over is poor. I suspect that the timing is now a little out and that I need to look at the governor. If I have to I will take the head off and do the valves etc but I would prefer to play with the plough for a bit first. You advice re the springs is well noted. Thanks for your interest.
Chris
April 5, 2015 at 7:30 pm #12430vhgmcbuddyKeymasterThe condenser is new new one from Neil, so think its a good one.
April 5, 2015 at 7:29 pm #12429vhgmcbuddyKeymasterHi the Mag on the other MG2 is in poor condition, parts missing, so I have ordered a replacement Mag. Will come back once I have new Mag fitted. With new Mag and new fuel I am hopeful she will run.
April 5, 2015 at 7:05 pm #12427vhgmcbuddyKeymasterI’m in! I will bring my almost working MG2, Magnito on its way, no implements at this time, but hoping to have one or two by next year to do with logging and forestry work. The only interesting thing with my MG2 is it has a V5 and period numberplate and good to go on the road. Accommodation booked this morning! Cheers.
April 5, 2015 at 2:21 pm #12423vhgmcbuddyKeymasterIf the thread is OK in the carb body, you could get a carb kit that includes a new emulsion tube. If the body is damaged it’s a new body part or find a a used one.
April 5, 2015 at 1:13 pm #12420vhgmcbuddyKeymasterRight I think I have run into problems, when I took the emulsion tube out it was threaded and worn and so was the carb where it goes in. I don’t think this could have happened when I took the tube out, could it? Is there anyway to repair this or is it another carb bottom end?
April 5, 2015 at 5:13 am #12416vhgmcbuddyKeymasterWelcome to JUST ANSWER small engines, let me try to help you !! Look at your pto clutch, if it has three self locking nuts and three springs, it can be adjusted to bring the armature closer to the magnet. This makes it easier for the magnetic to pull. The clearance should be about .025in. between the two parts. Here is an adjustable unit. Yours may or may not be adjustable. You never know what kind of pto they put on. Let me know.
Hello found this regarding your clutch,if it’s adjustable it might be worth a try.April 4, 2015 at 7:14 pm #12414vhgmcbuddyKeymasterTa chap, Again, my appreciation for reply is deep and genuine. I have the stops and haven’t altered either, on the basis that he who had ploughed with this machine before me knew more than I do. Another go tomorrow. When I got it it had a rogue/wrong needle in the carb. I have found the float needle in the pipe, twiddled, and got it starting OK from cold. Now need to sort out tick over (and therefore clucth not gripping) and hot starting.
I hope I can learn before he who own the field gives up on me. -
AuthorPosts