Charlie Moore (aka charlie)
@charlie Active 22 hours, 23 minutes agoForum Replies Created
-
AuthorPosts
-
March 26, 2014 at 2:53 pm #6900
 charlieKeymaster
A quick look through the parts books for series 2 and 3 machines confirms the gear operating lever MT103 is common to series 1 and 2 machines, worm gear MT17 is common to all models. This improves chances I may have what you require.
March 26, 2014 at 2:45 pm #6899charlieKeymasterI will see what I have. The wheel soften get chunks broken out of them, possibly someone has tried using a tyre lever to get the tyre off, the wheels split and do not have a well like normal wheels. Later wheels were all steel.
You should be able to get an exhaust and air cleaner from Meetens. Engine should be a Villiers Mk10, I wonder if somebody has changed it at sometime? Photos would be good to see what you have.March 25, 2014 at 3:44 pm #6883charlieKeymasterYou don’t want the trailer balanced, you will need to have a certain nose weight, this should be as recommend for vehicle towing the trailer.
March 25, 2014 at 3:38 pm #6878charlieKeymasterLooks like it has had a hard life with little or no lubrication, or the wrong oil, a straight gear oil should be used not an EP type. I will search through my spares pile to see what I have.
Below are the pages from the parts manual, if you can give me the part numbers you need it will help.March 25, 2014 at 3:32 pm #6877charlieKeymasterWhen you say standard I guess you mean bolt on like a Howard Gem. With a bit of engineering work it should be possible to fabricate a new sleeve to go over the rotor shaft and have suitable webs welded to it, not something I had thought of. One problem could be damage to drive train as there would be no spring to absorb the shock from the tines especially if large stones or roots are hit.
March 24, 2014 at 5:09 pm #6858charlieKeymasterJust a thought, what will it tow like as there seems to be a fair amount of weight quite high up, would hate to see the whole lot tip over on a bend after so much hard work getting to this stage. I think the chap on the will definetly be giving your house a wide berth in future
March 24, 2014 at 5:03 pm #6857charlieKeymasterView only is what any guest has. Unfortunately the few spammers we get manage to get through the registration process so can make posts.
March 24, 2014 at 5:00 pm #6856charlieKeymasterIt might be worth having a look at POR15 Marine Clean This is what comes in the fuel tank repair kits.
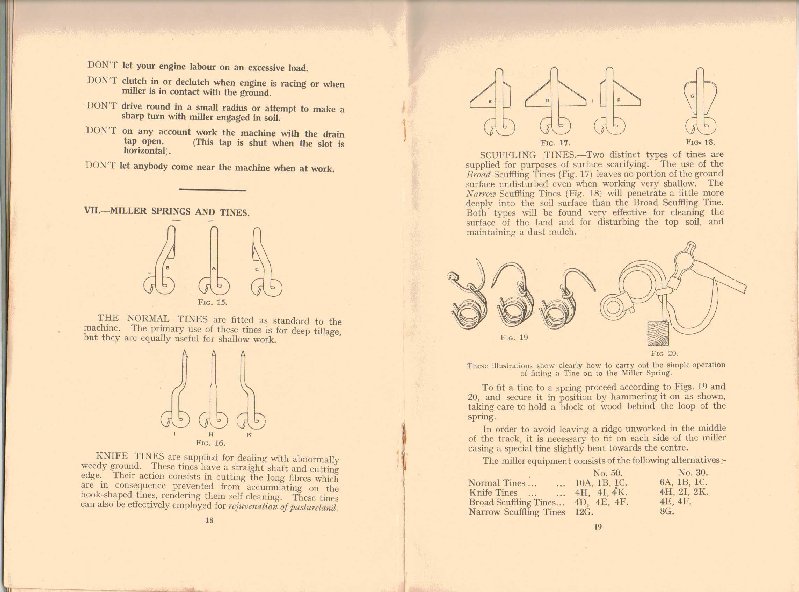
March 24, 2014 at 4:55 pm #6852charlieKeymasterDo the tines attach directly to the spring or are they attached to an insert in the loop of the spring? I suspect it is the former, which is the same as the Rototiller and can be a puzzle at first. The photo below is an extract from the Rototiller manual and may help with fitting.
As far as I know there are no suppliers of new tines or springs in the UK. A collector in Holland has details of some new tines on his website, it might be worth a look.
I have included a pdf copy of the same page which might be a bit clearer than the photo.March 24, 2014 at 4:44 pm #6851charlieKeymasterOpps, just re-read title and see it is a series 1.
March 24, 2014 at 4:43 pm #6850charlieKeymasterSwampy, my first question is which model of Monro Tiller? See my website for details of how to identify which you have. I have owners manuals with parts list for all models. I may also be able to help with spares (second hand from scrap machine). Any good bearing supplier should be able to supply bearings. Any photos of machine and damaged parts?
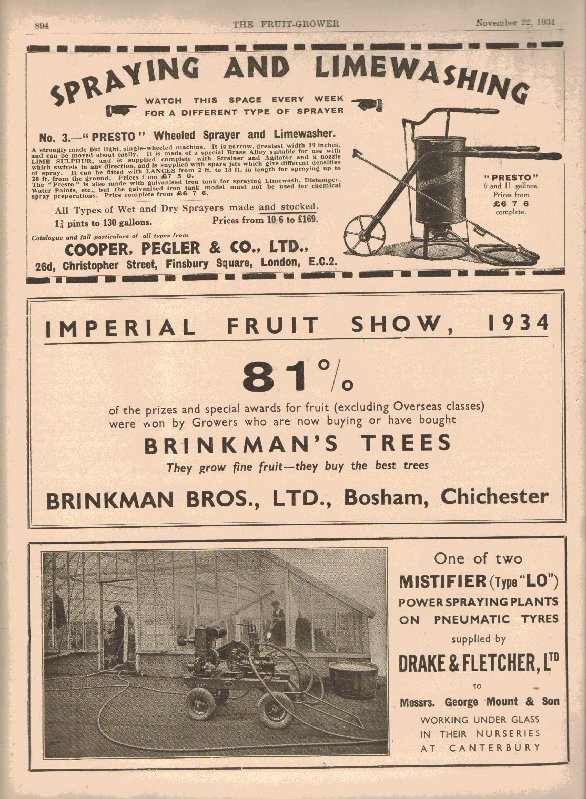
March 24, 2014 at 4:38 pm #6848charlieKeymasterCould it be a Presto, see copy of advert from The Fruit Grower below.
Attachments:
March 23, 2014 at 7:50 am #6807charlieKeymasterAlan, it probably won’t be as long as my SIMAR M11 restoration which is approaching the 9 year mark!
March 23, 2014 at 7:48 am #6806charlieKeymasterWonder if Mr Wallingfield will be attending?
March 23, 2014 at 7:36 am #6805charlieKeymasterAngus, we did try to get members to use their real names but this did not work. The idea of the free trial is to give users a chance to see what is available and hopefully realise what a good club we are and join.
Unfortunately we do get the occasional spammer, we are working on improving the anti spam measures, but the spammers are also working on ways around them. -
AuthorPosts