Home › Forums › The Machinery Forums › Garden implements › Simar 56 restoration, things look bad!!
- This topic has 29 replies, 3 voices, and was last updated 5 years, 10 months ago by
vhgmcbuddy.
-
AuthorPosts
-
February 11, 2019 at 8:28 pm #30341
roatavator
ParticipantFebruary 11, 2019 at 8:32 pm #30343roatavator
ParticipantFinally, have you seen Sean’s excellent restoration of a 56? The link may help you with yours.
February 12, 2019 at 8:58 am #30354charlie
KeymasterAlastair, e mail sent with a couple of attachments that should prove useful. Charlie.
February 12, 2019 at 10:12 am #30359vhgmcbuddy
Member
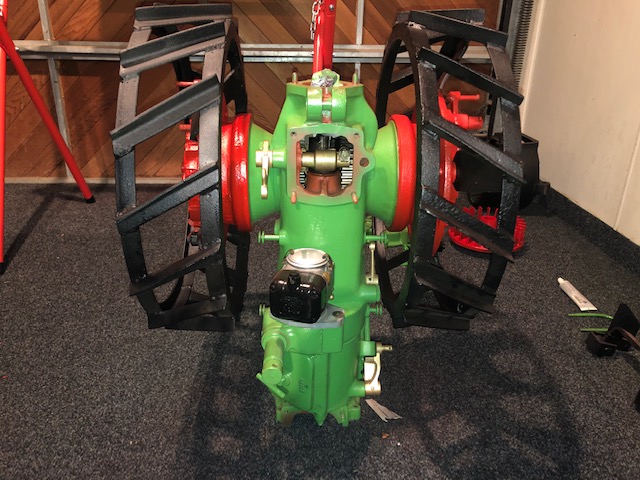
Hi Roatavator, thanks for the pictures. Sadly something is not right internally. The inner hubs do not move at all, I have removed the forward clutch assembly but was going to be too loud to drive out the roll pin required to remove the remaining half of the clutch from the main shaft. That will have to wait to tomorrow! I have had a look over the engine and the main bearings are in bad shape. Do you have a good method for flywheel removal? I can’t see how to attach a puller. I thought about splitting the crankcase and using a press however am worried the force may break the engine casing. As for the gearbox itself it is full of sludge so I feel a complete strip down is warranted. Also there is evidence of leakage at the gear casings so I will make up completely new gaskets and replace the oil seals. It will be a long slow project but I am 100% committed and have access to some very clever engineers!
February 12, 2019 at 5:51 pm #30361charlie
KeymasterDo you have the pegs which select high or low gear fitted? See page 14 of manual, part numbers 910974 and 910975 on plate 3 of parts list.
February 15, 2019 at 12:13 am #30364vhgmcbuddy
MemberThankfully I do have the pegs however everything around them is badly seized, I have removed the wheels to free off and repair. I have now stripped the entire machine to remove sludge and inspect internals. So far I have only found one worn bearing on the main pto shaft and all oil seals badly worn. I have dropped off the mill housing at a friend of mine to have rust removed and carry out some fabrication. I am now in the process of making a complete gasket set and I have sent the head gasket and manifold gasket away for reproduction.
Yes Charlie I have seen Sean’s amazing restoration on his Simar. He is my inspiration for my restoration. His descriptions and photos are excellent and nice and easy to follow. I may start a thread in the projects forum if that’s ok by admins.February 15, 2019 at 7:34 am #30365charlie
KeymasterA thread in projects section would be great. It is always good to see the before and after photos.
February 23, 2019 at 6:49 am #30482vhgmcbuddy
MemberWell we are off to a good start! I have started the process of cleaning, soda blasting and priming. I have sourced bearings and seals. The main problem I have right now is how to release the flywheel from taper! My plan is to strip off the rear of the crankcase and place the remaining half in the press and push on the crankshaft. I am worried that I will blow the crankcase to bits in the process!! There is nowhere where I can place a puller. I have tried heat and shock with no cigar! Any advice is highly appreciated!
Thanks so much in advance. Once fully stripped and inspected I will start a new thread in projects!February 23, 2019 at 8:26 am #30484charlie
KeymasterI made a puller that would fit in the two larger holes that are close to face of the flywheel with a large bolt that pushed on end of crankshaft, see rough sketch. Lots of heat and finally a good clout with soft faced hammer and flywheel come loose with a loud bang. I had soaked it with penetrating fluid for a week or so before. Leaving the locking nut loose on end of crankshaft helps locate bolt on puller and protect end of crank from damage.
February 23, 2019 at 9:10 am #30488vhgmcbuddy
MemberThanks Charlie! I have an old puller that I can modify, I have the nut loose and have wound it flush to the end of the threads to protect the shaft. I will go start soaking it now!!
March 4, 2019 at 3:24 pm #30584vhgmcbuddy
MemberWell the flywheel is off! My puller broke but I managed to press it off! It took 15 tons to shift it!
March 5, 2019 at 7:32 am #30585charlie
KeymasterThey can be very stubborn, Glad to know it did come off safely.
June 22, 2019 at 9:26 am #31448vhgmcbuddy
MemberWell a lot has progressed in 3
Months, I plan to start a thread in the projects forum. My 56A is coming along well. I managed to track down a brand new piston! I found the gearbox to be in good shape but had to spend a lot of time freeing up seized hubs etc. Here is a before pic and a couple of photos showing how it is looking up to date! I have lost track of the hours I have spent on her so far! I am aiming for completion towards the end of the year! I am very much inspired by Sean’s restoration and have been using his brilliant documentation as my go to guide!June 22, 2019 at 11:22 am #31452charlie
KeymasterLooking good. The inside of the miller hood on my 56 is red.
June 22, 2019 at 11:52 am #31456vhgmcbuddy
MemberYes I realised that after I put the black on but I am going to re do it in red, the Miller cover has been basically remade as it was fairly rotten! Will keep you up to date on my progress.
-
AuthorPosts
- You must be logged in to reply to this topic.